- Every time your Windows computer encounters an error, it displays a BSOD or blue screen of death.
- This screen usually appears for a split second, creates several logs or dump files, as many other people do, and then suddenly reboots the computer.
- These crash dump files are stored inside the computer and can only be viewed by the administrator.
- It turns out that various factors can contribute to this problem.
- The possible repairs listed below have been ranked by effectiveness and severity.
Introducing the perplexing predicament of dump file creation failure caused by an elusive error during the process.
Troubleshooting methods for ‘Dump file creation failed due to error during dump creation’
If you encounter the ‘Dump file creation failed due to error during dump creation’ issue, there are troubleshooting methods you can follow to resolve it. First, ensure that you have administrative privileges and enough free space on your system drive.
To start troubleshooting, open the Command Prompt as an administrator and run the following command: wmic recoveros set DebugInfoType = 3. This will enable the creation of dump files.
Next, check for any system file corruption by running the System File Checker tool. Open Command Prompt as an administrator and type sfc /scannow.
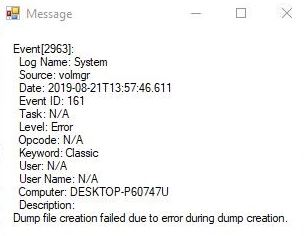
If the issue persists, examine the Event Viewer for any relevant error messages. Look for entries related to the error, such as Event ID 41.
Additionally, check for any recently installed third-party applications or drivers that may be causing conflicts. Uninstall them if necessary.
RAM health check and maintenance
1. Open the Event Viewer by searching for it in the Windows search bar.
2. In the Event Viewer, navigate to “Windows Logs” > “System.”
3. Look for any entries with the event ID “41” or “55,” which indicate system crashes.
4. Analyze the error message and gather information about the crash.
5. Check for third-party applications that might be causing the issue. Uninstall or update them if necessary.
6. Repair corrupted system files by running the System File Checker tool. Open Command Prompt as an administrator and enter the command “sfc /scannow.”
7. Perform a memory diagnostic by typing “Windows Memory Diagnostic” in the Windows search bar and follow the instructions.
8. If the error persists, consider seeking assistance from a system administrator or Microsoft support.
BIOS update and repair install for error resolution
To resolve the “Dump File Creation Failed Due To Error During Dump Creation” issue, you can try updating your BIOS and performing a repair install. These steps can help fix system crash issues and resolve the error message you’re encountering.
BIOS Update:
1. Visit the website of your computer manufacturer and locate the latest BIOS update for your specific model.
2. Follow the instructions provided by the manufacturer to download and install the BIOS update.
3. Restart your computer after the update completes.
Repair Install:
1. Press the Windows key + R to open the Run dialog box.
2. Type “cmd” and press Enter to open the Command Prompt.
3. In the Command Prompt, type “sfc /scannow” and press Enter to initiate the system file check.
4. Wait for the process to complete and follow any on-screen instructions.
5. Restart your computer after the repair install finishes.
Performing these steps can help resolve system file corruption and improve the health of your operating system. If the issue persists, consider seeking assistance from a system administrator or referring to Microsoft’s official support documentation for further solutions.
Uninstalling third-party cleanup software and system restore options
- Ensure compatibility: Prior to uninstalling any third-party cleanup software or attempting system restore, verify the compatibility of the software with your operating system.
- Uninstall third-party cleanup software: Access the Control Panel, navigate to “Programs and Features” or “Apps & Features” depending on your Windows version. Locate the third-party cleanup software, select it, and click on the “Uninstall” button.
- Follow uninstallation prompts: Pay attention to any prompts or instructions that may appear during the uninstallation process. Follow them accordingly to complete the removal of the third-party cleanup software.
- Restart your computer: After successfully uninstalling the software, restart your computer to ensure all changes take effect and to eliminate any remaining traces of the removed program.
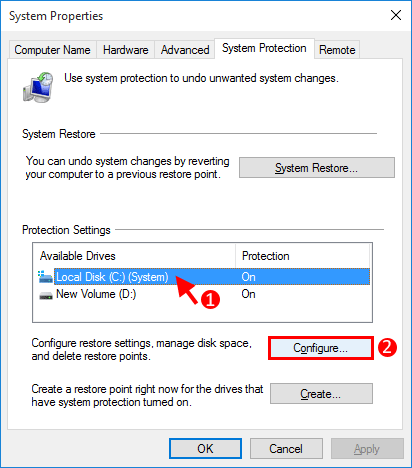
- Check for system restore points: Open the Start menu and search for “Create a restore point.” Click on the matching result to open the System Properties window.
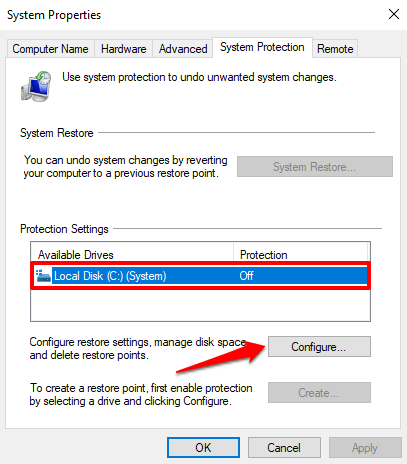
- Access system protection settings: Within the System Properties window, click on the “System Protection” tab, then select the drive where your operating system is installed (usually C:).
- Click “Configure”: Once you’ve selected the appropriate drive, click on the “Configure” button located below.
- Check available disk space: In the System Protection tab, make sure your system drive has enough free space allocated for creating system restore points.
- Adjust disk space usage: If necessary, use the “Max Usage” slider to increase or decrease the amount of disk space reserved for system restore points. Ensure it is set at an adequate level for your needs.
- Create a system restore point: To manually create a restore point, click on the “Create” button in the same System Protection tab. Follow any prompts or instructions that appear.
Memory diagnostic and automatic error repair methods
Memory Diagnostic and Automatic Error Repair Methods
| Error Type | Description | Possible Causes | Diagnostic Method | Error Repair Method |
|---|---|---|---|---|
| Dump File Creation Failed | An error occurred during the creation of a memory dump file. | Insufficient disk space, incompatible hardware, software conflicts. | Memory Diagnostic Tool, Event Viewer, Resource Monitor. | Check disk space, update drivers, resolve software conflicts. |

Mark Ginter is a tech blogger with a passion for all things gadgets and gizmos. A self-proclaimed "geek", Mark has been blogging about technology for over 15 years. His blog, techquack.com, covers a wide range of topics including new product releases, industry news, and tips and tricks for getting the most out of your devices. If you're looking for someone who can keep you up-to-date with all the latest tech news and developments, then be sure to follow him over at Microsoft.