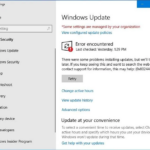
- Error code ‘0x80240fff’ is commonly found in Windows versions such as 1511 and only usually in Windows 10 Pro editions.
- The source of the common error code is unknown but I doubt we’ll ever know! Windows 10 ‘Defer Upgrades’ (May not work on newer versions of Windows) Users may be able to ‘defer’ the upgrade.
Unraveling the Mysteries: Tackling Windows 10 Update Code 0x80240fff
Restart Your PC
To fix Windows 10 update error code 0x80240fff, restarting your PC can often resolve the issue. Follow these steps:
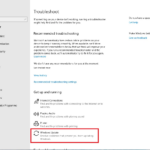
1. Open the Control Panel.
2. Type “troubleshoot” in the search bar and select “Troubleshooting” from the results.
3. Click on “Fix problems with Windows Update” under “System and Security.”
4. In the new window, click on “Advanced” and check the box that says “Apply repairs automatically.”
5. Click on “Next” and wait for the troubleshooter to detect and fix any issues.
6. Restart your PC and try updating Windows again.
If the error persists, you can also try resetting the Windows Update components. This can be done by following a step-by-step tutorial on websites like YouTube or Microsoft’s support page.
Remember to keep your PC protected from malware and ensure that your Windows Firewall is properly configured. These steps can help resolve connection issues and fix update errors like 0x80240fff.
Defer Windows Updates
To defer Windows updates and fix the error code 0x80240fff in Windows 10, follow these steps:
1. Open the Control Panel.
2. Type “Windows Updates” in the search bar and select “Windows Updates” from the filtered results.
3. Click on “Advanced options” in the Windows Updates window.
4. Scroll down and locate the “Pause updates” section.
5. Check the box that says “Pause updates for up to 7 days” to temporarily defer updates.
6. If you need to defer updates for longer, click on the drop-down menu and select a longer duration.
7. Click on “Apply” to save the changes.
By deferring updates, you can prevent any potential glitches or errors from affecting your system. This can be particularly helpful if you’re experiencing connection issues or other problems with Windows Updates. Remember to stay vigilant and regularly check for updates to ensure your system remains secure and protected against malware and other threats.
Run the Windows Update Troubleshooter
To fix Windows 10 update error code 0x80240fff, you can run the Windows Update Troubleshooter. Here’s how:
1. Open Control Panel.
2. In the search box, type “Troubleshoot” and click on “Troubleshooting”.
3. Under “System and Security”, click on “Fix problems with Windows Update”.
4. Follow the on-screen instructions to run the troubleshooter.
5. The troubleshooter will automatically detect and fix any issues with Windows Update.
If the troubleshooter doesn’t resolve the problem, you can try the following additional steps:
1. Open Command Prompt as an administrator.
2. Type the following command and press Enter: net stop wuauserv
3. Type the following command and press Enter: net start wuauserv
4. Restart your computer and try updating Windows again.
If you continue to experience issues, it may be helpful to consult Microsoft’s support website or watch a tutorial on YouTube for further assistance.
Disable Any VPN Connections and Antivirus Apps
To fix the Windows 10 update code 0x80240fff error, follow these steps:
1. Disable any VPN connections and antivirus apps as they may interfere with the update process.
– Open Control Panel and navigate to the Network and Internet section.
– Disable any active VPN connections.
– Temporarily disable any antivirus apps running in the background.
2. Check your Windows Firewall settings to ensure it’s not blocking the update.
– Open Control Panel and click on Windows Firewall.
– Select “Allow an app or feature through Windows Firewall.”
– Make sure that “Background Intelligent Transfer Services” is allowed.
3. Reset the Windows Update components.
– Press the Windows key + X and select Command Prompt (Admin).
– Type the following commands, pressing Enter after each one:
net stop wuauserv
net stop cryptSvc
net stop bits
net stop msiserver
ren C:\Windows\SoftwareDistribution SoftwareDistribution.old
ren C:\Windows\System32\catroot2 catroot2.old
net start wuauserv
net start cryptSvc
net start bits
net start msiserver
4. Retry the update. Go to Settings > Update & Security > Windows Update and click on “Check for updates.”
By following these steps, you should be able to resolve the error 0x80240fff and update your Windows 10 system successfully.
Restart Windows Update Services
To fix the Windows 10 Update Code 0x80240fff error, you can try restarting the Windows Update Services. Here’s how you can do it:
1. Open the Control Panel on your computer.
2. In the Control Panel, find and select “Administrative Tools.”
3. In the Administrative Tools window, locate and double-click on “Services.”
4. Scroll down and find “Background Intelligent Transfer Services” and “Windows Update” in the list of services.
5. Right-click on each service and select “Restart” from the context menu.
6. Once both services have been restarted, close the Services window.
7. Now, try running the Windows Update again and check if the error 0x80240fff is resolved.
By restarting the Windows Update Services, you can resolve common glitches and issues that may be causing the error. This simple solution has proven to be effective for many Windows users experiencing similar problems.
Run the System File Checker
To fix the Windows 10 Update Code 0x80240fff error, you can try running the System File Checker (SFC) tool. Here’s how:
1. Open the Control Panel.
2. In the search box, type “cmd” to open the Command Prompt.
3. Right-click on the Command Prompt icon and select “Run as administrator”.
4. In the Command Prompt window, type “sfc /scannow” and press Enter.
5. The System File Checker will scan your system for any corrupted or missing files and attempt to fix them.
6. Wait for the scan to complete. This may take some time.
7. If the SFC tool finds and fixes any issues, restart your computer and try updating Windows again.
Running the System File Checker can help resolve various update-related issues by repairing corrupted system files. It’s a simple and effective troubleshooting step to try before exploring other solutions.
Install the Newest Windows Version Manually
To manually install the newest version of Windows, follow these steps:
1. Open the Control Panel on your computer.
2. Go to “Windows Updates” or “Windows Update and Security.”
3. Click on “Check for Updates” to see if any updates are available.
4. If updates are found, click on “Install Updates” to start the installation process.
5. Follow the on-screen instructions to complete the installation.
If you encounter the error code 0x80240fff during the update, try the following steps to fix it:
1. Open the Control Panel and go to “Windows Updates.”
2. Click on “View update history” to see a list of recent updates.
3. Look for any failed updates with the error code 0x80240fff.
4. Right-click on the failed update and select “Uninstall.”
5. Restart your computer and try installing the updates again.
If the problem persists, you may need to contact Microsoft support for further assistance.
Backup Windows 10 and important data before Windows 10 update
Before performing a Windows 10 update, it is crucial to back up your important data. This ensures that in case anything goes wrong during the update process, you won’t lose any valuable information. To do this, follow these steps:
1. Open Control Panel on your Windows 10 device.
2. Select the “Backup and Restore” option.
3. Click on “Set up backup” and choose the location where you want to store your backup files.
4. Select the files and folders you want to include in the backup.
5. Click “Next” and then “Save settings and run backup” to start the backup process.
By following these steps, you can safeguard your data before proceeding with the Windows 10 update. This will give you peace of mind and ensure that your important information is protected.
Restart Background Intelligent Transfer Services to stop 0x80240fff error
To fix the Windows 10 Update Code 0x80240fff error, you can try restarting the Background Intelligent Transfer Services (BITS). Here’s how:
1. Open the Control Panel on your computer.
2. Filter the view by selecting “Large icons” or “Small icons” from the drop-down menu.
3. Click on “Administrative Tools”.
4. Double-click on “Services”.
5. Scroll down and locate “Background Intelligent Transfer Service”.
6. Right-click on it and select “Restart”.
7. Wait for the service to restart.
8. Once restarted, close the Services window.
9. Try running the system update again to see if the error is resolved.
Restarting BITS can help resolve various Windows update issues, including the 0x80240fff error. If the error persists, you may need to explore other troubleshooting steps or seek further assistance.