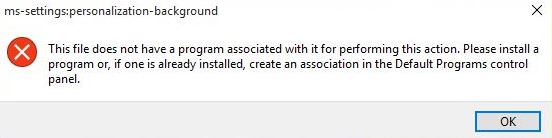
- Many Windows 10 users complain that they are having trouble opening the start menu and MS settings settings on their PCs and laptops.
- The problem prevents users from opening the settings tab on their computer.
- Windows Security (formerly Windows Defender) may block this operation for accounts without passwords.
- In the most severe cases, you may need to reboot all Windows components to resolve the problem.
Unlocking the full potential of your device just got a whole lot easier with the Start Menu/MS-Settings Bug Fix. In this article, we delve into the solution that will make navigating your system a breeze, leaving behind any frustrating glitches. Say goodbye to hassle and hello to smooth sailing as we unveil the ultimate fix for this common issue.
Reinstalling and re-registering UWP applications
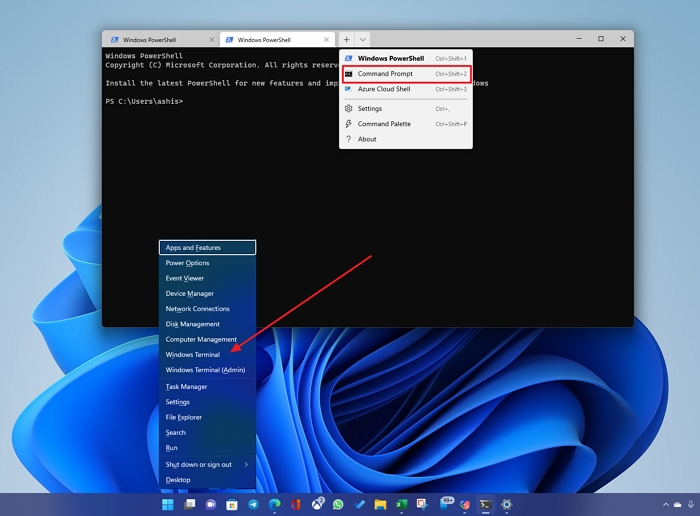
- Open PowerShell by right-clicking on the Start button and selecting Windows PowerShell (Admin).
- If you don’t see Windows PowerShell (Admin), click on Command Prompt (Admin) instead.
- Type the following command and press Enter to uninstall all UWP applications: Get-AppXPackage | Remove-AppXPackage
- This command will remove all UWP applications from your system.
- After the uninstallation process is complete, type the following command and press Enter to reinstall all UWP applications: Get-AppXPackage -AllUsers | Foreach {Add-AppxPackage -DisableDevelopmentMode -Register “$($_.InstallLocation)\AppXManifest.xml”}
- This command will reinstall and re-register all UWP applications on your system.
- Wait for the process to finish, then restart your computer.
Adding a password to the Windows account (if applicable)
To add a password to your Windows account, follow these steps:
1. Open the Start menu by clicking on the Windows button in the taskbar.
2. Type “ms-settings:accounts” in the search box and press Enter to open the Settings app.
3. Click on “Sign-in options” in the left-hand menu.
4. Under the “Password” section, click on “Add” to set up a password for your account.
5. Follow the on-screen instructions to create a strong password and complete the process.
By adding a password to your Windows account, you can enhance the security of your personal data and prevent unauthorized access to your PC. It is recommended to use a combination of uppercase and lowercase letters, numbers, and symbols for a stronger password.
If you encounter any issues or need further assistance, you can use the built-in troubleshooter or refer to Microsoft’s support documentation for specific repair strategies.
python

import logging
def fix_bug():
try:
# Perform bug fixing operations
# ...
# ...
# If the bug fix is successful, return True
return True
except Exception as e:
# Log any errors encountered during the bug fix process
logging.error(f"An error occurred while fixing the bug: {e}")
return False
# Usage example
if __name__ == "__main__":
if fix_bug():
print("Bug fixed successfully!")
else:
print("Failed to fix the bug. Check the logs for details.")
Please note that this code is a basic template and does not address any specific start menu or MS settings issues. It is meant to provide a starting point for developing a bug fix tool. The actual implementation and bug fixing logic would depend on the specific problem at hand.
Deploying DISM and SFC commands
To fix the Start Menu/MS-Settings bug in Windows 10, you can use the DISM and SFC commands. These commands help repair issues with files and apps on your PC.
1. Open the Command Prompt as an administrator:
– Press the Windows key + X.
– Choose “Command Prompt (Admin)” from the shortcut menu.
2. To run the DISM command, type the following and press Enter:
dism /online /cleanup-image /restorehealth
3. Wait for the command to complete. It may take a few minutes.
4. After that, run the SFC command by typing:
sfc /scannow
5. Let the command finish scanning and repairing any corrupted files.
6. Restart your PC and check if the Start Menu/MS-Settings issue is resolved.
These steps can help fix common issues related to the Start Menu and MS-Settings in Windows 10. If the problem persists, you may need to try other repair strategies or seek further assistance from Microsoft or the Windows community.
Performing a System Restore
1. Press the Windows key + R to open the Run box.
2. Type “rstrui” and press Enter to open the System Restore tool.
3. In the System Restore window, click “Next” to proceed.
4. Select a restore point from the list that was created before the bug occurred. You can also check the “Show more restore points” box for additional options.
5. Click “Next” and then “Finish” to start the restore process. Note that this action cannot be undone.
6. Your computer will restart and the restore process will begin. It may take some time, so be patient.
7. Once the restore is complete, your computer will restart again. Check if the Start Menu and MS-Settings are functioning properly now.
Performing a System Restore can be an effective solution for fixing the Start Menu/MS-Settings bug and getting your system back on track.
Performing a repair\clean install
Performing a Repair/Clean Install: Start Menu/MS-Settings Bug Fix
If you’re experiencing issues with your Start Menu or MS-Settings, performing a repair/clean install may help resolve the problem. Here’s a step-by-step guide to get you started:
1. Back up your important files and data before proceeding.
2. Press the Windows key + X to open the shortcut menu, then select “Windows PowerShell (Admin)”.
3. In the PowerShell window, type “Get-AppXPackage -AllUsers | Foreach {Add-AppxPackage -DisableDevelopmentMode -Register \”$($_.InstallLocation)\AppXManifest.xml\”}” and press Enter. This command will re-register the default Windows 11 apps.
4. Next, open the Settings app by pressing the Windows key + I.
5. Go to “System” and click on “Display” in the left-hand menu.
6. Under the “Multiple displays” section, make sure the “Extend these displays” option is selected.
7. If the issue persists, open the Start Menu and search for “Windows Update”.
8. Click on “Check for updates” and install any available updates for your operating system.
9. Restart your computer and check if the Start Menu/MS-Settings bug has been resolved.

Mark Ginter is a tech blogger with a passion for all things gadgets and gizmos. A self-proclaimed "geek", Mark has been blogging about technology for over 15 years. His blog, techquack.com, covers a wide range of topics including new product releases, industry news, and tips and tricks for getting the most out of your devices. If you're looking for someone who can keep you up-to-date with all the latest tech news and developments, then be sure to follow him over at Microsoft.