- The “Could not find source files” error in the DISM tool often occurs for the following reasons.
- The most common problem is that you have specified the wrong Windows image file (install.wim) as the recovery source, etc.
- Use Windows Repair Upgrade to fix the problem with the troubleshooting guide below.
Unveiling the Elusive Solution: DISM Error Source Files Could Not Be Found
Causes of the DISM Source Files Could Not Be Found Error
If you encounter the DISM Source Files Could Not Be Found error, there are a few possible causes and solutions.
One common cause is an issue with the Windows image file. To fix this, you can use the Cleanup-Image command to scan and repair the image file.
Another possible cause is a problem with the source files themselves. You can try using the DISM tool with the /Source option to specify the correct path to the source files.
Additionally, running the SFC command or SFC /scannow can help identify and repair any corrupted system files.
If none of these solutions work, you can also try using the DISM /Online command to perform an online repair of your PC.
Remember to check the log file for any specific error messages that can help troubleshoot the issue further.
How to Fix the DISM Source Files Could Not Be Found Issue
If you’re encountering the “DISM Source Files Could Not Be Found” issue, there are a few steps you can take to resolve it quickly.
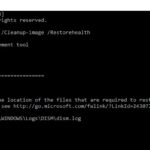
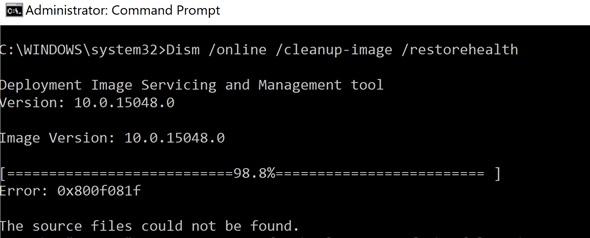
First, open the Command Prompt as an administrator. Then, enter the following command:
dism /online /cleanup-image /restorehealth
This command will initiate the DISM process and scan your PC for any issues. It will also repair any corrupted files it finds.
If the scanning process is unable to find the necessary source files, you’ll need to provide them manually. To do this, follow these steps:
1. Download the Windows Image file from the Microsoft website.
2. Open the Command Prompt as an administrator again.
3. Enter the following command, replacing [path] with the location of the downloaded file:
dism /online /cleanup-image /restorehealth /source:[path]
Once the process is complete, restart your PC. This should resolve the “DISM Source Files Could Not Be Found” issue and improve your PC’s performance.
Use Windows Repair Upgrade to Resolve the Issue
To fix the DISM Error “Source Files Could Not Be Found,” you can use the Windows Repair Upgrade tool. This tool is designed to resolve various PC system issues, including DISM errors.
Here’s how you can use it:
1. Download the Windows Repair Upgrade tool from the Microsoft website.
2. Run the tool and select the “Repair” option.
3. Follow the on-screen instructions to initiate the repair process.
4. During the repair process, the tool will scan your PC for any source file issues.
5. If any issues are found, the tool will automatically repair them.
6. Once the repair process is complete, restart your PC.
By using the Windows Repair Upgrade tool, you can easily fix the DISM Error “Source Files Could Not Be Found” and ensure the smooth functioning of your operating system.
Remember to always keep your system up to date and regularly perform maintenance tasks to avoid such errors in the future.
Clean and Analyze the WinSXS Folder for a Solution
Clean and analyze the WinSXS folder to fix the DISM error “Source files could not be found.”
To fix this error, follow these steps:
1. Open Command Prompt as an administrator.
2. Type “dism /online /cleanup-image /scanhealth” and press Enter. This command scans the Windows image for any corruption.
3. If corruption is found, type “dism /online /cleanup-image /restorehealth” and press Enter. This command repairs the corrupted files using Windows Update.
4. If the error persists, you can try using the System File Checker (SFC) tool. Type “sfc /scannow” and press Enter. This tool scans and repairs corrupt system files.
5. If none of the above solutions work, you may need to use the DISM command with the /source option. This requires a Windows installation media or a Windows Update package as the repair source.
Remember to restart your computer after completing these steps. This should help resolve the DISM error and ensure your PC system is running smoothly.
Utilize an Alternative Repair Source in DISM
To fix the DISM error “Source Files Could Not Be Found,” you can utilize an alternative repair source in DISM. This method is helpful when the scanning process fails to find the required files on your PC.
Here’s how to utilize an alternative repair source in DISM:
1. Download the installation media or ISO file for your Windows version from the official Microsoft website.
2. Mount the ISO file by right-clicking on it and selecting “Mount.”
3. Open Command Prompt as an administrator by searching for “Command Prompt” in the Start menu, right-clicking on it, and selecting “Run as administrator.”
4. In the Command Prompt window, type the following command and press Enter: dism /Online /Cleanup-Image /RestoreHealth /Source:[path to the mounted ISO file]
5. Wait for the DISM process to complete, which may take some time.
6. Once the process is finished, restart your computer and check if the error has been resolved.
By utilizing an alternative repair source in DISM, you can effectively fix the “Source Files Could Not Be Found” error and ensure the smooth functioning of your Windows operating system.

Mark Ginter is a tech blogger with a passion for all things gadgets and gizmos. A self-proclaimed "geek", Mark has been blogging about technology for over 15 years. His blog, techquack.com, covers a wide range of topics including new product releases, industry news, and tips and tricks for getting the most out of your devices. If you're looking for someone who can keep you up-to-date with all the latest tech news and developments, then be sure to follow him over at Microsoft.