- This article mainly focuses on the “Xbox Teredo cannot qualify” error, which is an annoying problem for multiplayer gamers.
- To solve the problem, here are Techquack’s 6 solutions with detailed steps.
- There can be several reasons for this problem, most of which are network-related.
- Make sure the Internet is working properly is the first step in troubleshooting.
Welcome to our article on resolving the frustrating issue of Teredo Unable to Qualify Error. Explore effective solutions to fix this error and regain smooth and uninterrupted connectivity.
Troubleshooting Teredo Connectivity Issues
If you’re experiencing Teredo connectivity issues, follow these steps to fix the “Teredo unable to qualify” error:
1. Open the Command Prompt as an administrator by searching for “Command Prompt” in the Start menu, right-clicking it, and selecting “Run as administrator.”
2. Type “netsh interface teredo set state disabled” and press Enter to disable the Teredo adapter.
3. Type “netsh interface teredo set state type=default” and press Enter to set the Teredo adapter to its default state.
4. Type “netsh interface teredo set state enterpriseclient” and press Enter to enable the Teredo adapter.
5. Restart your computer to apply the changes.
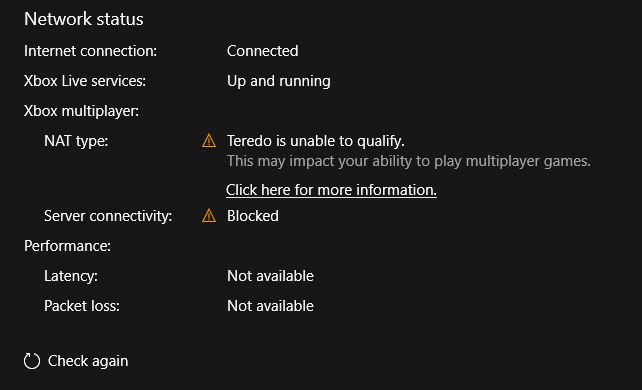
6. Check your network settings in the Xbox app or the Xbox Networking tab in Windows 10 settings to ensure Teredo is now qualified.
By following these steps, you should be able to fix Teredo connectivity issues and resolve the “Teredo unable to qualify” error message. Remember to restart your PC after making the changes for them to take effect.
Checking Internet Connection for Teredo Errors
1. Open the Start menu and search for “Command Prompt.” Right-click on it and select “Run as administrator.”
2. In the Command Prompt window, type “netsh interface teredo show state” and press Enter.
3. Look for the “Server Name” and “Client Refresh Interval” entries. If the server name is not “win10.ipv6.microsoft.com” and the client refresh interval is not set to a non-zero value, there may be a Teredo error.
4. Next, type “netsh interface teredo show state verbose” and press Enter. Check if the “Teredo Client” or “Teredo Server” fields show any error messages.
5. If there are any Teredo errors, try the following fixes:
– Update your network driver and ensure it is compatible with Teredo tunneling.
– Enable Teredo in your network settings.
– Check your router settings and make sure it supports Teredo.
– Disable any VPN or firewall that may be blocking the Teredo connection.
6. Restart your PC and check the Teredo status again using the previous commands. If the errors persist, consult Microsoft’s support documentation or seek further assistance.
Remember, a stable Internet connection is crucial for smooth online experiences, especially for multiplayer gaming or using Xbox Live.
Uninstalling and Reinstalling Teredo Adapter
To fix the “Teredo Unable to Qualify” error in Windows 10 or Windows 11, you may need to uninstall and reinstall the Teredo Adapter. Here’s how:
1. Press the Windows key + R to open the Run dialog box.
2. Type “devmgmt.msc” and press Enter to open Device Manager.
3. Expand the “Network adapters” category.
4. Look for “Microsoft Teredo Tunneling Adapter” and right-click on it.
5. Select “Uninstall device” from the context menu.
6. Tick the box that says “Delete the driver software for this device” and click Uninstall.
7. Once the uninstallation is complete, click the “Action” menu at the top of the Device Manager window.
8. Select “Scan for hardware changes” to reinstall the Teredo Adapter.
9. Wait for the process to finish, and then close Device Manager.
By uninstalling and reinstalling the Teredo Adapter, you can resolve the Teredo Unable to Qualify error and enjoy a better online gaming experience.
powershell

# Run PowerShell as an administrator
# Reset the Teredo interface
$resetResult = & netsh interface Teredo reset
# Check if the reset was successful
if ($resetResult -match "OK.")
{
Write-Host "Teredo interface reset successful!"
}
else
{
Write-Host "Failed to reset Teredo interface. Additional troubleshooting may be required."
}
Please note that this code snippet is written in PowerShell and assumes you have administrative privileges to execute it. You can run it directly in a PowerShell console or save it to a `.ps1` file and execute it using PowerShell.
Remember, this code snippet only attempts to reset the Teredo interface, and it may not resolve the error in all cases. Troubleshooting network-related issues can be complex, and it’s advisable to consult official documentation or seek assistance from network administrators or support forums for a comprehensive solution.
Ensuring IP Helper is Set to Automatic Startup
To fix the “Teredo Unable to Qualify” error, it is important to ensure that IP Helper is set to automatic startup. Here’s how you can do it:
1. Press the Windows key + R to open the Run dialog box.
2. Type “services.msc” and hit Enter to open the Services window.
3. Scroll down and locate “IP Helper” in the list of services.
4. Double-click on “IP Helper” to open its properties.
5. In the “General” tab, under “Startup type,” select “Automatic” from the drop-down menu.
6. Click on “Apply” and then “OK” to save the changes.
By setting IP Helper to automatic startup, you ensure that it is always running, which is crucial for resolving the Teredo error. Remember to restart your computer for the changes to take effect.
This simple adjustment can help you fix the Teredo issue and improve your network connectivity for gaming, apps, and other online activities.
Restoring Teredo Server Name to Default
To restore the Teredo Server Name to default, follow these steps:
1. Open the Start menu and search for “Services”.
2. Select the “Services” app from the search results.
3. In the Services window, scroll down and find “Teredo Tunneling Pseudo-Interface”.
4. Right-click on “Teredo Tunneling Pseudo-Interface” and select “Properties”.
5. In the Properties window, go to the “General” tab.
6. Under Startup type, select “Automatic” from the drop-down menu.
7. Click on the “Apply” button and then click “OK”.
8. Close the Services window.
Note: Restart your device for the changes to take effect.
By restoring the Teredo Server Name to default, you can resolve the “Teredo Unable to Qualify” error and improve your network connection for multiplayer gaming on Xbox Live and other applications.
Deleting Unnecessary Entries for Teredo
If you’re experiencing the “Teredo Unable to Qualify” error, you can try deleting unnecessary entries for Teredo to resolve the issue. Here’s how:
1. Open the Command Prompt as an administrator.
2. Type “netsh interface Teredo set state disable” and press Enter to disable Teredo.
3. Next, type “netsh interface Teredo delete” and press Enter to delete any unnecessary Teredo entries.
4. Finally, type “netsh interface Teredo set state type=default” and press Enter to re-enable Teredo.
By deleting unnecessary Teredo entries, you can potentially fix the “Teredo Unable to Qualify” error and restore proper functionality to your network connection.
Remember to restart your device after performing these steps to ensure the changes take effect. If the issue persists, you may need to explore other fixes or consult Microsoft support for further assistance.
Configuring Router for Teredo Connectivity
To configure your router for Teredo connectivity and fix the “Teredo Unable to Qualify” error, follow these steps:
1. Access your router’s settings by entering its IP address in your web browser.
2. Locate the “Port Forwarding” or “Virtual Server” section.
3. Create a new rule to forward UDP traffic on port 3544 to your computer’s IP address. This allows Teredo to establish a connection.
4. Save the settings and restart your router.
5. On your computer, open the Xbox app or go to Xbox Networking in the Settings menu.
6. Check the network status and ensure that the Teredo technology is enabled.
7. If the error persists, update your network driver. Visit the manufacturer’s website for the latest driver version.
8. Disable any VPN or firewall software temporarily to see if they are causing conflicts.
9. For Fortect routers, disable “FortiGuard Web Filtering” temporarily.
10. If you are using an IPv4 network, consider enabling IPv6 or using a different network with IPv6 support.
11. Test your Xbox Live connection to verify if the Teredo error has been resolved.
By following these steps, you should be able to configure your router for Teredo connectivity and resolve the “Teredo Unable to Qualify” error on Windows 11.
Disabling VPN Services that Interfere with Teredo
If you’re experiencing the “Teredo Unable to Qualify” error on your Xbox or Windows device, it may be due to VPN services interfering with Teredo. To fix this issue, you will need to disable any VPN services that are running on your device. Here’s how:
1. Open the settings on your device.
2. Look for the “Network & Internet” or “Network” section.
3. Navigate to the VPN settings.
4. Disable any active VPN connections by turning them off or disconnecting from them.
5. Once the VPN services are disabled, check the Teredo status again by going to the network settings or using the Xbox network status tool.
6. If the issue persists, you may need to restart your device and check the Teredo status again.
Disabling VPN services that interfere with Teredo should help resolve the “Teredo Unable to Qualify” error and allow you to have a proper Teredo NAT type for online gaming and other network activities.
Checking Registry Settings for Teredo
To check the registry settings for Teredo and fix the “Teredo Unable to Qualify” error, follow these steps:
1. Press the Windows key + R to open the Run dialog box.
2. Type “regedit” and press Enter to open the Registry Editor.
3. In the Registry Editor, navigate to the following location: HKEY_LOCAL_MACHINE\SYSTEM\CurrentControlSet\Services\Tcpip6\Parameters.
4. Right-click on the “Parameters” folder and select “New” -> “DWORD (32-bit) Value”.
5. Name the new value “DisabledComponents” and press Enter.
6. Double-click on the “DisabledComponents” value and set the value data to “0” (zero).
7. Click OK and close the Registry Editor.
8. Restart your computer for the changes to take effect.
After following these steps, check if the “Teredo Unable to Qualify” error is resolved. This fix can help improve your NAT type and allow you to connect to Xbox Live and other devices without any issues.
Resolving Invalid Value on Teredo Server Name
If you encounter an “Invalid Value on Teredo Server Name” error while trying to fix the “Teredo Unable to Qualify” problem, here are some steps to resolve it:
1. Open the Command Prompt as an administrator by searching for “cmd” in the Start menu, right-clicking on “Command Prompt,” and selecting “Run as administrator.”
2. Type the following command and press Enter: netsh interface teredo set state disabled
3. Next, type this command and press Enter: netsh interface teredo set state type=default
4. Restart your computer to apply the changes.
5. After rebooting, open the Command Prompt as an administrator again and enter the following command: netsh interface teredo set state type=default
6. Restart your computer once more.
These steps should help resolve the “Invalid Value on Teredo Server Name” error and fix the “Teredo Unable to Qualify” problem. If you continue to experience issues, it may be necessary to seek further assistance or consult additional resources.
Checking Host File for Teredo Issues
If you are experiencing the “Teredo Unable to Qualify” error on your Xbox or Windows device, checking the host file can help resolve the issue.
To do this, follow these steps:
1. Press the Windows key and type “cmd” to open the Command Prompt.
2. Right-click on Command Prompt and select “Run as administrator”.
3. In the Command Prompt window, type “notepad C:\Windows\System32\drivers\etc\hosts” and press Enter.
4. This will open the host file in Notepad. Look for any lines that contain “teredo” or “xbox” and delete them.
5. Save the changes and close Notepad.
6. Restart your device and check if the “Teredo Unable to Qualify” error persists.
By checking the host file for any teredo-related entries, you can eliminate potential conflicts and fix the error.
Creating a New User Account to Fix Teredo Problems
To fix the Teredo Unable to Qualify error, you can create a new user account on your computer. This simple solution can help resolve the issue and get you back to enjoying uninterrupted gaming.
Here’s how to create a new user account:
1. Press the Windows key + I to open the Settings menu.
2. Click on “Accounts” and then select “Family & other users” from the left-hand menu.
3. Under the “Other users” section, click on “Add someone else to this PC.”
4. Follow the prompts to create a new account, providing the necessary information.
5. Once the new account is created, log out of your current account and log in to the new account.
6. Launch the game or application that was giving you the Teredo error and check if the issue is resolved.
Creating a new user account can help reset any settings or configurations that may be causing the Teredo Unable to Qualify error. Give it a try and get back to enjoying your gaming experience.

Mark Ginter is a tech blogger with a passion for all things gadgets and gizmos. A self-proclaimed "geek", Mark has been blogging about technology for over 15 years. His blog, techquack.com, covers a wide range of topics including new product releases, industry news, and tips and tricks for getting the most out of your devices. If you're looking for someone who can keep you up-to-date with all the latest tech news and developments, then be sure to follow him over at Microsoft.