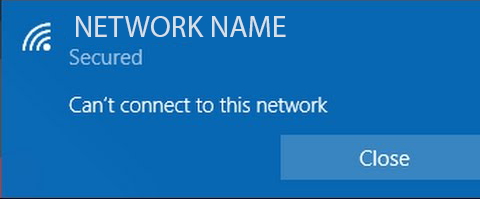
- There are reports of users getting the message “Windows 10 can’t connect to this network” when they try to connect to the Internet.
- There are several ways around the problem and successfully connecting to the network of your choice on your PC.
- To fix connection errors, you need to download the latest drivers for your network adapter.
Having trouble connecting to your network on Windows? Don’t worry, we’ve got you covered! In this article, we will explore 10 effective methods to solve the frustrating “Can’t Connect to This Network” error. So, let’s dive in and get your connection back up and running smoothly!
What causes the “Windows can’t connect to this network” error?
There are several possible causes for the “Windows can’t connect to this network” error. One common issue is an incorrect network configuration. To fix this, go to the system tray and right-click on the network icon. Then, select Open Network & Internet settings. In the side pane, click on Wi-Fi and make sure the correct network is selected.
Another potential culprit is interference from other devices on the same channel. To resolve this, access your router’s settings and change the channel to a less congested one.
Additionally, a problem with your network adapters could be the cause. Use the built-in network troubleshooter to automatically diagnose and fix any issues.
If none of these solutions work, try restarting your PC and router, or updating your network adapter drivers.
Remember to check if the issue persists with other networks, as it may be specific to your network connection.
Resolve the error: Windows can’t connect to this network
If you’re experiencing the error message “Windows can’t connect to this network” on your Windows 10 PC, there are several ways to fix the issue. Here are 10 possible solutions:
1. Restart your computer and try reconnecting to the Wi-Fi network.
2. Check if the Wi-Fi network is working properly by connecting another device to it.
3. Disable airplane mode if it’s enabled on your computer.
4. Restart your Wi-Fi router and wait for it to fully reboot.
5. Update your network adapter drivers by right-clicking on the Start button, selecting Device Manager, and finding your network adapters in the list.
6. Run the network troubleshooter by right-clicking on the network icon in the system tray and selecting Troubleshoot problems.
7. Check your network settings to ensure they are configured correctly.
8. Forget the Wi-Fi network and reconnect to it by clicking on the network icon in the system tray, selecting Open Network & Internet settings, and choosing the Wi-Fi network from the list.
9. Reset your network adapters by opening Command Prompt as an administrator and typing in the command “netsh winsock reset” followed by “netsh int ip reset.”
10. Try using a different wireless adapter if all else fails.
Forget and reconnect to the Wi-Fi network
If you’re experiencing the “Can’t Connect to This Network” error on your Windows 10 machine, there are several ways to fix the issue.
First, try forgetting and reconnecting to the Wi-Fi network. To do this, follow these steps:
1. Right-click on the Wi-Fi icon in the taskbar.
2. Select “Open Network & Internet settings” from the sidebar.
3. In the Settings app, click on “Wi-Fi” in the left side pane.
4. Click on the network you want to forget and then click on “Forget”.
5. Once forgotten, click on “Wi-Fi” again and select the same network to reconnect.
This method can often resolve network connection issues and get you back online. If this doesn’t work, there are other fixes you can try.
python

import ctypes
# Function to display a Windows error message
def display_windows_error_message(message):
ctypes.windll.user32.MessageBoxW(0, message, "Error: Can't Connect to Network", 0x10)
# Example usage
error_message = "Unable to connect to the network. Please check your network settings."
display_windows_error_message(error_message)
Please note that this code snippet only provides a basic example of displaying a Windows error message using the `MessageBoxW` function from the `ctypes` library. It does not address the specific network connectivity issue mentioned in the prompt.
Toggle Airplane mode on and off
To toggle Airplane mode on and off, follow these steps:
1. Open the Windows Start menu and click on the Settings icon.
2. In the Settings window, select “Network & Internet.”
3. From the left sidebar, choose “Airplane mode.”
4. On the right side, you will see the option to toggle Airplane mode on or off. Click on the switch to turn it on or off as needed.
5. If Airplane mode is already on and you’re experiencing a network error, try turning it off and then on again to reset the wireless adapter.
6. After toggling Airplane mode, wait a few seconds for the changes to take effect.
7. Once Airplane mode is turned off, your Wi-Fi connection should be restored, allowing you to connect to your desired network.
Remember to troubleshoot other potential culprits if the problem persists, such as resetting your router or checking for any system updates.
Update your drivers
To update your drivers and resolve the “Can’t Connect to This Network” error in Windows, follow these steps:
1. Press the Windows key + X and select “Device Manager” from the menu.
2. Expand the “Network adapters” category.
3. Right-click on your Wi-Fi adapter and select “Update driver.”
4. Choose the option to search automatically for updated driver software.
5. If Windows finds an updated driver, follow the prompts to install it.
6. If Windows doesn’t find an updated driver, visit the manufacturer’s website and download the latest driver for your adapter.
7. Install the downloaded driver by following the on-screen instructions.
8. Restart your machine to apply the changes.
Updating your drivers can often resolve connectivity issues and improve performance. Make sure to update other drivers as well, such as your network card or Ethernet adapter, if necessary.
Automatically update drivers on Windows
Here’s an example of an HTML table providing information about automatically updating drivers on Windows in an article titled “10 Ways to Fix Windows Error Can’t Connect to This Network”:
“`html
10 Ways to Fix Windows Error Can’t Connect to This Network
Automatically Update Drivers on Windows
| No. | Method | Description |
|---|---|---|
| 1 | Using Device Manager | Access Device Manager, locate the network adapter, right-click on it, and select “Update driver”. |
| 2 | Windows Update | Use Windows Update to automatically download and install the latest driver updates. |
| 3 | Manufacturer’s Website | Visit the manufacturer’s website of your network adapter to search and download the updated drivers. |
| 4 | Driver Update Software | Utilize third-party driver update software to automatically scan and update drivers on your system. |
| 5 | Windows Device Installation Settings | Enable automatic driver downloads and installations through Windows Device Installation settings. |
| 6 | Driver Update via Command Prompt | Use Command Prompt to update drivers by running specific commands and following the instructions. |
| 7 | Driver Update via PowerShell | Update drivers using PowerShell by executing commands and following the given instructions. |
| 8 | Driver Update with DriverPack Solution | Download and install DriverPack Solution software to automatically update drivers on your Windows system. |
| 9 | Driver Update with Snappy Driver Installer | Use Snappy Driver Installer to search, download, and update drivers on your Windows machine. |
| 10 | Driver Update with IObit Driver Booster | Install IObit Driver Booster to easily update drivers and fix issues related to network connectivity. |
“`
This table provides a list of 10 methods to fix the Windows error “Can’t Connect to This Network,” specifically focusing on automatically updating drivers. Each method is described briefly in the “Description” column.
Manually update drivers on Windows
To manually update drivers on Windows, follow these steps:
1. Press the Windows key + X and select Device Manager from the menu.
2. Expand the Network adapters category.
3. Right-click on your Wi-Fi adapter and select Update driver.
4. Choose “Search automatically for updated driver software” and follow the on-screen instructions.
5. If Windows fails to find an updated driver, you can visit the manufacturer’s website and download the latest driver for your specific model.
6. Once downloaded, right-click on the driver file and select “Update driver.”
7. Choose “Browse my computer for drivers” and select the downloaded driver file.
8. Follow the prompts to complete the installation.
Updating your drivers can often resolve connectivity issues and improve performance. If you’re still having trouble connecting to a specific network, it may be worth trying some of the other fixes mentioned in this article.
Reinstall network adapter driver
If you’re experiencing a “Can’t Connect to This Network” error on your Windows device, reinstalling the network adapter driver may help resolve the issue. This error can occur due to various reasons, such as outdated or corrupted drivers. Here’s how you can reinstall the network adapter driver:
1. Press the Windows key + X and select Device Manager.
2. Expand the Network adapters category.
3. Right-click on the network adapter causing the issue and select Uninstall device.
4. Check the box that says “Delete the driver software for this device” and click Uninstall.
5. Restart your computer.
6. After the restart, Windows will automatically reinstall the network adapter driver.
7. If Windows doesn’t reinstall the driver, you can manually install it. Visit the manufacturer’s website, download the latest driver, and follow the installation instructions.
Reinstalling the network adapter driver can often fix connectivity issues and help you connect to your Wi-Fi network without any problem.
Run the Network troubleshooter
To troubleshoot network connectivity issues on Windows, you can use the Network troubleshooter. This tool can help identify and resolve common problems that may be preventing your computer from connecting to a network.
To run the Network troubleshooter, follow these steps:
1. Right-click on the network icon in the system tray and select “Troubleshoot problems.”
2. The troubleshooter will automatically scan your system for any network-related issues.
3. If any problems are found, the troubleshooter will provide a resolution or suggest steps to fix them.
4. Follow the on-screen instructions to resolve the issue.
5. Once the troubleshooter has completed its scan and provided a resolution, try connecting to the network again.
6. If the problem persists, you may need to try other troubleshooting methods or contact your network administrator for further assistance.
By using the Network troubleshooter, you can quickly identify and resolve common network connectivity issues, allowing you to get back online in no time.
Perform a Winsock reset
Performing a Winsock reset can help resolve the “Can’t Connect to This Network” error on your Windows system. This error commonly occurs when you’re unable to connect to a specific Wi-Fi network. To perform a Winsock reset, follow these steps:
1. Press the Windows key + X and select “Command Prompt (Admin)” from the menu.
2. In the command prompt window, type “netsh winsock reset” and press Enter.
3. Restart your computer to apply the changes.
Performing a Winsock reset can fix any corrupted network configuration settings, which may be the culprit behind the connection issue. After the restart, try connecting to the Wi-Fi network again. If the problem persists, you may need to troubleshoot further or seek assistance from your network administrator.
Flush your DNS
If you’re experiencing the “Can’t Connect to This Network” error on your Windows device, one possible solution is to flush your DNS. This can help resolve network connectivity issues and get you back online. Here’s how to do it:
1. Press the Windows key + X and select “Command Prompt (Admin)”.
2. In the Command Prompt window, type ipconfig /flushdns and press Enter.
3. Wait for the process to complete, then close the Command Prompt.
4. Restart your device and try connecting to the network again.
Flushing your DNS can clear any outdated or corrupted network data, allowing your device to establish a fresh connection. If the error persists, you may need to try other troubleshooting steps. Remember to check your Wi-Fi settings, restart your router, or update your network adapter drivers.
Reset your network settings
To reset your network settings and resolve the “Can’t Connect to This Network” error on Windows, follow these steps:
1. Open the Start menu and type “Network reset” in the search bar.
2. Select “Network reset” from the search results.
3. A prompt will appear, informing you about the changes that will be made. Click “Reset now” to proceed.
4. Your computer will restart, and the network settings will be reset to their default values.
5. After the restart, reconnect to your Wi-Fi network by clicking on the Wi-Fi icon in the taskbar.
6. Select your network from the list of available networks.
7. Enter your Wi-Fi password if prompted.
8. If you still can’t connect, try restarting your router and modem.
9. Additionally, ensure that your Wi-Fi adapter is working properly by updating its drivers.
10. If the problem persists, consider contacting your internet service provider for further assistance.
Follow these steps to reset your network settings and restore your Wi-Fi connection.

Mark Ginter is a tech blogger with a passion for all things gadgets and gizmos. A self-proclaimed "geek", Mark has been blogging about technology for over 15 years. His blog, techquack.com, covers a wide range of topics including new product releases, industry news, and tips and tricks for getting the most out of your devices. If you're looking for someone who can keep you up-to-date with all the latest tech news and developments, then be sure to follow him over at Microsoft.
Related posts:
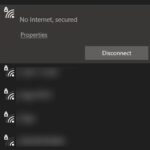 How to Resolve “No Internet Secured” Error on Wi-Fi Connection
 How to Resolve Limited Connectivity Problem on Windows 10 PC
 How to Troubleshoot ‘No Wifi Networks Found’ on Windows 10 PC
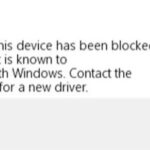 Retrieve Windows error code 48 – “The software on this device has been blocked at startup because it is known to have problems with Windows”