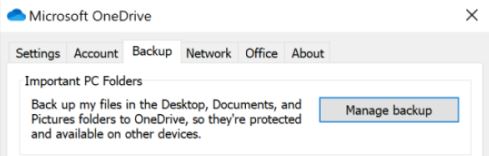
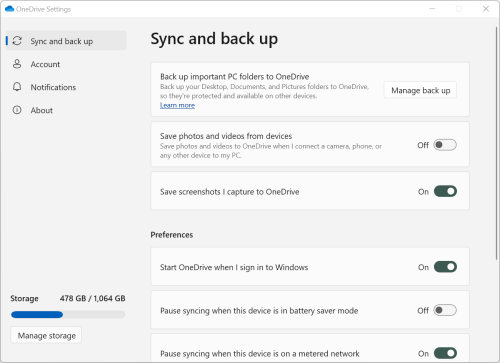
- Some OneDrive users have reported that the Backup tab doesn’t appear in Settings when they try to back up their work to the Microsoft cloud service.
- The Backup tab helps protect important documents and folders visible under “This PC” and can be accessed from other devices.
- This post may help you and solve the problem.
- You may need to log in as an administrator to make these changes.
Troubleshooting missing OneDrive Backup tab in Settings
If you are experiencing the issue of a missing OneDrive Backup tab in Settings, there are a few steps you can take to troubleshoot and resolve the problem.
First, ensure that you are using the latest version of Windows, such as Windows 10 or Windows 11.
Next, open the Registry Editor by pressing “Win + R” and typing “regedit” into the Run dialog box.
Navigate to the following path address: “HKEY_CURRENT_USER\Software\Microsoft\OneDrive”.
If you do not see an “EnableMove” DWORD entry, right-click in the right pane and select “New -> DWORD (32-bit) Value”.
Name the new entry “EnableMove” and double-click on it to change the value data to “0”.
Exit the Registry Editor and restart your computer.
After following these steps, the OneDrive Backup tab should now appear in your Settings. If the issue persists, it may be necessary to contact Microsoft support for further assistance.
Steps to fix the missing OneDrive Backup tab
- Right-click on the OneDrive icon in the system tray.
- Select Exit from the context menu to close OneDrive completely.
- Press Win + R to open the Run dialog box.
- Type onedrive.exe and press Enter to restart OneDrive.
- Check if the Backup tab is now visible in the OneDrive settings.
Method 2: Update OneDrive
- Click on the Start button and type Microsoft Store.
- Open the Microsoft Store app.

- Click on the three-dot menu button, and then select Downloads and updates.
- Click on Get updates to check for updates.
- If an update is available for OneDrive, click on the Update button to install it.
- Restart your computer and see if the Backup tab appears in the OneDrive settings.
Method 3: Reset OneDrive
- Press Win + R to open the Run dialog box.
- Type %localappdata%\Microsoft\OneDrive\onedrive.exe /reset and press Enter.
- OneDrive will reset itself, and you may be prompted to sign in again.
- After signing in, check if the Backup tab is visible in the OneDrive settings.
Method 4: Reinstall OneDrive
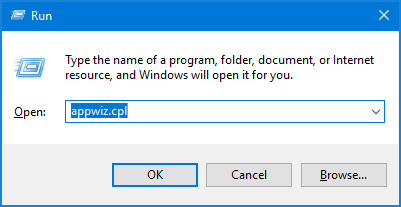
- Press Win + R to open the Run dialog box.
- Type appwiz.cpl and press Enter to open the Programs and Features window.
- Scroll down and locate Microsoft OneDrive.
- Right-click on Microsoft OneDrive and select Uninstall.
- Follow the on-screen instructions to uninstall OneDrive.
- Restart your computer.
- Download the latest version of OneDrive from the official Microsoft website and install it.
- Sign in to your OneDrive account and check if the Backup tab is now visible in the settings.

Resolving the issue of the missing OneDrive Backup tab
To fix the missing OneDrive Backup tab in Settings, you can follow these steps:
1. Open the Registry Editor by pressing Windows + R, typing “regedit,” and hitting Enter.
2. Navigate to the following path address: HKEY_CURRENT_USER\Software\Microsoft\OneDrive.
3. In the right-hand pane, find the “EnableMove D” value data.
4. Double-click on “EnableMove D” and change its value data to “1.”
5. Close the Registry Editor and restart your PC.
6. After rebooting, open File Explorer and right-click on “This PC.”
7. Select “Properties” and click on the “Autosave” tab.
8. Check the box that says “Automatically save files to OneDrive by default.”
9. Click “OK” to save the changes.
How to restore the OneDrive Backup tab in Settings
- Right-click the OneDrive icon in the system tray and select Settings.
- In the Settings tab, click on the Unlink this PC button.
- Click OK when prompted to confirm the action.
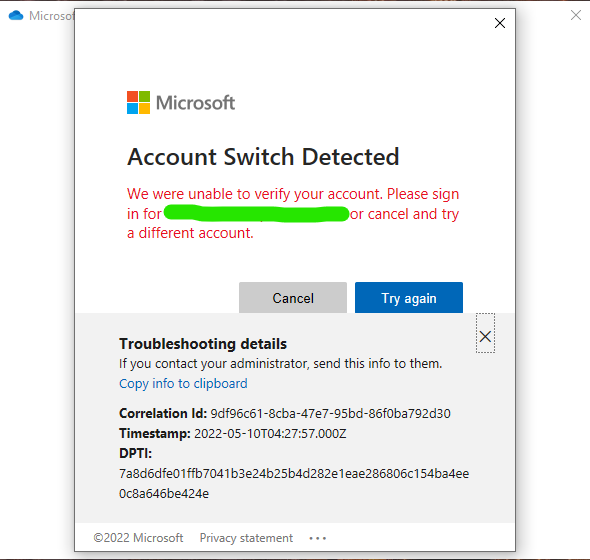
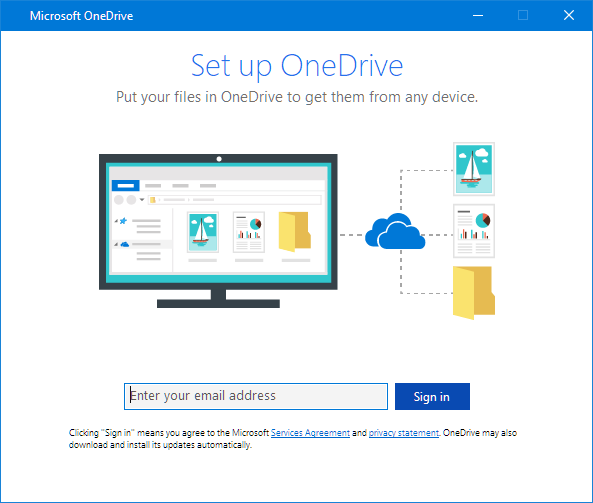
- Sign in to your OneDrive account again by entering your email and password.
- Follow the on-screen instructions to set up OneDrive on your PC.
Method 2: Reinstalling OneDrive
- Press Windows + R to open the Run dialog box.
- Type “appwiz.cpl” and press Enter to open the Programs and Features window.
- Scroll down and locate Microsoft OneDrive in the list of installed programs.
- Right-click on Microsoft OneDrive and select Uninstall.
- Follow the on-screen prompts to complete the uninstallation process.
- Visit the official Microsoft OneDrive website and download the latest version of OneDrive.
- Install OneDrive by following the setup wizard instructions.
- Sign in to your OneDrive account using your email and password.
- Check if the Backup tab is now visible in the OneDrive Settings.
Method 3: Updating OneDrive
- Press Windows + R to open the Run dialog box.
- Type “ms-settings:windowsupdate” and press Enter.
- In the Windows Update window, click on Check for updates.
- If any updates are available for OneDrive, click on Install to update the application.
- Restart your computer after the update is completed.
- Launch OneDrive and check if the Backup tab is now visible in the Settings.

Mark Ginter is a tech blogger with a passion for all things gadgets and gizmos. A self-proclaimed "geek", Mark has been blogging about technology for over 15 years. His blog, techquack.com, covers a wide range of topics including new product releases, industry news, and tips and tricks for getting the most out of your devices. If you're looking for someone who can keep you up-to-date with all the latest tech news and developments, then be sure to follow him over at Microsoft.