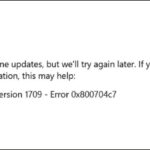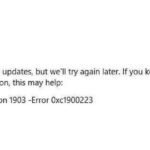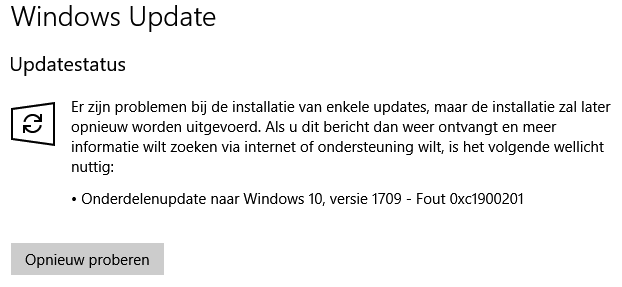
- Error occurs when the update process gets stuck every time you try to update your Windows 10 system.
- Usually, the error occurs when there is a problem with the server connection or update.
- We have prepared a list of the best solutions that can either give you a viable alternative or help you fix the error.
- If you get the 0xc1900201 update error, you should follow the following guide.
- It turns out that several different scenarios could be triggering this particular error code.
Unveiling the Windows 10 Update Bug 0xc1900201: Resolving the Glitch
Troubleshooting and Error Code Fixes
If you’re encountering the error code 0xc1900201 while trying to update Windows 10, don’t worry, we’re here to help. This error typically occurs when there are compatibility issues with your system or when certain system data is corrupted. To fix this issue, follow these steps:
1. Run the Windows Update Troubleshooter tool. This tool can automatically detect and fix common Windows Update problems.
2. Clear the SoftwareDistribution folder. This folder contains temporary files used by Windows Update, and clearing it can resolve update errors.
3. Check your system requirements. Make sure your PC meets the minimum hardware and software requirements for the update.
4. Update your system’s drivers and firmware. Outdated drivers can cause compatibility issues, so it’s important to keep them up to date.
5. If the above steps don’t work, you can try performing a Windows Repair or reinstalling Windows.
Remember to always back up your important files before making any changes to your system.
Repairing Windows Update Components
To fix the Windows 10 update bug with error code 0xc1900201, follow these steps:
1. Run the Windows Update Troubleshooter to automatically detect and fix common update errors.
2. Clear the SoftwareDistribution folder, which stores temporary update files, by following these steps:
a. Press the Windows key + R to open the Run dialog box.
b. Type “services.msc” and press Enter.
c. In the Services window, locate and stop the Windows Update service.
d. Open File Explorer and navigate to the “C:\Windows\SoftwareDistribution” folder.
e. Delete all the files and folders within the SoftwareDistribution folder.
f. Go back to the Services window and start the Windows Update service again.
3. If the issue persists, try upgrading to the latest version of Windows 10 using the Windows Update Assistant or Media Creation Tool.
4. If you’re still experiencing problems, consider reaching out to Microsoft support or your hardware vendor for further assistance.
Remember to always back up your important files and create a system restore point before making any changes to your PC.
Resolving Partition Issues
If you’re encountering the Windows 10 update bug 0xc1900201, you may be experiencing partition issues. This can be frustrating, but don’t worry, we have a solution for you.
The Troubleshooter is a handy tool developed by Microsoft to help users resolve various issues, including partition problems. It can be accessed through the Windows Settings menu.
First, make sure to back up all your important files and data. Then, follow these steps:
1. Open Windows Settings by pressing the Windows key + I.
2. Go to “Update & Security” and click on “Troubleshoot” in the left-hand menu.
3. Select “Windows Update” and click on “Run the troubleshooter.”
The Troubleshooter will analyze your system and attempt to fix any partition-related issues. Once it’s done, reboot your computer and try running the update again.
If this doesn’t resolve the issue, you can also try using the Windows Repair tool or seeking assistance from Microsoft’s support team. Remember, it’s always a good idea to stay updated with the latest patches and updates to ensure a smooth-running system.
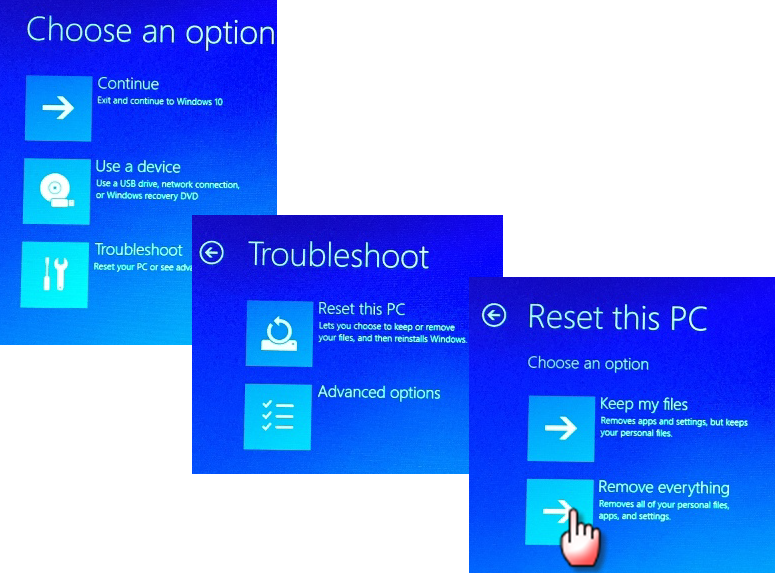
Performing Clean Reinstallation and Updates
- Back up your important files and data.
- Ensure you have a stable internet connection.
- Open Settings by clicking on the Start button and selecting it from the menu.
- Click on Update & Security.
- Choose Recovery from the left panel.
- Under the Reset this PC section, click on Get started.
- Select either Keep my files or Remove everything, depending on your preference.
- If you chose Keep my files, follow the on-screen instructions to complete the reinstallation process. If you chose Remove everything, you will need to reinstall your applications and restore your files from the backup you created.
- Once the reinstallation is complete, open Settings again.
- Click on Update & Security.
- Select Windows Update from the left panel.
- Click on Check for updates to ensure your system is up to date.
- If updates are available, click on Install now to install them.
- Restart your computer if prompted.

Mark Ginter is a tech blogger with a passion for all things gadgets and gizmos. A self-proclaimed "geek", Mark has been blogging about technology for over 15 years. His blog, techquack.com, covers a wide range of topics including new product releases, industry news, and tips and tricks for getting the most out of your devices. If you're looking for someone who can keep you up-to-date with all the latest tech news and developments, then be sure to follow him over at Microsoft.