- Using Skype, you can share your screen with other callers on the phone using Skype screen sharing.
- It’s very important to redirect the audio to video, otherwise, the call will soon become boring.
- In some cases, Windows interference is the cause of this persistent problem.
- You can solve this problem by changing the settings on your Windows PC or using the Skype client.
Troubleshooting Skype Share System Sound Issues
If you’re experiencing issues with Skype system sound not working on Windows, follow these steps to troubleshoot and fix the problem:
1. Check your audio drivers: Ensure that your audio drivers are up to date. Open the Device Manager and locate the audio driver. Right-click on it and select “Update driver.”
2. Check your audio settings: Open Skype and go to “Settings.” Under “Audio & Video,” ensure that the correct audio device is selected.
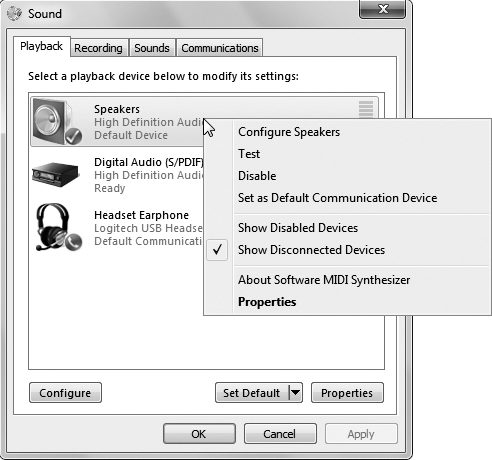
3. Check system sound settings: Right-click on the sound icon in the taskbar and select “Open Sound settings.” Under the “Output” section, ensure that the correct device is selected.
4. Check Skype audio settings: In Skype, go to “Settings” and select “Audio & Video.” Make sure the “Share system sound” option is enabled.
If these steps don’t resolve the issue, try restarting your computer or reinstalling Skype. Contact Skype support for further assistance if needed.
Checking and Updating Audio Settings
- Open Skype on your Windows computer.
- Click on the Settings icon in the top-right corner of the Skype window.
- In the Settings menu, click on Audio & Video from the left-hand side panel.
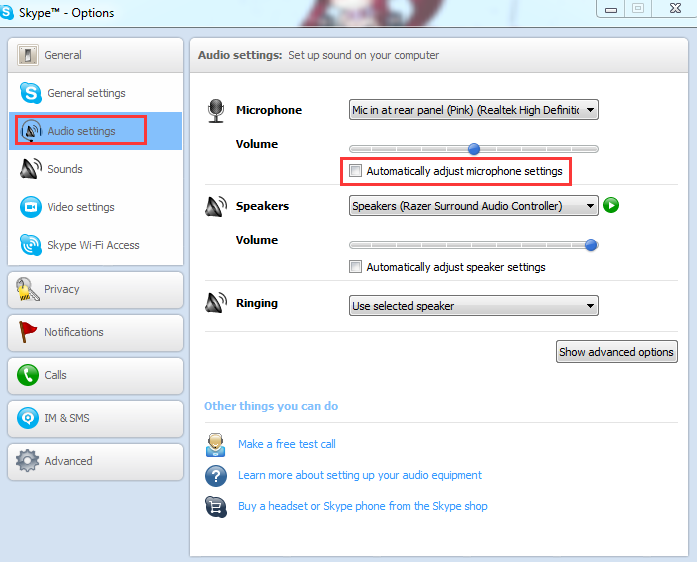
- Make sure that the correct Microphone and Speakers are selected from the respective drop-down menus.
- If the desired audio devices are not listed, click on the drop-down menus and select the appropriate devices.
- Adjust the Speaker and Microphone volume levels as needed.
- Check the Automatically adjust microphone settings option and ensure it is enabled.
- Click on the Save button to apply the changes.
- Close and reopen Skype to see if the audio issue has been resolved.
Resolving Backend and Hardware Issues
If you’re experiencing issues with the system sound not working on Skype for Windows, there are a few troubleshooting steps you can try.
First, check your audio settings by clicking on the gear icon in the top right corner of the Skype screen. Go to “Audio & Video” and make sure the correct audio device is selected.
If that doesn’t solve the issue, try updating your audio driver. Right-click on the Windows Start button and select “Device Manager”. Expand the “Sound, video and game controllers” section, right-click on your audio device, and select “Update driver”.
You can also try restarting the Skype application or your computer to see if that resolves the problem.
If none of these methods work, it may be helpful to reach out to Skype support for further assistance.
Adjusting Skype’s Audio Settings
Adjusting Skype’s audio settings is essential for troubleshooting and fixing system sound issues on Windows. To do this, follow these steps:
1. Open Skype and sign in to your account.
2. Click on the “Settings” icon in the top-right corner of the screen.
3. In the settings menu, click on “Audio & Video” from the left-hand side panel.
4. Under the “Speakers” section, select the appropriate audio output device from the drop-down menu.
5. Test the audio by clicking on the “Make a test call” button. If you can hear the test sound, your audio settings are correct.
6. If the sound is still not working, click on the “Troubleshoot audio problems” link for further assistance.
Remember, it’s important to ensure that your speakers are functioning properly and that the correct audio output device is selected in Skype. By following these steps, you should be able to resolve any system sound issues you may be experiencing while using Skype on Windows.
Reinstalling Skype and Reporting Problems
Troubleshoot and Fix Skype System Sound Not Working on Windows
Reinstalling Skype
If you are facing issues with Skype system sound not working on Windows, reinstalling the application might help resolve the problem. Follow the steps below to reinstall Skype:
| Step | Description |
|---|---|
| 1 | Open the Control Panel on your Windows computer. |
| 2 | Go to “Programs” or “Programs and Features” (depending on your Windows version). |
| 3 | Find Skype in the list of installed programs. |
| 4 | Select Skype and click on the “Uninstall” or “Remove” button. |
| 5 | Follow the prompts to complete the uninstallation process. |
| 6 | Visit the official Skype website and download the latest version of Skype for Windows. |
| 7 | Run the downloaded installer file and follow the on-screen instructions to reinstall Skype. |
Reporting Problems
If reinstalling Skype didn’t fix the system sound issue, you can report the problem to Skype support for further assistance. Follow the steps below to report the problem:
| Step | Description |
|---|---|
| 1 | Open Skype on your Windows computer. |
| 2 | Click on the “Help” menu at the top of the Skype window. |
| 3 | Select “Support” from the drop-down menu. |
| 4 | In the support window, click on “Contact us” or “Report a problem”. |
| 5 | Provide detailed information about the system sound issue you are facing. |
| 6 | Submit the form or follow any additional instructions provided by Skype support. |

Mark Ginter is a tech blogger with a passion for all things gadgets and gizmos. A self-proclaimed "geek", Mark has been blogging about technology for over 15 years. His blog, techquack.com, covers a wide range of topics including new product releases, industry news, and tips and tricks for getting the most out of your devices. If you're looking for someone who can keep you up-to-date with all the latest tech news and developments, then be sure to follow him over at Microsoft.