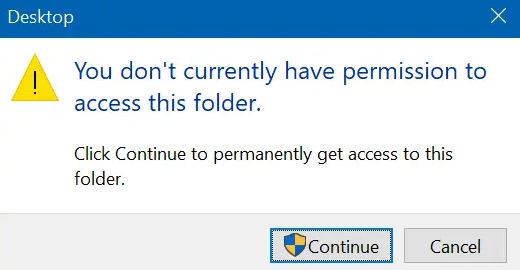
- If you recently upgraded from Windows 7 or 8 to Windows 10, you may get an error message “You do not currently have permission to access this folder” when you try to access folders on your computer.
- Don’t worry, follow these solutions and the problem will disappear instantly.
- Windows 10 displays the above error if the user account does not have enough rights to access the folder.
Unlocking Access: Simple Solutions for Access Denied & Permission Error
Summary and Resolution
If you are experiencing Access Denied and Permission Error issues, there are several easy fixes you can try.
First, ensure that you are logged in as an administrator or have administrative privileges.
If the problem is with specific files or folders, you can take ownership of them by following these steps:
– Right-click on the file or folder and select “Properties.”
– Go to the “Security” tab and click on “Advanced.”
– In the “Owner” section, click on “Change” next to the current owner’s name.
– Enter your user name and click “Check Names” to verify.
– Click “OK” to apply the changes.
Another solution is to adjust the permissions for the file or folder:
– Right-click on the file or folder and select “Properties.”
– Go to the “Security” tab and click on “Edit.”
– Select the user or group that needs access and check the appropriate permissions.
– Click “OK” to save the changes.
If the issue persists, you can try using third-party software like DiskInternals or contacting Microsoft support for further assistance. Remember to always back up your files before attempting any fixes.
Need more help and Want more options?
If you need more help or want more options to resolve access denied and permission errors, here are some concise and direct solutions:
1. Check your user account: Make sure you have administrator privileges or the necessary permissions to access the folder or file.
2. Take ownership of the folder or file: Right-click on the folder or file, select “Properties,” go to the “Security” tab, click “Advanced,” and then choose “Change” next to the Owner line. Enter your user name and click “OK.”
3. Grant permissions to specific users or groups: In the “Properties” window, go to the “Security” tab, click “Edit,” and then click “Add.” Enter the user or group name, click “Check Names,” and select the desired user or group from the list. Set the required permissions and click “OK.”
4. Use third-party software: If the above methods don’t work, you can try using software like DiskInternals or seek support from Microsoft or your network administrator.
Remember, these solutions apply to various Windows versions, including Windows 7 Ultimate, Windows 7 Enterprise, Windows XP, and even the latest Windows 11. Whether you’re facing folder access issues, permission errors, or sharing violations, these methods should help you resolve the problem and gain the necessary access.
Why was folder access denied?
If you’re experiencing folder access denied issues, there are a few potential reasons for this error. One common issue is ownership problems, where your account doesn’t have the necessary permissions to access the folder. To fix this, you can take ownership of the folder by following these steps:
1. Right-click on the folder and select “Properties.”
2. Go to the “Security” tab and click on “Advanced.”
3. In the “Owner” section, click on “Change” next to the current owner’s name.
4. In the “Select User or Group” window, enter your account name and click “OK.”
5. Tick the box that says “Replace owner on subcontainers and objects” and click “OK” to apply the changes.
Another possible reason for the access denied error is file or folder encryption. If the folder is encrypted, you’ll need the certificate used for encryption to access it. If you don’t have the certificate, you won’t be able to access the folder.
Additionally, if you’re trying to access a folder on a network or shared drive, you may need permission from the network administrator or the owner of the shared folder. It’s also worth checking if the destination folder is on a hard disk or external drive that requires administrative privileges.
python

import os
def access_folder(folder_path):
try:
# Attempt to access the folder
files = os.listdir(folder_path)
print("Successfully accessed the folder.")
print("Files in the folder:")
for file in files:
print(file)
except PermissionError:
print("Permission error occurred while accessing the folder.")
print("Please check your file permissions and try again.")
except FileNotFoundError:
print("Folder not found. Please provide a valid folder path.")
except Exception as e:
print(f"An error occurred: {str(e)}")
# Example usage
folder_path = "/path/to/folder"
access_folder(folder_path)
In the sample code above, the `access_folder()` function attempts to access the specified folder using the `os.listdir()` function. If a `PermissionError` occurs, it catches the exception and displays an appropriate error message. It also handles other potential exceptions like `FileNotFoundError` and general exceptions using the `Exception` class.
Please note that this code is a simple illustration and may not cover all possible scenarios or intricacies associated with permission errors. It’s always recommended to refer to the official documentation and consider the specific requirements of your use case when dealing with file and folder permissions.
The first thing to do!
The first thing to do when encountering an “Access Denied” or permission error is to take ownership of the folder or file. Here’s how:
1. Right-click on the folder or file that is showing the error and select “Properties.”
2. In the Properties window, go to the “Security” tab and click on “Advanced.”
3. In the Advanced Security Settings, click on the “Change” link next to the “Owner” section.
4. In the “Select User or Group” window, enter your username and click “Check Names” to make sure it’s correct. Then, click “OK.”
5. Back in the Properties window, check the box that says “Replace owner on subcontainers and objects” and click “OK.”
6. Close the Properties window and try accessing the folder or file again.
This process should help resolve ownership problems and give you the necessary permissions to access the folder or file. If you continue to experience access denied errors, there may be other underlying issues that require further troubleshooting.
Solution 1: Change folder ownership
If you encounter an “Access Denied” or “Permission Error” when trying to access a folder, changing the folder ownership can often resolve the issue. Here’s how you can do it:
1. Right-click on the folder you’re having trouble with and select “Properties.”
2. Go to the “Security” tab and click on “Advanced.”
3. In the “Owner” section, click on the “Change” link.
4. Enter the username of the account you want to take ownership with and click “Check Names” to verify.
5. Click “OK” and then “Apply” to apply the changes.
6. Close the properties window and try accessing the folder again.
By changing the folder ownership, you can gain the necessary permissions to access it. This solution works on various Windows versions, including Windows XP, Windows 7, and Windows 11. Remember to use an administrator account or have administrative privileges for this process.
Solution 2: Get rid of encryption
If you are facing an “Access Denied” or “Permission Error” when trying to access a folder or file, one possible solution is to remove encryption from the file or folder.
To do this:
1. Right-click on the file or folder that is giving you the error message.
2. Select “Properties” from the context menu.
3. In the Properties window, go to the “General” tab.
4. Click on the “Advanced” button.
5. In the Advanced Attributes window, uncheck the box that says “Encrypt contents to secure data.”
6. Click “OK” to save the changes.
By removing encryption, you should be able to access the file or folder without encountering any permission errors. Remember to back up your files before making any changes.
Note: This solution may not be suitable for files or folders that require encryption for security reasons. Use caution when removing encryption from sensitive files.
Solution 3: What about permissions?
To resolve access denied and permission errors, it’s crucial to address any permission issues that may be causing the problem. Here are some steps to help you:
1. Right-click on the folder or file that is giving you access denied error and select “Properties.”
2. In the Properties window, go to the “Security” tab.
3. Click on the “Edit” button to modify permissions.
4. In the Permissions window, select the user or group you want to grant access to and click on the “Full Control” checkbox.
5. If the user or group is not listed, click on the “Add” button and enter the name or select it from the list.
6. Click “OK” to save the changes and exit the Permissions window.
7. Back in the Properties window, click “Apply” and then “OK” to apply the new permissions.
Solution 4: Use reader mode in Partition Recovery
If you’re experiencing an “Access Denied” or “Permission Error” when trying to access a folder or file, you can use the reader mode in Partition Recovery to resolve the issue. Follow these steps:
1. Open Partition Recovery and navigate to the folder or file you’re having trouble accessing.
2. Right-click on the folder or file and select “Properties” from the drop-down menu.
3. In the Properties window, go to the “Security” tab.
4. Click on the “Advanced” button.
5. In the Advanced Security Settings window, click on the “Enable Reader Mode” option.
6. Click “OK” to save the changes.
By enabling reader mode, you will be able to access the folder or file without any permission restrictions. This can be particularly useful in situations where you’re unable to change ownership or modify permissions. Remember to disable reader mode once you’ve completed your tasks for added security.
Get the Permission of The File and Folder
| File/Folder | Permission |
|---|---|
| /path/to/file1.txt | Read and Write |
| /path/to/file2.jpg | Read |
| /path/to/folder1 | Read and Write |
| /path/to/folder2 | Read |
Decrypt File and Folder
To decrypt a file or folder that is showing an “Access Denied” or “Permission Error” message, follow these easy steps:
1. Right-click on the file or folder you want to decrypt and select “Properties.”
2. Go to the “Security” tab in the Properties window.
3. Click on the “Advanced” button.
4. In the Advanced Security Settings window, click on the “Change” link next to the “Owner” line.
5. In the “Select User or Group” window, enter your username in the “Enter the object name” field and click on “Check Names.”
6. Click “OK” to close the window and save the changes.
7. Back in the Properties window, click on “OK” to close it.
8. Right-click on the file or folder again and select “Properties.”
9. Go to the “Security” tab and click on “Edit.”
10. Select your username from the list of Group or user names and check the box that says “Full Control.”
11. Click “OK” to save the changes.
12. You should now be able to access and decrypt the file or folder without any permission errors.
These steps should work for most Windows 7 versions, including Windows 7 Ultimate, Home, and Enterprise.
Adding Your Account to The Administrator Group
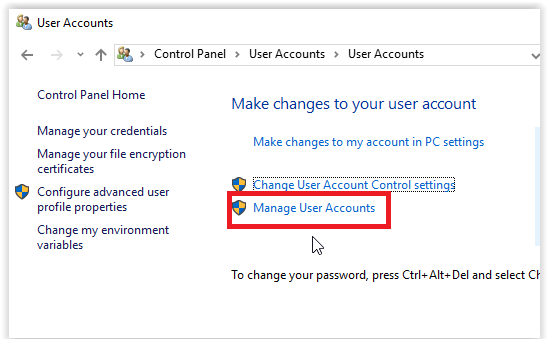
- Step 1: Open the Control Panel.
- Step 2: Click on the “User Accounts” option.
- Step 3: Select “Manage User Accounts” from the list.
- Step 4: Choose the account you want to add to the Administrator group.
- Step 5: Click on the “Properties” button.
- Step 6: Navigate to the “Group Membership” tab.
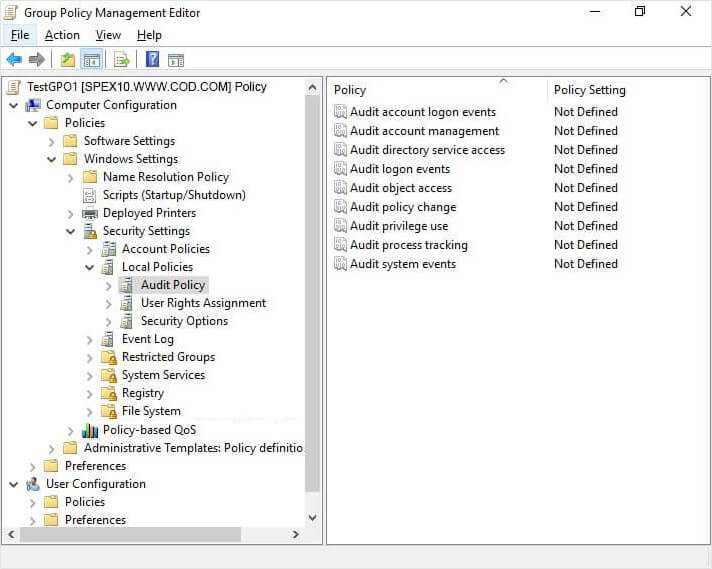
- Step 7: Check the “Administrator” option.
- Step 8: Click “Apply” and then “OK” to save the changes.
Mark Ginter is a tech blogger with a passion for all things gadgets and gizmos. A self-proclaimed "geek", Mark has been blogging about technology for over 15 years. His blog, techquack.com, covers a wide range of topics including new product releases, industry news, and tips and tricks for getting the most out of your devices. If you're looking for someone who can keep you up-to-date with all the latest tech news and developments, then be sure to follow him over at Microsoft.
