- DISM is a built-in tool in Windows 10 that can update and repair all corrupted files, images, etc.
- In some circumstances, this problem may be caused by some corruption that affects some files in your operating system.
- In this case, the problem can be solved by resetting all the Windows components using procedures such as restore installation and clean installation.
Introducing an Essential Guide: Troubleshooting DISM Error 1910 in Windows 10
Running an SFC Scan
To fix DISM Error 1910 in Windows 10, you can try running an SFC scan. This scan will check for any corrupted system files and attempt to repair them.
To run an SFC scan, follow these steps:
1. Open Command Prompt as an administrator. You can do this by searching for “Command Prompt” in the Start menu, right-clicking on it, and selecting “Run as administrator”.
2. In the Command Prompt window, type “sfc /scannow” and press Enter.
3. The scan will begin and may take some time to complete. Do not close the Command Prompt window until the scan is finished.
4. Once the scan is complete, check the results. If any issues were found and fixed, restart your computer and see if the DISM Error 1910 is resolved.
Running an SFC scan is one of the troubleshooting utilities available in Windows 10 that can help resolve system file corruption errors. It is a useful tool for fixing various issues with your operating system.
Using System Restore
To fix DISM Error 1910 in Windows 10, you can try using System Restore. This feature allows you to revert your computer’s settings to a previous state when everything was working fine.
Here’s how to use System Restore:
1. Press the Windows key + R to open the Run dialog box.
2. Type “rstrui” and press Enter to open the System Restore wizard.
3. Select a restore point from the list (choose one that was created before the DISM Error 1910 occurred).
4. Follow the on-screen instructions to complete the system restore process.
5. Once the restoration is complete, restart your computer and check if the error is resolved.
System Restore can help undo any changes that might have caused the DISM Error 1910. It’s a useful troubleshooting utility that can get your system back to a working state without affecting your personal files. Give it a try if you’re experiencing this error.
Performing a Repair or Clean Install
To fix DISM Error 1910 in Windows 10, you can perform a repair or clean install. Here are the steps to follow:
1. Repair Windows System Files:
– Open Command Prompt as an administrator.
– Type “sfc /scannow” and hit Enter to run the System File Checker.
– Wait for the scan to complete and follow any on-screen instructions.
2. Use DISM Tool:
– Open Command Prompt as an administrator.
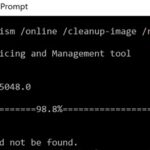
– Type “dism /online /cleanup-image /restorehealth” and hit Enter to run the DISM tool.
– Wait for the tool to complete the scan and repair process.
– Restart your computer.
If the above methods don’t resolve the issue, you may need to perform a clean install of Windows 10. Make sure to back up your important files before proceeding.
Remember to consult official Microsoft documentation or contact Microsoft Support for further assistance.
python

import subprocess
def run_dism_command(command):
try:
subprocess.run(command, check=True, capture_output=True)
except subprocess.CalledProcessError as e:
print(f"Error occurred: {e.stderr.decode('utf-8')}")
return False
return True
def fix_dism_error_1910():
# Step 1: Open an elevated command prompt
run_dism_command(["cmd", "/k", "runas /user:Administrator cmd"])
# Step 2: Execute DISM command to repair image
run_dism_command(["dism", "/Online", "/Cleanup-Image", "/RestoreHealth"])
# Step 3: Restart the computer to complete the repair process
run_dism_command(["shutdown", "/r", "/t", "0"])
# Run the fix for DISM error 1910
fix_dism_error_1910()
Please note that this code is just a basic sample and may require additional checks, error handling, or modifications based on your specific requirements. It attempts to open an elevated command prompt, execute the DISM command to repair the image, and then restart the computer.
Performing an In-place Repair Upgrade
1. Press the Windows key + R, type ‘ms-settings:windowsupdate‘, and hit Enter.
2. Click on “Check for updates” and install any available updates.
3. Download the Windows 10 ISO file from the Microsoft website.
4. Mount the ISO file by double-clicking on it.
5. Open File Explorer and navigate to the mounted ISO.
6. Double-click the “setup.exe” file to start the in-place upgrade.
7. Follow the on-screen instructions to complete the repair upgrade.
8. After the upgrade is finished, check if the DISM Error 1910 is resolved.
If the error persists, you may need to perform additional troubleshooting steps or seek further assistance from Microsoft support. Remember to back up your important files before attempting any repairs or upgrades.
Confirming the DISM Error 1910
If you’re encountering DISM Error 1910 in Windows 10, there are a few steps you can take to fix it.
First, try running the System File Checker (SFC) scan to check for any corrupted files on your operating system. Open the Command Prompt as an administrator and enter the command “sfc /scannow“. This will scan your system for any issues and attempt to repair them.
If the SFC scan doesn’t resolve the problem, you can try using the DISM utility. Open the Command Prompt as an administrator and enter the command “dism /online /cleanup-image /restorehealth“. This will scan your system and attempt to fix any corruption errors.
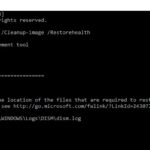
If you’re still experiencing issues, you can check the DISM log file for more details. Open the Command Prompt as an administrator and enter the command “dism /online /get-logpaths“. This will display the location of the log file.
In most cases, these methods should help resolve DISM Error 1910 and restore your system to optimal performance.
How to Fix the DISM 1910 Error
- Open Command Prompt as an administrator by right-clicking on the Start button and selecting Command Prompt (Admin).
- Type the following command and press Enter: sfc /scannow
- Wait for the System File Checker to scan and repair any corrupted system files.
- Once the process is complete, type the following command and press Enter: dism /online /cleanup-image /restorehealth
- Allow the DISM tool to scan and repair any corrupted files.
- Restart your computer and check if the DISM 1910 error has been resolved.

Repair Method 2: Use Windows Update Troubleshooter
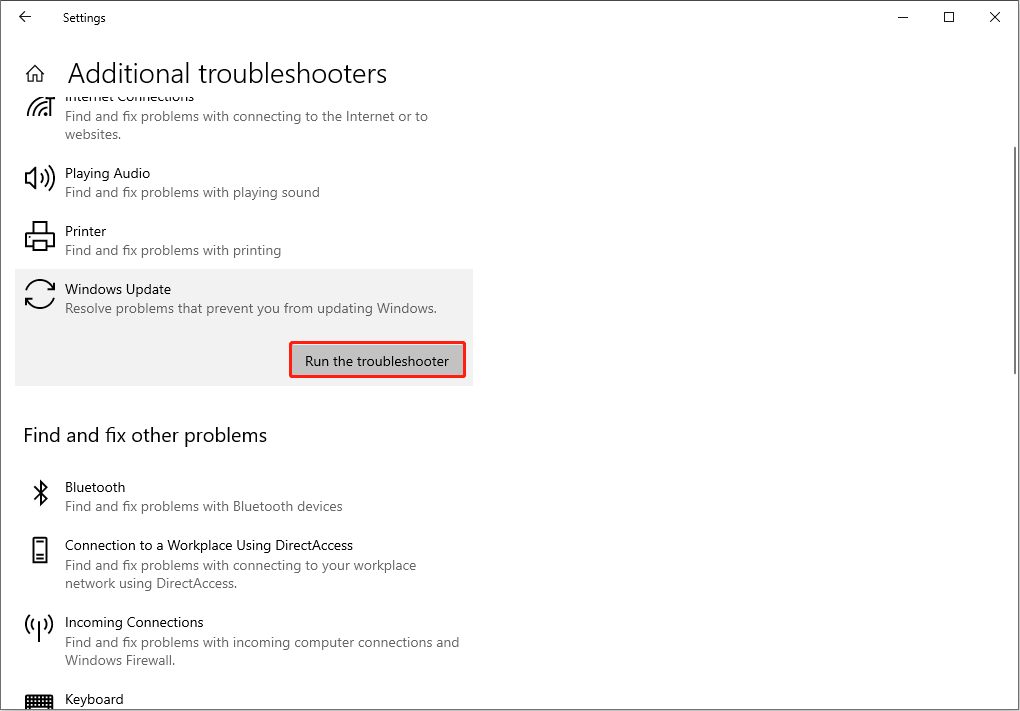
- Press Windows Key + I to open the Settings app.
- Go to Update & Security and select Troubleshoot from the left pane.
- Click on Additional Troubleshooters and then select Windows Update.
- Click on Run the troubleshooter and follow the on-screen instructions.
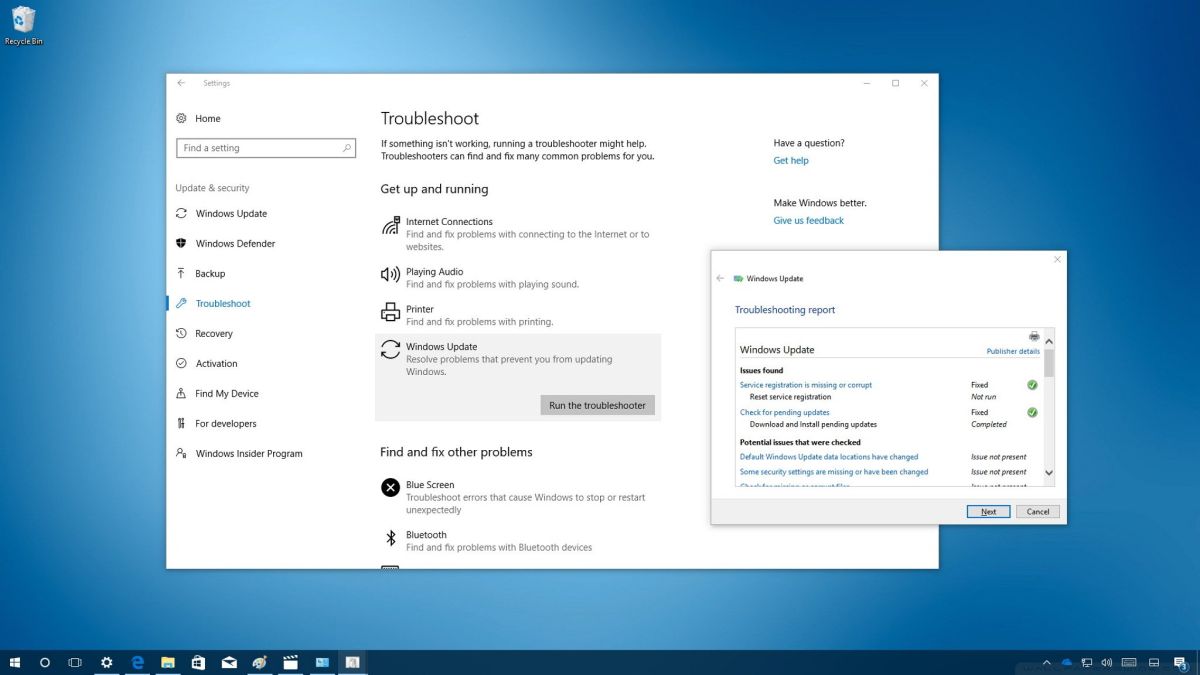
- Once the troubleshooter completes, restart your computer and check if the DISM 1910 error persists.
Repair Method 3: Perform a Clean Boot
- Press Windows Key + R to open the Run dialog box.
- Type msconfig and press Enter.
- In the System Configuration window, go to the Services tab.
- Check the box that says Hide all Microsoft services.
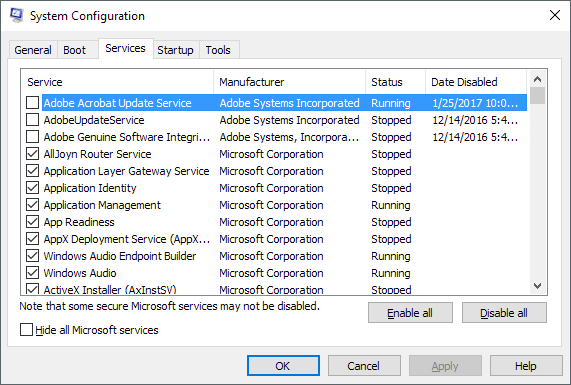
- Click on Disable all to disable all non-Microsoft services.
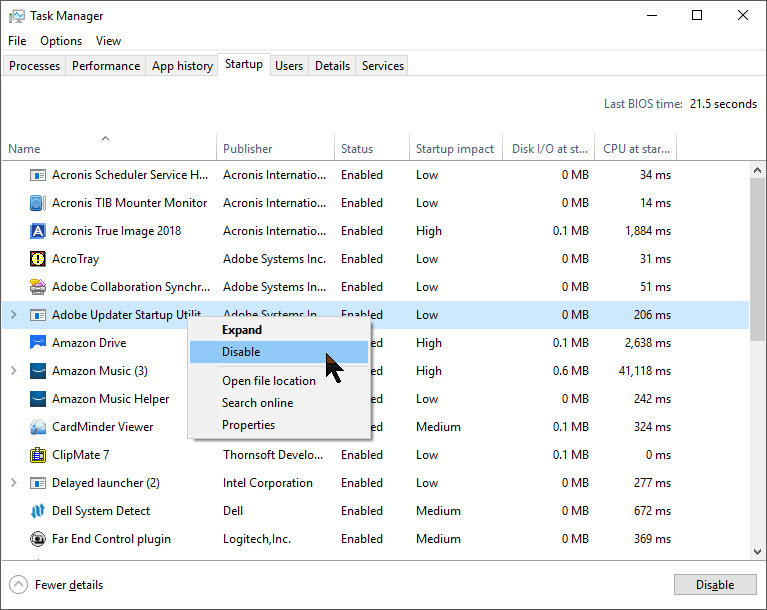
- Go to the Startup tab and click on Open Task Manager.
- In the Task Manager, disable all startup items by right-clicking on each item and selecting Disable.
- Close the Task Manager and go back to the System Configuration window.
- Click on OK and restart your computer.
- After the restart, check if the DISM 1910 error is resolved.

Mark Ginter is a tech blogger with a passion for all things gadgets and gizmos. A self-proclaimed "geek", Mark has been blogging about technology for over 15 years. His blog, techquack.com, covers a wide range of topics including new product releases, industry news, and tips and tricks for getting the most out of your devices. If you're looking for someone who can keep you up-to-date with all the latest tech news and developments, then be sure to follow him over at Microsoft.