- Windows updates often bring bug fixes, security fixes, and new features to your computer.
- If you notice problems after installing an update, you can reset the update to try to get everything working again.
- Microsoft usually provides quick fixes for some of these problems, but sometimes you may need an immediate fix if you’ve pulled the trigger and damaged the system.
Welcome to a troubleshooting journey where we delve into the world of Windows Update issues. In this article, we explore the art of resetting and preventing these pesky problems, empowering you to maintain a smoothly running system. Get ready to conquer Windows Update glitches and embrace a hassle-free computing experience.
Troubleshooting Steps for Windows Update Issues
If you’re experiencing issues with Windows Update, here are some troubleshooting steps to help you resolve them:
1. Restart your device: Sometimes a simple restart can fix update problems. Make sure to save your work and then restart your device.
2. Check your internet connection: Ensure that your device is connected to the internet and has a stable connection.
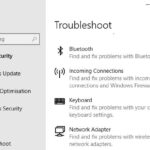
3. Run Windows Update Troubleshooter: This built-in tool can automatically detect and fix common Windows Update problems. To run it, go to Settings > Update & Security > Troubleshoot > Additional troubleshooters > Windows Update.
4. Reset Windows Update components: Use the Windows Update reset script provided by Microsoft to reset the Windows Update components. You can find the script and instructions in our article.
5. Check for pending restart: Sometimes updates require a restart to complete installation. Go to Settings > Update & Security > Windows Update and click on “Restart now” if available.
6. Modify active hours: Active hours determine the time when your device is usually in use. Adjusting this setting can prevent automatic restarts during your active hours. Go to Settings > Update & Security > Windows Update > Change active hours.
If you’re still experiencing issues after following these troubleshooting steps, reach out to Microsoft Support for further assistance.
Resetting Windows Update Using Various Methods
Resetting and Preventing Windows Update Issues
Resetting Windows Update Using Various Methods
| Method | Description |
|---|---|
| Method 1: Windows Update Troubleshooter | Use the built-in Windows Update Troubleshooter tool to automatically detect and fix common Windows Update issues. |
| Method 2: Reset Windows Update Components | Manually reset the Windows Update components by stopping related services, deleting temporary files, and restarting the services. |
| Method 3: Clear Windows Update Cache | Delete the contents of the SoftwareDistribution folder, which stores temporary files related to Windows Updates. |
| Method 4: Use DISM and SFC Tools | Use the Deployment Image Servicing and Management (DISM) tool and System File Checker (SFC) tool to repair corrupted system files that may be causing Windows Update issues. |
| Method 5: Reset Windows Update Components using PowerShell | Reset Windows Update components using PowerShell commands to re-register the required DLL files and reset the Windows Update settings. |
Fixing Windows Update Errors with Troubleshooter
When experiencing Windows Update errors, the Troubleshooter is a helpful tool for resolving the issue. Follow these steps to use the Troubleshooter:
1. Open the Windows Settings by pressing Win + I.
2. Select “Update & Security” from the options.
3. Click on “Troubleshoot” in the left sidebar.
4. Scroll down and click on “Windows Update” under “Get up and running.”
5. Click on “Run the troubleshooter.”
The Troubleshooter will automatically detect and fix any issues related to Windows Update. It will identify problems like update installation failures, pending restarts, or corrupted update files.
If the Troubleshooter is unable to resolve the issue, it will provide additional guidance or suggest advanced troubleshooting techniques.
Remember, it’s important to regularly update your Windows system to ensure security and receive bug fixes. By using the Troubleshooter, you can quickly diagnose and resolve Windows Update errors, keeping your system up to date and running smoothly.
Repairing Corrupted System Files for Windows Update
If you’re experiencing issues with your Windows Update, such as errors or update failures, it’s possible that your system files have become corrupted. Fortunately, there are steps you can take to repair these files and get your updates back on track.
Firstly, you’ll want to run the System File Checker (SFC) tool to scan and repair any corrupted files. To do this, open a Command Prompt as an administrator and type “sfc /scannow“. This will initiate the scanning process and automatically fix any issues it finds.
If the SFC tool doesn’t resolve the problem, you can try using the Deployment Image Servicing and Management (DISM) tool. Open a Command Prompt as an administrator and type “dism /online /cleanup-image /restorehealth“. This will download and replace any damaged files from Windows Update.
In some cases, you may need to manually reset the Windows Update components. To do this, open a Command Prompt as an administrator and run the following commands, one at a time:
net stop wuauserv
net stop cryptSvc
net stop bits
net stop msiserver
After stopping these services, you can rename the SoftwareDistribution and Catroot2 folders. To do this, run the following commands:
ren C:\Windows\SoftwareDistribution SoftwareDistribution.old
ren C:\Windows\System32\catroot2 Catroot2.old
Finally, restart the previously stopped services by running the following commands:
net start wuauserv
net start cryptSvc
net start bits
net start msiserver
Clearing Windows Update Cache to Resolve Issues
Clearing the Windows Update Cache can help resolve various issues with Windows updates. Here’s how to do it:
1. Close any open programs and save your work.
2. Press the Windows key + R to open the Run dialog box.
3. Type “services.msc” and press Enter to open the Services window.
4. Scroll down and find “Windows Update” in the list.
5. Right-click on it and select “Stop“.
6. Minimize the Services window, but keep it open.
7. Open File Explorer and navigate to “C:\Windows\SoftwareDistribution“.
8. Delete all the files and folders inside the SoftwareDistribution folder.
9. Go back to the Services window and right-click on “Windows Update” again.
10. Select “Start” to restart the Windows Update service.
11. Close the Services window and restart your computer.
By clearing the Windows Update Cache, you can resolve issues such as update errors, stuck updates, and pending restarts. This troubleshooting technique can help ensure that your Windows system stays up-to-date and protected from security threats. Remember to follow these steps whenever you encounter Windows update problems.
Resetting Windows Update Components and Policies
If you’re experiencing issues with Windows Update, resetting the components and policies can often resolve the problem. Here’s how you can do it:
1. Open the Command Prompt as an administrator.
2. Type the following commands, pressing Enter after each one:
net stop wuauserv
net stop cryptSvc
net stop bits
net stop msiserver
3. Next, you’ll need to rename the SoftwareDistribution and Catroot2 folders. Use the following commands:
ren C:\Windows\SoftwareDistribution SoftwareDistribution.old
ren C:\Windows\System32\catroot2 Catroot2.old
4. Now, restart the Windows Update services by entering the following commands:
net start wuauserv
net start cryptSvc
net start bits
net start msiserver
5. Finally, restart your computer for the changes to take effect.
By resetting the Windows Update components and policies, you can often resolve common update issues. If you continue to experience problems, consider seeking further assistance from Microsoft Support or exploring additional troubleshooting techniques available online.
Manual Installation of Latest Windows Update and Servicing Stack Update
To manually install the latest Windows Update and Servicing Stack Update, follow these steps:
1. Download the latest Windows Update and Servicing Stack Update from the Microsoft Update Catalog website.
2. Locate the downloaded update file and double-click on it to start the installation process.
3. Follow the on-screen instructions to complete the installation.
4. If prompted, restart your computer to apply the updates.
By manually installing the updates, you can ensure that your system stays up to date and prevent any potential Windows Update issues. This method is particularly useful if you’re experiencing trouble with the automatic update process or if you want to have more control over the update installation.
Remember to always download updates from trusted sources, such as the official Microsoft website or the Microsoft Update Catalog, to avoid any security threats or system errors.
By following these steps, you can handle Windows Update issues and ensure that your system is running smoothly.

Mark Ginter is a tech blogger with a passion for all things gadgets and gizmos. A self-proclaimed "geek", Mark has been blogging about technology for over 15 years. His blog, techquack.com, covers a wide range of topics including new product releases, industry news, and tips and tricks for getting the most out of your devices. If you're looking for someone who can keep you up-to-date with all the latest tech news and developments, then be sure to follow him over at Microsoft.