- Techquack has put together some user-tested solutions to help you solve this pesky problem.
- Twitch is delayed by several seconds in almost all browsers and WiFi connections.
- Users have complained about VoD, playback, or buffering clips that occur due to background applications.
- Twitch seems to be the only place where users experience constant buffering, and it really makes the whole site unusable.
Tackling Twitch’s persistent buffering issues on Windows 10 can be a frustrating ordeal. However, fear not, as we delve into effective solutions to bid farewell to endless loading screens and enjoy uninterrupted streaming experiences. Gain insight into overcoming this hurdle with our expert tips and tricks.
Understanding the Twitch Constantly Buffering Problem
If you’re experiencing constant buffering issues while watching Twitch streams on Windows 10, don’t worry, we’ve got you covered. Here are a few steps you can take to fix this problem:
1. Check your internet connection: Make sure you have a stable and fast internet connection. Slow speeds can cause buffering and lagging issues.
2. Try a different browser: If you’re using Google Chrome and experiencing buffering problems, try using Microsoft Edge. Sometimes, browser issues can affect streaming performance.
3. Disable hardware acceleration: Open your browser’s settings and disable hardware acceleration. This can help improve streaming performance on certain systems.
4. Clear your browser’s cache: Over time, your browser’s cache can accumulate data and cause performance issues. Clearing it can help resolve buffering problems.
5. Restart your PC: Sometimes, a simple restart can fix streaming issues. Turn off your computer, wait a few seconds, and then turn it back on.
By following these steps, you should be able to resolve the Twitch constantly buffering problem on your Windows 10 PC. Enjoy uninterrupted gameplay and smooth streaming on Twitch!
Resolving Low Latency Issues on Twitch
Solutions to Twitch Constantly Buffering on Windows 10
If you’re experiencing low latency issues on Twitch while using Windows 10, there are a few ways you can resolve this problem.
First, make sure you’re using the latest version of Google Chrome or Microsoft Edge as your browser. These browsers are optimized for video streaming and can help improve your Twitch experience.
Next, check your PC system for any issues that might be affecting the performance. Perform a thorough scan for malware or viruses that could be causing lag. Additionally, clear your browser cache and cookies to free up resources.
If the problem persists, it might be worth considering upgrading your internet connection to a faster speed. This can help ensure a smooth and uninterrupted Twitch stream.
Lastly, if none of these solutions work, it’s possible that the issue lies with Twitch’s servers. In this case, try switching to a different stream or watching a VoD until the problem is resolved.
By following these procedures, you can enjoy lag-free Twitch streaming on your Windows 10 device.
Disabling Hardware Acceleration for Smooth Streaming
To resolve issues with Twitch constantly buffering on Windows 10, disabling hardware acceleration can help ensure smooth streaming.
First, open your preferred browser and navigate to the settings menu. Look for the option to disable hardware acceleration. In Google Chrome, click on the three-dot menu in the top-right corner, select “Settings,” then click “Advanced” and scroll down to the “System” section. Toggle off the “Use hardware acceleration when available” option.
In Firefox, click on the three-line menu in the top-right corner, select “Options,” then go to the “General” tab. Scroll down to the “Performance” section and uncheck the “Use recommended performance settings” box. Finally, uncheck the “Use hardware acceleration when available” box.
By disabling hardware acceleration, you can alleviate issues such as buffering, freezing, and lagging during Twitch streams. Give it a try and enjoy uninterrupted gameplay and streaming on Twitch.
python

import subprocess
def check_network_connection():
try:
subprocess.check_output(["ping", "-n", "5", "twitch.tv"])
print("Network connection is stable.")
except subprocess.CalledProcessError:
print("Network connection is unstable. Please check your internet connection.")
def check_twitch_buffering():
try:
subprocess.check_output(["tracert", "twitch.tv"])
print("Trace route to Twitch completed successfully.")
except subprocess.CalledProcessError:
print("Unable to trace route to Twitch. There may be network issues.")
def main():
print("Welcome to the Twitch Constant Buffering Troubleshooter!")
print("Let's check your network connection first...")
check_network_connection()
print("\nNow, let's perform a trace route to Twitch...")
check_twitch_buffering()
print("\nTroubleshooting completed. If you're still experiencing buffering issues, please contact Twitch support.")
if __name__ == "__main__":
main()
This script utilizes subprocess module to run command-line utilities such as `ping` and `tracert` to check the network connection and trace the route to Twitch respectively. It provides simple diagnostic information to help identify any network-related issues that may cause buffering problems on Twitch.
Please note that this script is a basic example and may not cover all possible scenarios or solutions. It’s recommended to consult Twitch support or relevant technical resources for more comprehensive assistance.
Clearing Browser Cache to Improve Twitch Performance
Clearing your browser cache can significantly improve Twitch performance on Windows 10. When your browser cache is filled with temporary files, it can slow down your browsing experience and cause Twitch to constantly buffer. To resolve this issue, follow these simple steps:
1. Open your browser settings by clicking on the menu icon in the top-right corner.
2. Select “Settings” or “Options” from the drop-down menu.
3. Look for the “Privacy & Security” section and find the option to clear your browsing data.
4. Click on the option to clear your cache and ensure that cookies and other site data are also selected.
5. Confirm the deletion of your cache and wait for the process to complete.
6. Restart your browser to apply the changes.
By clearing your browser cache, you are removing temporary files that may be causing Twitch to buffer. This will help improve your streaming experience and prevent lagging or freezing issues.
Managing Browser Extensions to Prevent Buffering
- Disable unnecessary browser extensions: Remove any extensions that are not essential for your browsing experience to reduce the chances of buffering.
- Check for updates: Keep your browser and extensions up to date to ensure they are optimized for performance and to fix any bugs that may be causing buffering issues.
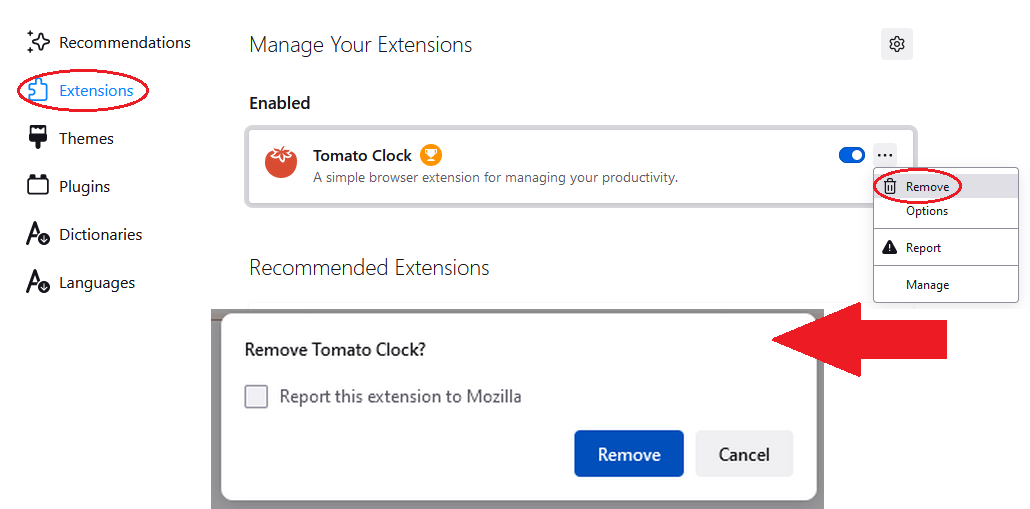
- Monitor resource usage: Use your browser’s task manager or a third-party extension to identify any extensions that are consuming excessive system resources and causing buffering. Disable or remove these extensions.
- Enable hardware acceleration: In your browser’s settings, enable hardware acceleration to offload some of the processing tasks to your computer’s GPU, which can help alleviate buffering issues.
- Clear cache and cookies: Regularly clear your browser’s cache and cookies to free up storage space and remove any corrupted or outdated data that may be impacting streaming performance.
- Disable ad-blockers selectively: While ad-blockers can improve browsing speed, they may also interfere with streaming services. Consider disabling ad-blockers on trusted streaming sites to prevent buffering.
- Manage permission settings: Review the permissions granted to your browser extensions and ensure they only have access to necessary resources. Limiting excessive permissions can help improve overall performance.
- Experiment with different browsers: If one browser consistently experiences buffering issues, try using an alternative browser to see if the problem persists. Some browsers may be better optimized for streaming services.
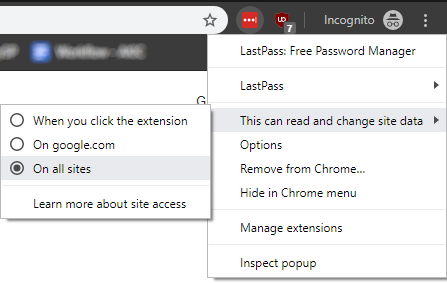
- Consult support forums or contact Twitch support: If you have tried all the above solutions and are still experiencing constant buffering, reach out to the Twitch support team or consult online forums for further guidance.
Optimizing DNS Settings for Twitch Streaming
1. Change DNS settings: Open Network and Internet settings, select your network connection, and click on “Change adapter options.” Right-click on your active network connection and choose “Properties.” Select “Internet Protocol Version 4 (TCP/IPv4)” and click on “Properties.” Choose “Use the following DNS server addresses” and enter the preferred DNS server addresses provided by your ISP or a third-party DNS provider like Google DNS (8.8.8.8 and 8.8.4.4).
2. Flush DNS cache: Open Command Prompt as an administrator and type “ipconfig /flushdns” to clear the DNS cache.
3. Disable IPv6: If your network connection doesn’t support IPv6, disabling it can help improve performance. In the same “Properties” window as step 1, uncheck “Internet Protocol Version 6 (TCP/IPv6).”
4. Restart your PC and router: Sometimes, a simple restart can resolve network issues.
By following these steps, you can optimize your DNS settings and potentially eliminate Twitch buffering problems on Windows 10.
Minimizing Background Applications for Better Streaming
To ensure a smooth streaming experience on Twitch, it’s essential to minimize background applications that may be using up valuable system resources. These applications can cause buffering and lagging issues, resulting in a frustrating viewing experience for both streamers and viewers.
To address this problem, follow these steps:
1. Close any unnecessary applications running in the background. This includes web browsers, messaging apps, and other non-essential programs.
2. Open Task Manager by pressing Ctrl + Shift + Esc, and navigate to the “Processes” tab. Look for any resource-intensive applications and end their processes.
3. Consider disabling any startup programs that are not essential. You can do this by opening the “Startup” tab in Task Manager and disabling any unnecessary applications.
By minimizing background applications, you’ll free up system resources for Twitch and prevent buffering issues. This simple solution can greatly improve your streaming experience on Windows 10.
Ensuring Internet Security by Checking for Malware
To address the issue of Twitch constantly buffering on Windows 10, it’s essential to ensure your internet security by checking for malware. Malicious software can significantly impact your streaming experience and cause buffering issues.
One effective solution is to use a reliable antivirus program, such as Windows Defender or a third-party software like Fortect, to scan your system for any malware. If any threats are detected, follow the recommended procedures to clean your PC from these harmful components.
Additionally, it’s crucial to keep your PC and browser up to date with the latest security patches and updates provided by Microsoft. This helps to protect your system from potential vulnerabilities that can lead to streaming problems.
By taking these steps, you can ensure a secure and uninterrupted Twitch streaming experience on your Windows 10 device.
Troubleshooting Proxy and VPN Interference with Twitch
If you’re experiencing constant buffering while watching Twitch on Windows 10, proxy and VPN interference may be the culprit. Here are some solutions to help troubleshoot the issue:
1. Disable your proxy or VPN: Turn off any proxy or VPN services that you may have enabled, as they can interfere with Twitch’s video streaming network.
2. Check your network settings: Ensure that your network settings are properly configured and not causing any conflicts with Twitch. Reset your network settings if necessary.
3. Optimize your PC system: Update your browser and graphics drivers to their latest versions, as outdated software can cause buffering issues. Additionally, clear your browser cache and cookies to improve performance.
4. Close unnecessary applications: Close any unnecessary applications or browser tabs that may be using up your system’s resources and causing Twitch to buffer.
5. Test on different browsers: If you’re still experiencing buffering, try using a different browser to see if the issue persists. This can help determine if the problem is specific to a certain browser.
By following these troubleshooting steps, you should be able to resolve the buffering issue on Twitch and enjoy lag-free streaming.
Tips for a Buffer-Free Twitch Streaming Experience
| Tips for a Buffer-Free Twitch Streaming Experience |
|---|
| 1. Check your internet connection: Ensure that you have a stable and high-speed internet connection. Buffering issues often occur due to slow or unstable internet connections. |
| 2. Use a wired connection: Whenever possible, connect your PC directly to the router using an Ethernet cable. This helps eliminate potential Wi-Fi interference and provides a more stable internet connection. |
| 3. Close unnecessary applications: Streaming content requires significant bandwidth. Close any unnecessary applications or browser tabs that might be using up your internet resources. |
| 4. Clear browser cache: Clearing your browser cache can help speed up your browsing experience and resolve buffering issues. Go to your browser settings and clear the cache. |
| 5. Disable browser extensions: Some browser extensions can interfere with streaming and cause buffering problems. Disable or remove any unnecessary extensions, especially ad-blockers. |
| 6. Update your browser and plugins: Ensure that you are using the latest version of your browser and any required plugins (such as Adobe Flash Player). Outdated software can sometimes cause streaming issues. |
| 7. Adjust Twitch video quality: Lowering the video quality can help reduce buffering. On the Twitch player, click on the gear icon and select a lower resolution option. |
| 8. Disable hardware acceleration: In some cases, hardware acceleration can cause compatibility issues with certain browsers or graphics cards. Disable hardware acceleration in your browser settings. |
| 9. Update graphics card drivers: Outdated graphics card drivers can lead to performance issues. Visit the manufacturer’s website and download the latest drivers for your graphics card. |
| 10. Use a different browser: If you are experiencing persistent buffering issues, try using a different browser to stream Twitch. Sometimes, certain browsers may perform better than others. |

Mark Ginter is a tech blogger with a passion for all things gadgets and gizmos. A self-proclaimed "geek", Mark has been blogging about technology for over 15 years. His blog, techquack.com, covers a wide range of topics including new product releases, industry news, and tips and tricks for getting the most out of your devices. If you're looking for someone who can keep you up-to-date with all the latest tech news and developments, then be sure to follow him over at Microsoft.