- Nvidia Overlay allows gamers to see refresh rates, take screenshots, and even record their screen.
- The problem of Nvidia overlay not working can be caused by a number of different factors.
- There are several reasons why the Nvidia overlay doesn’t work on Windows.
- Changing a specific setting can easily fix the problem.
- Granting GeForce Experience administrator rights is one of the easiest ways to fix the issue.
- Update your graphics drivers to the latest version, allowing you to enjoy maximum performance from your PC.
Unveiling the Enigma: Resolving the Curious Case of NVIDIA Overlay Dysfunction on Windows
Enable the Nvidia GeForce Overlay
To enable the NVIDIA GeForce Overlay on Windows and troubleshoot any issues with it, follow these steps:
1. Make sure you have the latest NVIDIA drivers installed on your Windows PC. You can update them through the NVIDIA website or GeForce Experience tool.
2. Ensure that you have administrator permissions on your computer. Some features of the overlay may require elevated privileges to function properly.
3. Open the NVIDIA GeForce Experience program and go to the Settings tab.
4. Under the General section, toggle the “Enable Overlay” option to turn on the overlay.
5. If the overlay is still not working, check if any other programs or applications are conflicting with it. Turn off programs like Steam overlay or Spotify, as they may interfere with the NVIDIA overlay.
6. If you are experiencing performance issues with the overlay, try disabling features like ShadowPlay, Instant Replay, or Performance Monitoring. These options can be found in the Overlay section of the NVIDIA GeForce Experience settings.
By following these steps, you should be able to enable and troubleshoot the NVIDIA GeForce Overlay on your Windows PC.
Update the Nvidia Graphics Driver
To update your Nvidia Graphics Driver and troubleshoot the NVIDIA Overlay not working on Windows, follow these steps:
1. Go to the Nvidia website and download the latest driver for your graphics card.
2. Once downloaded, open the driver installer and follow the on-screen prompts to update your driver.
3. After the driver installation is complete, restart your computer.
4. Check if the NVIDIA Overlay is working by pressing Alt+R while in a supported game.
5. If the overlay is still not working, make sure you have the latest version of GeForce Experience installed.
6. Disable any third-party software that may interfere with the NVIDIA Overlay, such as Steam Overlay or Spotify.
7. If you are using ShadowPlay or Instant Replay, make sure they are enabled in the GeForce Experience settings.
8. If the problem persists, try running the game as an administrator or updating your Windows operating system.
9. If none of these steps fix the issue, contact Nvidia support for further assistance.
Remember to always update your Nvidia drivers to ensure optimal performance and compatibility with your system.
Enable the GeForce Experience Experimental Features
To troubleshoot the issue of NVIDIA Overlay not working on Windows, you can enable the GeForce Experience Experimental Features. Follow these steps:
1. Open the GeForce Experience application.
2. Click on the cogwheel icon in the top right corner to open the settings menu.
3. Select the “General” tab.
4. Scroll down to the “Experimental Features” section.
5. Toggle on the “Enable experimental features” option.
6. Click on “Apply” to save the changes.
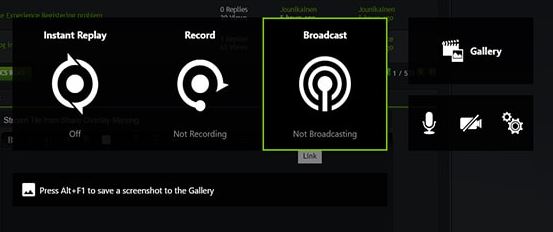
Once you have enabled the experimental features, you can try using the NVIDIA Overlay again. This should resolve any issues you were facing. Remember, you can use the Alt + R hotkey to access the overlay and utilize features such as performance monitoring, capturing screenshots, and recording gameplay with ShadowPlay.
Perform a Clean Boot
Performing a clean boot can help troubleshoot issues with NVIDIA Overlay not working on Windows. Here’s how:
1. Press the Windows key + R to open the Run dialog box.
2. Type “msconfig” and press Enter. This will open the System Configuration window.
3. In the General tab, select “Selective startup” and uncheck the box next to “Load startup items”.
4. Go to the Services tab and check the box next to “Hide all Microsoft services”.
5. Click on “Disable all” to disable all non-Microsoft services.
6. Click on the Startup tab and click on “Open Task Manager”.
7. In the Task Manager window, disable all startup items by right-clicking on each item and selecting “Disable”.
8. Close the Task Manager and go back to the System Configuration window.
9. Click on “Apply” and then click on “OK”.
10. Restart your computer.
Performing a clean boot will help eliminate any conflicting software or services that may be causing issues with NVIDIA Overlay. If the problem persists, you may need to reinstall the NVIDIA drivers or seek further assistance.
Repair the Visual C++ Redistributable Package
To repair the Visual C++ Redistributable Package and troubleshoot NVIDIA Overlay not working on Windows, follow these steps:
1. Open the Control Panel and go to “Programs and Features”.
2. Uninstall all versions of Microsoft Visual C++ Redistributable Package.
3. Download the latest version of Visual C++ Redistributable Package from the Microsoft website.
4. Install the downloaded package and restart your computer.
If the issue persists, try the following steps:
1. Press “Windows + R” to open the Run dialog box.
2. Type “appwiz.cpl” and press Enter to open the Programs and Features window.
3. Look for NVIDIA Graphics Driver in the list and uninstall it.
4. Download the latest NVIDIA Graphics Driver from the official website and install it.
5. Restart your computer and check if the NVIDIA Overlay is now working.
If you are still experiencing problems, make sure you have Administrator permissions and try turning off any other overlays or recording software, such as ShadowPlay. You can disable ShadowPlay by pressing “Alt + R” while in-game.
Update Windows
Troubleshooting NVIDIA Overlay Not Working on Windows
If you’re experiencing issues with the NVIDIA overlay not working on Windows, we have some steps to help you resolve the problem.
First, ensure that you have the latest NVIDIA drivers installed on your system. You can download them from the NVIDIA website or use the GeForce Experience tool to update them automatically.
Next, make sure that the overlay is enabled in the GeForce Experience settings. Open the GeForce Experience app, go to the Settings tab, and toggle on the “In-Game Overlay” option.
If the overlay still doesn’t work, try turning off any third-party antivirus or firewall software temporarily, as they may interfere with the overlay.
Another troubleshooting step is to disable any other overlays or screen recording software, such as Discord overlay or OBS, as they can conflict with the NVIDIA overlay.
Additionally, check if the Alt+R shortcut is set to open the overlay. You can change this shortcut in the GeForce Experience settings under the “Keyboard Shortcuts” section.
If none of these fixes work, consider reinstalling the NVIDIA drivers or performing a clean installation. You can find detailed instructions on how to do this on the NVIDIA support website.
Remember to provide any relevant information, such as screenshots or error messages, when seeking further assistance.
Reinstall GeForce Experience
To resolve the NVIDIA Overlay not working issue on Windows, you can try reinstalling GeForce Experience. Follow these steps:
1. Press the Windows key + R to open the Run dialog box.
2. Type “appwiz.cpl” and press Enter to open the Programs and Features window.
3. Look for “NVIDIA GeForce Experience” in the list of installed programs.
4. Right-click on it and select “Uninstall”.
5. Follow the on-screen instructions to complete the uninstallation process.
6. Once uninstalled, visit the official NVIDIA website and download the latest version of GeForce Experience.
7. Install the downloaded file and follow the installation wizard.
8. After installation, launch GeForce Experience and check if the NVIDIA Overlay is working properly.
Reinstalling GeForce Experience can often resolve issues with the overlay, allowing you to enjoy features like in-game FPS monitoring and ShadowPlay.
Install a Media Feature Pack (for Windows 10 N users)
To install a Media Feature Pack for Windows 10 N users and troubleshoot NVIDIA Overlay not working on Windows, follow these steps:
1. Go to the Microsoft website and search for “Media Feature Pack for Windows 10 N” in the search bar.
2. Click on the official Microsoft download link for the Media Feature Pack.
3. On the download page, select the version of Windows 10 N that matches your system.
4. Click the “Download” button to start downloading the Media Feature Pack.
5. Once the download is complete, locate the downloaded file and double-click on it to run the installer.
6. Follow the on-screen instructions to install the Media Feature Pack on your Windows 10 N system.
7. After the installation is complete, restart your computer.
8. Open the NVIDIA GeForce Experience software and navigate to the Overlay settings.
9. Make sure the “In-Game Overlay” option is enabled.
10. If the overlay is still not working, try disabling any antivirus or firewall software that may be interfering with the overlay.
11. Additionally, ensure that you have the latest NVIDIA graphics drivers installed on your system.
By following these steps, you should be able to install the Media Feature Pack and troubleshoot any issues with the NVIDIA Overlay not working on Windows.
Disable NVFBC Capture on NVIDIA GPU in Steam
To troubleshoot the NVIDIA Overlay not working on Windows, you may need to disable NVFBC Capture on your NVIDIA GPU in Steam. Follow these steps:
1. Open Steam and go to the Library tab.
2. Right-click on the game you want to disable NVFBC Capture for and select Properties.
3. In the Properties window, click on the General tab.
4. Click on the “Set Launch Options” button.
5. In the text box, type “-no_nvfbccapture” (without the quotes) and click OK.
6. Close the Properties window and launch the game.
By disabling NVFBC Capture, you should be able to resolve issues with the NVIDIA Overlay not working properly. This can help fix problems with features like FPS counter, ShadowPlay, Alt+R hotkey, and GeForce ShadowPlay.
If you continue to experience issues, consider updating your NVIDIA drivers and ensuring that your system meets the necessary requirements for the overlay to function correctly.
Run GeForce Experience as an Administrator
To troubleshoot the issue of NVIDIA Overlay not working on Windows, try running GeForce Experience as an administrator. This can help resolve any permission-related conflicts that may be preventing the overlay from functioning properly.
To do this, follow these steps:
1. Right-click on the GeForce Experience shortcut or executable file.
2. Select “Run as administrator” from the context menu.
3. If prompted, click “Yes” to confirm.
4. Launch the game or application where you want to use the overlay.
Running GeForce Experience as an administrator grants it the necessary access and privileges to function correctly, which can often resolve issues with the overlay not working. By following these steps, you should be able to use features such as NVIDIA Performance Overlay, ShadowPlay, Alt+R, and In-Game Overlay without any problems.
Enable in-game Overlay in GeForce Experience
To enable in-game Overlay in GeForce Experience, follow these steps:
1. Open GeForce Experience on your Windows computer.
2. Click on the “Settings” icon located in the top-right corner of the window.
3. In the Settings menu, select the “General” tab.
4. Scroll down to the “In-Game Overlay” section and click on it.
5. Toggle the switch next to “Enable In-Game Overlay” to the ON position.
6. You can customize the overlay by adjusting the various settings available, such as the shortcut keys and the overlay display.
7. Once you’re done customizing, close the Settings menu.
8. Launch your game, and while in-game, press the designated shortcut keys (by default, it’s Alt+R) to open the in-game overlay.
If you’re experiencing any issues with the NVIDIA Overlay not working on Windows, make sure you have the latest drivers installed and try disabling any conflicting software or overlays. Additionally, ensure that the ShadowPlay feature is enabled in GeForce Experience.
Reboot Your System
If you’re experiencing issues with NVIDIA Overlay not working on Windows, here are some troubleshooting steps to help you resolve the problem:
1. Restart your system: Sometimes a simple system reboot can fix the issue. Turn off your computer and then turn it back on after a few seconds.
2. Disable NVIDIA Performance Overlay: Open the NVIDIA GeForce Experience app and go to the Settings tab. Under the General section, toggle off the “Enable in-game overlay” option.
3. Check ShadowPlay settings: In the NVIDIA GeForce Experience app, navigate to the Settings tab and click on the “ShadowPlay” option. Ensure that the “In-game overlay” option is enabled.
4. Use Alt+R shortcut: While in-game, press the Alt+R keys on your keyboard to bring up the overlay. Make sure the shortcut is not conflicting with any other programs or functions.
By following these steps, you should be able to troubleshoot and resolve the NVIDIA Overlay not working issue on your Windows system.
Make Changes in the System Configuration
To troubleshoot NVIDIA Overlay not working on Windows, you can make changes in the system configuration by following these steps:
1. Open the NVIDIA Control Panel by right-clicking on the desktop and selecting “NVIDIA Control Panel” from the context menu.
2. In the left navigation pane, click on “Manage 3D settings.”
3. Under the “Global Settings” tab, scroll down to find the “Preferred graphics processor” option and set it to “High-performance NVIDIA processor.”
4. Next, click on the “Program Settings” tab and select the application or game you are experiencing issues with from the drop-down menu.
5. Set the “Preferred graphics processor” for that specific application to “High-performance NVIDIA processor” as well.
6. Click “Apply” to save the changes.
If the issue persists, you can try updating your NVIDIA graphics driver to the latest version from the NVIDIA website. Additionally, make sure that the GeForce Experience software is up to date.
By following these steps, you should be able to troubleshoot the NVIDIA Overlay not working issue on your Windows system.

Mark Ginter is a tech blogger with a passion for all things gadgets and gizmos. A self-proclaimed "geek", Mark has been blogging about technology for over 15 years. His blog, techquack.com, covers a wide range of topics including new product releases, industry news, and tips and tricks for getting the most out of your devices. If you're looking for someone who can keep you up-to-date with all the latest tech news and developments, then be sure to follow him over at Microsoft.