- Windows 10 guide walks you through how to solve and repair microphone problems using Microsoft Teams.
- Microsoft Teams is a useful system for communicating and interacting with other people.
- If the microphone does not work in Microsoft commands, you have several options to solve the problem in Windows 10 and Microsoft Teams to fix the problem.
- If you’re having trouble using the microphone, you can use the settings available in.
Unveiling the Mystery: Resolving the Enigma of Microsoft Teams Mic Not Recognized
Adjusting microphone settings for Microsoft Teams
1. Check physical connections: Make sure your microphone is securely connected to your PC or laptop. If you’re using a USB microphone, try using a different USB port.
2. Verify microphone access: Click on the Teams app and go to Settings. Under the Permissions tab, ensure that the microphone has permission to access your system.
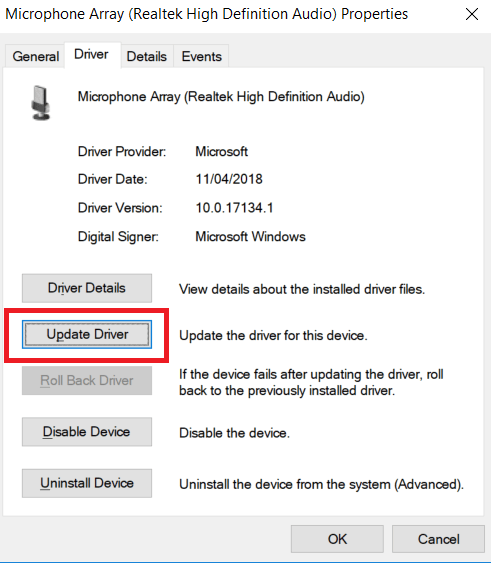
3. Update audio drivers: Outdated audio drivers can cause microphone problems. Search for “Device Manager” in the Windows search box, expand the “Audio inputs and outputs” category, right-click on your microphone device, and select “Update driver.”
4. Test with other apps: Check if your microphone works with other apps or desktop apps. If it doesn’t, the problem may lie with your microphone itself.
5. Mute/unmute settings: During a Teams call, check if you accidentally muted your microphone. Press the microphone mute button on your device or click the microphone icon on the Teams call interface to unmute.
Remember, troubleshooting methods may vary depending on your device and operating system. If you continue to experience issues, seek further assistance from Microsoft support or refer to the official Microsoft Teams documentation.
Allowing microphone access for Microsoft Teams
To allow microphone access for Microsoft Teams, follow these troubleshooting steps:
1. Check your microphone settings: Type “control panel” in the search box and open it. Go to “Sound” and select the “Recording” tab. Make sure your desired microphone is set as the default recording device. Adjust the microphone volume levels if needed.
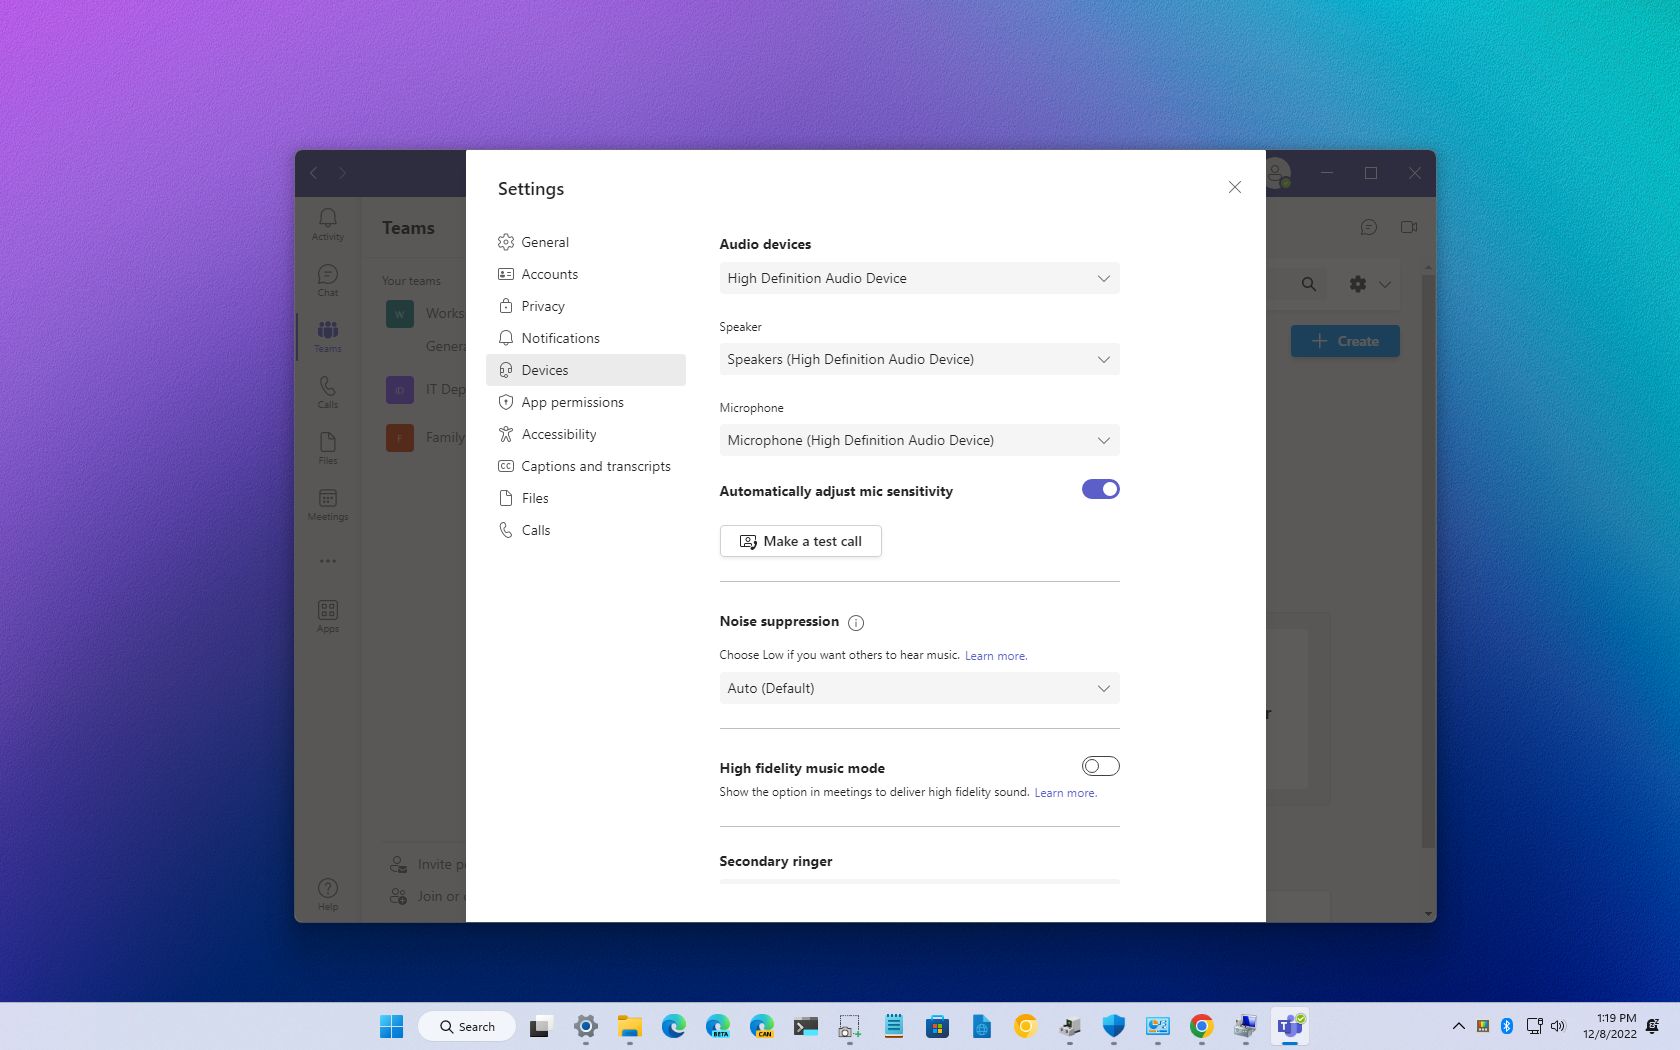
2. Grant microphone permission in Teams: Open the Teams app and click on your profile picture. Go to “Settings” and select “Devices.” Under the “Audio devices” section, ensure that the correct microphone is selected.
3. Update audio drivers: Outdated or incompatible audio drivers can cause microphone issues. Visit the manufacturer’s website or use Windows Update to download and install the latest audio drivers for your PC.
4. Check physical connections: Ensure that your microphone is properly connected to the correct port on your PC. For USB microphones, try a different USB port.
5. Test your microphone: Use the “Test call” feature in Teams to check if your microphone is working properly. If not, try using a different microphone or headset to isolate the issue.
Remember to unmute yourself during conferences by pressing the microphone or mute button. If you continue to experience microphone problems, seek further assistance from Microsoft support or refer to their official troubleshooting documentation.
Disconnecting extra devices for better microphone recognition in Microsoft Teams
Disconnecting extra devices can improve microphone recognition in Microsoft Teams. When there are multiple devices connected to your computer, it can confuse the system and cause the mic to not be recognized. To fix this issue, follow these steps:
1. Start by disconnecting any external microphones or headsets from your computer.
2. Next, unplug any USB microphones or webcams that are not being used for the Teams conference.
3. If you are using a laptop, make sure the built-in microphone is not disabled. You can check this by going to Control Panel > Sound > Recording tab and ensuring that the internal microphone is enabled.
4. If you are using a desktop, make sure the microphone is plugged into the correct audio port. Sometimes, plugging it into the wrong port can cause the mic to not be recognized.
5. Once you have disconnected the extra devices and ensured the correct settings, restart Microsoft Teams and join the conference again.
By following these troubleshooting steps, you should be able to fix microphone recognition issues in Microsoft Teams.
python

import speech_recognition as sr
# Create a recognizer object
recognizer = sr.Recognizer()
# Get a list of available microphones
microphone_list = sr.Microphone.list_microphone_names()
# Print the available microphones
for index, microphone_name in enumerate(microphone_list):
print(f"Microphone {index}: {microphone_name}")
# Prompt the user to select a microphone
selected_microphone = int(input("Select a microphone (enter the corresponding number): "))
# Use the selected microphone as the audio source
with sr.Microphone(device_index=selected_microphone) as source:
print("Say something...")
audio = recognizer.listen(source)
try:
# Recognize speech using Google Speech Recognition
text = recognizer.recognize_google(audio)
print(f"You said: {text}")
except sr.UnknownValueError:
print("Unable to recognize speech")
except sr.RequestError as e:
print(f"Recognition request error: {e}")
Please note that this sample code is a basic demonstration of how you can use the SpeechRecognition library to recognize speech from a selected microphone. It is not specific to Microsoft Teams and may require additional customization and integration to work within the platform.
Configuring privacy settings to fix microphone issues in Microsoft Teams
To configure privacy settings and resolve microphone issues in Microsoft Teams, follow these steps:
1. Open Microsoft Teams on your Windows 11 or Windows 10 computer.
2. Click on your profile picture or initials at the top right corner of the Teams window.
3. Choose “Settings” from the dropdown menu.
4. In the Settings menu, select “Privacy & permissions” from the left-hand sidebar.
5. Under the “Microphone” section, ensure that the toggle switch is turned on.
6. If you’re using a USB microphone, make sure it’s properly connected to your computer.
7. Check if the microphone is selected as the default audio device in Windows settings.
8. If you’re using a headset with a microphone, ensure that it’s properly plugged in.
9. If you’re using a webcam with a built-in microphone, check its settings and make sure it’s enabled.
10. Restart Teams and test your microphone during a call or meeting to see if the issue is resolved.
If you’re still experiencing microphone problems, consider updating your audio driver or checking for any other factors that may be causing the issue. Remember to reach out to the Microsoft Teams support team or comment below for further assistance.
Running troubleshooter for microphone problems in Microsoft Teams
If you’re experiencing microphone problems in Microsoft Teams, there are a few troubleshooting methods you can try:
1. Check your Teams settings. Click on your profile picture in the top-right corner, select “Settings,” and go to the “Devices” tab. Make sure the correct microphone is selected under the “Audio devices” section.
2. Update your audio driver. Visit the manufacturer’s website or use Windows Update to check for any available driver updates for your audio device.
3. Check your microphone hardware. Ensure that it is properly connected to your computer and not muted or disabled.
4. Restart your computer. Sometimes a simple restart can fix microphone recognition issues.
5. Try using a different microphone. If you have access to another microphone, connect it to your computer and see if it works in Teams.
Remember, these troubleshooting methods can help resolve common microphone issues in Microsoft Teams. If none of the fixes work, it’s recommended to seek further assistance from Microsoft support or your IT department.
Updating Microsoft Teams app to resolve microphone recognition issues
Updating Microsoft Teams app can help resolve microphone recognition issues. Here are the steps to troubleshoot the mic not being recognized:
1. Close Microsoft Teams and ensure it is not running in the background.
2. Open the Microsoft Store app on your Windows 11 device.
3. Search for “Microsoft Teams” and click on the app.
4. If an update is available, click on the “Update” button.
5. Once the update is complete, launch Microsoft Teams again.
If the microphone recognition issue persists, try the following:
1. Press the Windows logo key + R to open the Run dialog box.
2. Type “control panel” and press Enter.
3. In the Control Panel window, click on “Sound”.
4. Under the “Recording” tab, ensure that your microphone is set as the default device.
5. If not, right-click on your microphone and select “Set as Default Device”.
These steps should help resolve microphone recognition issues in Microsoft Teams. If you continue to experience problems, please comment below or contact our support team for further assistance.
Image credit: Portia Linao
Reinstalling Microsoft Teams for improved microphone functionality
If you are experiencing microphone issues in Microsoft Teams, reinstalling the application can help improve functionality. Here’s how to do it:
1. Close Microsoft Teams and all other open applications.
2. Press the Windows logo key + R to open the Run dialog box.
3. Type “control panel” and press Enter to open the Control Panel.
4. In the Control Panel, click on “Uninstall a program” under the “Programs” category.
5. Find Microsoft Teams in the list of installed programs and right-click on it.
6. Select “Uninstall” and follow the prompts to complete the uninstallation process.
7. Once uninstalled, restart your computer.
8. Visit the Microsoft Teams website and download the latest version of the application.
9. Run the installer and follow the on-screen instructions to reinstall Microsoft Teams.
10. After the installation is complete, open Microsoft Teams and check if the microphone functionality has improved.
By reinstalling Microsoft Teams, you can troubleshoot mic recognition issues and ensure smoother collaboration during conferences and remote desktop sessions.
Adding a newer driver for better microphone recognition in Microsoft Teams
To add a newer driver for better microphone recognition in Microsoft Teams, follow these steps:
1. Open the Start menu and type “Device Manager” to access the Device Manager settings.
2. Click on “Device Manager” to open the application.
3. Look for the “Audio inputs and outputs” category and expand it.
4. Right-click on your microphone device and select “Update driver.”
5. Choose the option to search automatically for updated driver software.
6. Wait for the system to search and install any available updates for the microphone driver.
7. Once the update is complete, restart your computer.
8. Open Microsoft Teams and go to the Teams settings.
9. Click on “Devices” and make sure your microphone is selected as the input device.
10. Test your microphone in Microsoft Teams to ensure it is now recognized.
By following these steps, you should be able to resolve microphone recognition issues in Microsoft Teams. If you continue to experience problems, consider checking for other factors such as faulty hardware or outdated software.
Using the web version of Microsoft Teams to troubleshoot microphone problems
If you’re experiencing microphone problems in Microsoft Teams, using the web version can help troubleshoot the issue. Here are some steps to follow:
1. Check your audio settings: Click on your profile picture and select “Settings.” Under the “Devices” tab, make sure the correct microphone is selected.
2. Test your microphone: Join a meeting or call and click on the microphone icon. If the microphone isn’t recognized, try the following fixes:
3. Check your browser permissions: Make sure your browser has permission to access your microphone. Click on the lock icon in the address bar and select “Site settings.” Under the “Permissions” section, ensure that the microphone is allowed.
4. Restart the browser: Close and reopen your browser to refresh any settings that might be causing issues.
5. Restart your device: Sometimes a simple restart can fix microphone problems.
Remember to check if your microphone works in other apps or programs to determine if it’s a Microsoft Teams specific issue. If the problem persists, you may need to seek further assistance from Microsoft support or consult online resources for additional troubleshooting steps.
Additional resources for fixing microphone issues in Microsoft Teams
- Open the Microsoft Teams application.
- Click on your profile picture or initials at the top right corner of the screen.
- Select “Settings” from the dropdown menu.
- In the Settings window, click on “Devices” from the left-hand menu.
- Under the “Audio devices” section, ensure that the correct microphone is selected as the “Microphone” device.
- If the correct microphone is not listed, click on the dropdown menu and select the appropriate microphone.
Method 2: Update microphone drivers
- Press the Windows key + X on your keyboard and select “Device Manager” from the menu.
- In the Device Manager window, expand the “Audio inputs and outputs” category.
- Right-click on your microphone device and select “Update driver” from the context menu.
- Choose the option to automatically search for updated driver software.
- Follow the on-screen instructions to complete the driver update process.
Method 3: Check microphone permissions
- Open the Windows Settings by pressing the Windows key + I on your keyboard.
- Click on “Privacy” in the Settings window.
- In the left-hand menu, select “Microphone”.
- Ensure that the toggle switch under “Allow apps to access your microphone” is turned on.
- Scroll down and make sure that the toggle switch under “Microsoft Teams” is also turned on.
Method 4: Restart Microsoft Teams
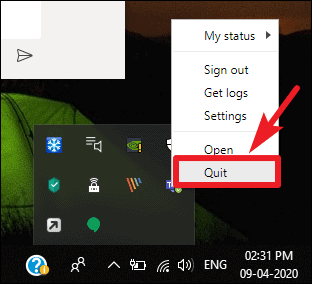
- Close the Microsoft Teams application.
- Right-click on the Microsoft Teams icon in the system tray, usually located in the bottom right corner of the screen.
- Select “Quit” or “Exit” from the context menu.
- Relaunch Microsoft Teams from the Start menu or desktop shortcut.
Method 5: Restart your computer
- Click on the “Start” button in the bottom left corner of the screen.
- Select the power icon and choose “Restart” from the menu.
- Wait for the computer to restart and then open Microsoft Teams again.

Mark Ginter is a tech blogger with a passion for all things gadgets and gizmos. A self-proclaimed "geek", Mark has been blogging about technology for over 15 years. His blog, techquack.com, covers a wide range of topics including new product releases, industry news, and tips and tricks for getting the most out of your devices. If you're looking for someone who can keep you up-to-date with all the latest tech news and developments, then be sure to follow him over at Microsoft.