- VirtualBox is open-source software for virtualizing the architecture of x86 computers.
- It acts as a hypervisor and creates a VM (virtual machine) on which the user can run another OS (operating system) When the VM is running, it can be “suspended” at this point, the system execution will be frozen.
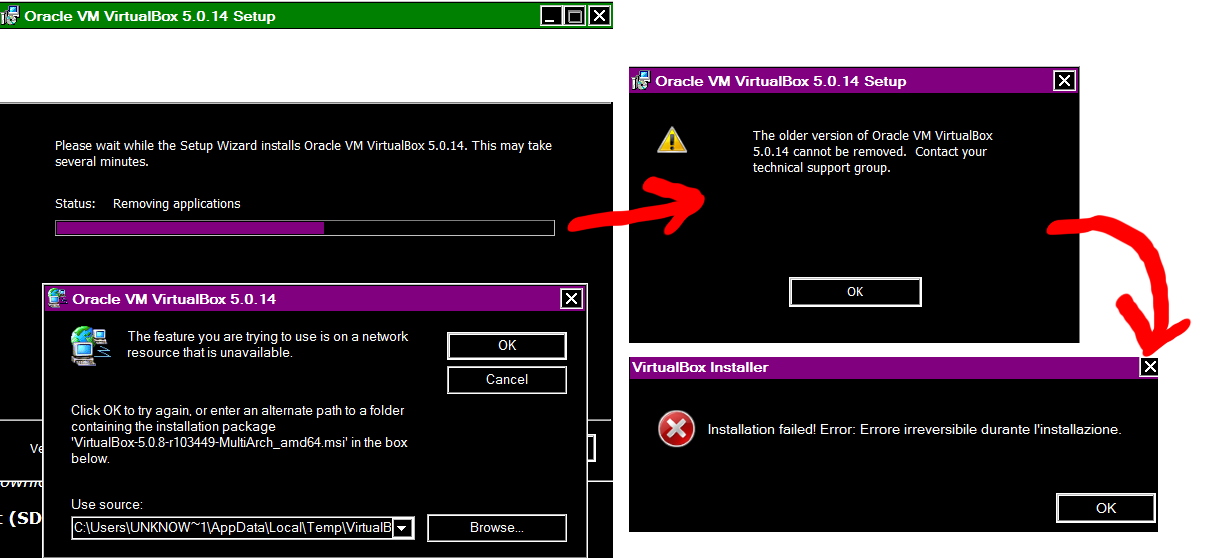
- Several culprits can trigger this problem: VirtualBox not being installed with administrator privileges.
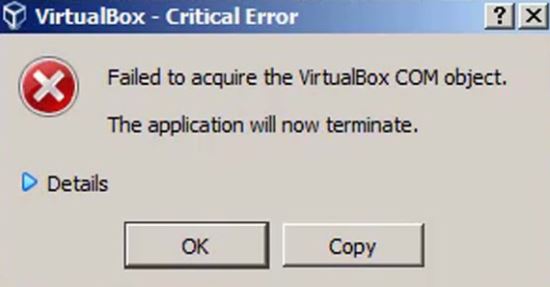
Troubleshooting technological mishaps can be both perplexing and frustrating. One such enigma that plagues VirtualBox users is the dreaded error message “Failed to Acquire a VirtualBox COM Object.” In this article, we delve into the depths of this conundrum, equipping you with effective solutions to tackle this vexing issue head-on. So, bid farewell to your woes as we unravel the secrets behind rectifying this troubling error.
Troubleshooting the ‘Failed to Acquire the VirtualBox COM Object’ Error
If you’re encountering the “Failed to Acquire the VirtualBox COM Object” error, here are a few troubleshooting methods to help you resolve the issue.
First, make sure that the VirtualBox application is completely closed. Then navigate to the VirtualBox configuration folder by following this path: ~/.config/VirtualBox.
Locate the “VirtualBox.xml” file and delete it. This will reset the VirtualBox settings to their default state.
Next, restart your computer and open VirtualBox again. This should recreate the “VirtualBox.xml” file with the necessary configurations.
If the error persists, try running VirtualBox as an administrator. Right-click on the VirtualBox application shortcut and select the “Run as Administrator” option. This can help resolve any permission-related issues.
If none of these methods work, you may need to repair or reinstall the VirtualBox application.
Remember to always back up your virtual machines before attempting any troubleshooting steps.
Methods for Resolving the VirtualBox COM Object Acquisition Issue
- Press Win + R to open the Run dialog box.
- Type services.msc and press Enter.
- Locate the VirtualBox Service and right-click on it.
- Select Restart from the context menu.
- Wait for the service to restart and try launching VirtualBox again.
Method 2: Reinstall VirtualBox
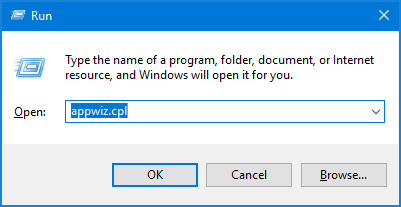
- Press Win + R to open the Run dialog box.
- Type appwiz.cpl and press Enter.
- Find Oracle VM VirtualBox in the list of installed programs.
- Right-click on it and select Uninstall.
- Follow the on-screen instructions to uninstall VirtualBox.
- Download the latest version of VirtualBox from the official website.
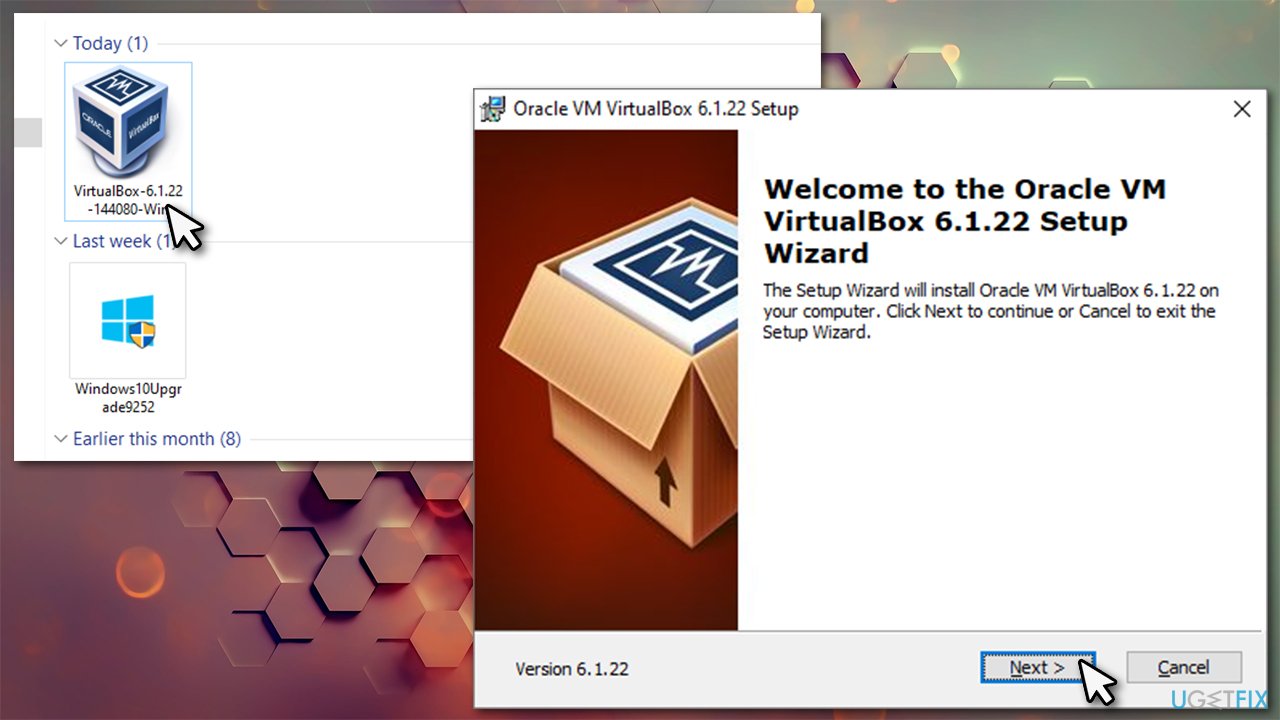
- Install VirtualBox by following the installation wizard.
- Check if the issue is resolved after the reinstallation.
Method 3: Repair VirtualBox Installation
- Press Win + R to open the Run dialog box.
- Type appwiz.cpl and press Enter.
- Find Oracle VM VirtualBox in the list of installed programs.
- Right-click on it and select Repair.
- Follow the on-screen instructions to repair the VirtualBox installation.
- Restart your computer and try launching VirtualBox again.

Method 4: Check VirtualBox Dependencies
- Press Win + R to open the Run dialog box.
- Type appwiz.cpl and press Enter.
- Find Oracle VM VirtualBox in the list of installed programs.
- Right-click on it and select Change.
- Click on Modify and then click on Next.
- Make sure all the required components and dependencies are selected.
- Click on Repair and follow the on-screen instructions.
- Restart your computer and check if the issue is resolved.
Steps to Fix the Error Message: Failed to Acquire a VirtualBox COM Object
1. Check the permissions of the VirtualBox configuration file.
– Navigate to the ~/.config/VirtualBox directory.
– Look for the “VirtualBox.xml” file.
– Ensure that the file has the correct permissions.
2. Repair the VirtualBox installation.
– Open the Control Panel and go to “Programs and Features”.
– Locate VirtualBox in the list of installed software.
– Right-click on VirtualBox and select the “Repair” option.
3. Start the VirtualBox services with admin access.
– Right-click on the VirtualBox application shortcut.
– Choose the “Run as administrator” option.
– Start the VirtualBox System Service and other related services.
Solutions for Resolving the ‘Failed to Acquire the VirtualBox COM Object’ Error
| Error Message | Possible Solutions |
|---|---|
| Failed to Acquire the VirtualBox COM Object |
|

Mark Ginter is a tech blogger with a passion for all things gadgets and gizmos. A self-proclaimed "geek", Mark has been blogging about technology for over 15 years. His blog, techquack.com, covers a wide range of topics including new product releases, industry news, and tips and tricks for getting the most out of your devices. If you're looking for someone who can keep you up-to-date with all the latest tech news and developments, then be sure to follow him over at Microsoft.