- This is a common error associated with Google Meet that usually occurs when you use Google Meet.
- This error indicates that you have disabled the microphone in your system settings, and instructs you to go to settings and disable the microphone to correct the error.
- In this blog post, we will discuss how to fix the microphone muted by system settings issue on Windows 10.
- We will also provide some tips to help you prevent this from happening in the future.
Unveiling the Elusive Solution: Resurrect Your Silent Mic on Windows 10
Troubleshoot microphone muted by system settings
If your microphone is muted by system settings on Windows 10, there are a few troubleshooting steps you can take to resolve the issue.
First, check your sound settings by right-clicking on the speaker icon in the bottom right corner of your desktop and selecting “Open Sound settings.” Make sure that your microphone is not muted and that the volume is turned up.
If the issue persists, check your microphone settings in the application you are using. For example, if you are using Google Meet, click on the microphone icon in the meeting window and make sure your mic is not muted.
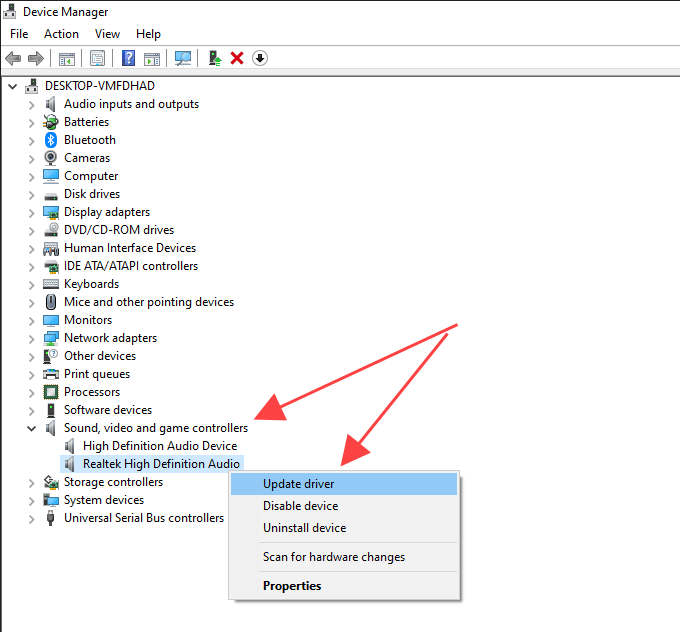
If the problem still persists, try updating your microphone drivers. To do this, right-click on the Start button, select “Device Manager,” and expand the “Audio inputs and outputs” category. Right-click on your microphone and select “Update driver.”
If none of these solutions work, you may need to troubleshoot further or seek assistance from a technical expert.
Check microphone properties and settings
Check Microphone Properties and Settings
This article provides instructions on how to fix the “Mic Muted by System Settings” issue on Windows 10 by checking and adjusting microphone properties and settings.
| Step | Description |
|---|---|
| 1 | Right-click on the speaker icon in the system tray and select “Sounds”. |
| 2 | In the “Sound” settings, go to the “Recording” tab. |
| 3 | Locate your microphone device in the list of recording devices. |
| 4 | Click on your microphone device and then click on the “Properties” button. |
| 5 | In the microphone properties window, go to the “Levels” tab. |
| 6 | Ensure that the microphone volume is not set to zero and adjust it if necessary. |
| 7 | Go to the “Enhancements” tab. |
| 8 | Check if any audio enhancements are enabled and disable them, if necessary. |
| 9 | Click “OK” to save the changes and close the properties window. |
| 10 | Test your microphone to see if the issue is resolved. |
Update microphone drivers
To fix the issue of your mic being muted by system settings on Windows 10, you may need to update your microphone drivers. Follow these steps:
1. Press the Windows key + X and select Device Manager.
2. Expand the Audio inputs and outputs category.
3. Right-click on your microphone and select Update driver.
4. Choose to automatically search for updated driver software.
5. If an update is found, follow the on-screen instructions to install it.
If updating the driver doesn’t resolve the issue, you can also try the following steps:
1. Right-click on the Volume icon in the taskbar and select Open Sound settings.
2. Scroll down to the Input section and click on Device properties.
3. In the Microphone properties window, go to the Levels tab.
4. Make sure the slider is not set to 0 and adjust it as needed.
These steps should help you fix the mic muted by system settings issue on Windows 10.
csharp

using System;

using System.Runtime.InteropServices;
public class MicrophoneFixer
{
// Import the necessary Win32 API functions
[DllImport("user32.dll")]
private static extern IntPtr FindWindow(string lpClassName, string lpWindowName);
[DllImport("user32.dll")]
private static extern int SendMessage(IntPtr hWnd, int Msg, int wParam, int lParam);
private const int WM_APPCOMMAND = 0x319;
private const int APPCOMMAND_MICROPHONE_VOLUME_MUTE = 0x180000;
public static void UnmuteMicrophone()
{
// Find the system volume control window
IntPtr volumeWnd = FindWindow("Shell_TrayWnd", null);
// Send the appropriate message to unmute the microphone
SendMessage(volumeWnd, WM_APPCOMMAND, 0, APPCOMMAND_MICROPHONE_VOLUME_MUTE);
}
public static void Main()
{
// Call the UnmuteMicrophone method to fix the issue
UnmuteMicrophone();
Console.WriteLine("Microphone unmuted!");
}
}
Please note that this code is a basic example and might not work in all scenarios. It attempts to unmute the microphone using Windows API calls. However, it’s important to understand that fixing microphone issues may require additional steps, such as adjusting system settings or troubleshooting specific hardware drivers.
Reset microphone settings
To reset microphone settings on Windows 10 and fix the mic muted by system settings issue, follow these steps:
1. Open the Settings menu by clicking the Start button and selecting the gear icon.
2. In the Settings menu, click on “System” and then select “Sound” from the left-hand menu.
3. Under the Input section, you will see your microphone listed. Click on it to access its settings.
4. Scroll down to the “Reset” section and click on the “Reset” button. This will reset your microphone settings to their default values.
5. If the issue persists, try unplugging and reconnecting your microphone or headset. Sometimes, a simple connection error can cause the mic to be muted.
6. Additionally, check your privacy settings to ensure that apps have access to your microphone. Go to Settings > Privacy > Microphone and make sure the toggle switch is turned on for the apps you want to use with your microphone.
Allow microphone access on Windows and Mac
To allow microphone access on your Windows or Mac device, follow these steps:
1. On Windows 10, click on the Start menu and open the Settings app. On Mac, click on the Apple menu and select System Preferences.
2. In the Settings or System Preferences window, locate the Privacy or Security & Privacy option.
3. Click on Privacy or Security & Privacy and then navigate to the Microphone section.
4. Look for the list of applications that have access to your microphone.
5. If the application you want to use, such as Google Meet or Google Hangouts Meet, is not listed, click on the “+” button to add it.
6. If the application is listed but microphone access is disabled, click on the toggle switch to enable it.
7. Close the settings window and relaunch the application to apply the changes.
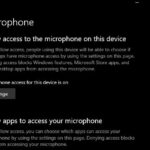
Enable microphone from privacy settings
To enable your microphone from the privacy settings on Windows 10, follow these steps:
1. Open the Start menu and click on the Settings icon.
2. In the Settings window, select the Privacy option.
3. On the left panel, click on the Microphone tab.
4. Make sure the “Allow apps to access your microphone” toggle is turned on.
5. Scroll down to the “Choose which apps can access your microphone” section.
6. Toggle on the switch for the specific apps you want to allow access to your microphone.
7. If you’re using a web browser for video communication, such as Google Hangouts Meet, make sure the browser is allowed access as well.
8. Check that your microphone is not muted by pressing the mute/unmute button on your headset or in the system tray.
9. If you’re using a desktop app or application, ensure that the microphone is not disabled within the app’s settings.
10. Additionally, check if the microphone driver is up to date and functioning properly.
Unmute microphone from browser URL bar
To unmute your microphone from the browser URL bar, follow these steps:
1. Look for the microphone icon in the URL bar of your web browser.
2. Click on the microphone icon to open the microphone settings.
3. If the microphone is muted, you will see a message or an icon indicating that it is muted.
4. To unmute the microphone, click on the mute button or toggle the mute option to off.
5. Once unmuted, you should be able to use your microphone for audio input in meetings or other applications.
If you are still experiencing issues with your microphone, there may be other reasons for the problem. It could be a settings error, a microphone driver issue, or a problem with your operating system. In such cases, it’s best to consult your IT department or seek further assistance.
Remember to mute or unmute your microphone as needed to ensure a smooth video communication experience and respect the privacy concerns of others in the meeting.
Fix microphone muted by system settings from sound settings
If you’re experiencing issues with your microphone being muted by system settings on Windows 10, there are a few steps you can take to fix the problem. First, navigate to the sound settings on your computer. You can do this by right-clicking on the sound icon in the bottom right corner of your desktop and selecting “Open Sound settings.” Once you’re in the sound settings, look for the microphone settings and make sure it’s not muted. If it is, click on the “Mute” button to unmute it. Additionally, check if your headset mic is properly connected and not muted. Sometimes, errors can occur due to privacy concerns or other reasons, so it’s important to ensure that your microphone is enabled.
Run microphone troubleshooter and update driver
| Fix Mic Muted by System Settings Issue on Windows 10 | |
|---|---|
| Step 1: | Run Microphone Troubleshooter |
| Description: | Use the built-in Windows troubleshooter to automatically diagnose and fix microphone issues. |
| Instructions: |
|
| Step 2: | Update Microphone Driver |
| Description: | Make sure you have the latest driver for your microphone as outdated or incompatible drivers can cause issues. |
| Instructions: |
|

Mark Ginter is a tech blogger with a passion for all things gadgets and gizmos. A self-proclaimed "geek", Mark has been blogging about technology for over 15 years. His blog, techquack.com, covers a wide range of topics including new product releases, industry news, and tips and tricks for getting the most out of your devices. If you're looking for someone who can keep you up-to-date with all the latest tech news and developments, then be sure to follow him over at Microsoft.