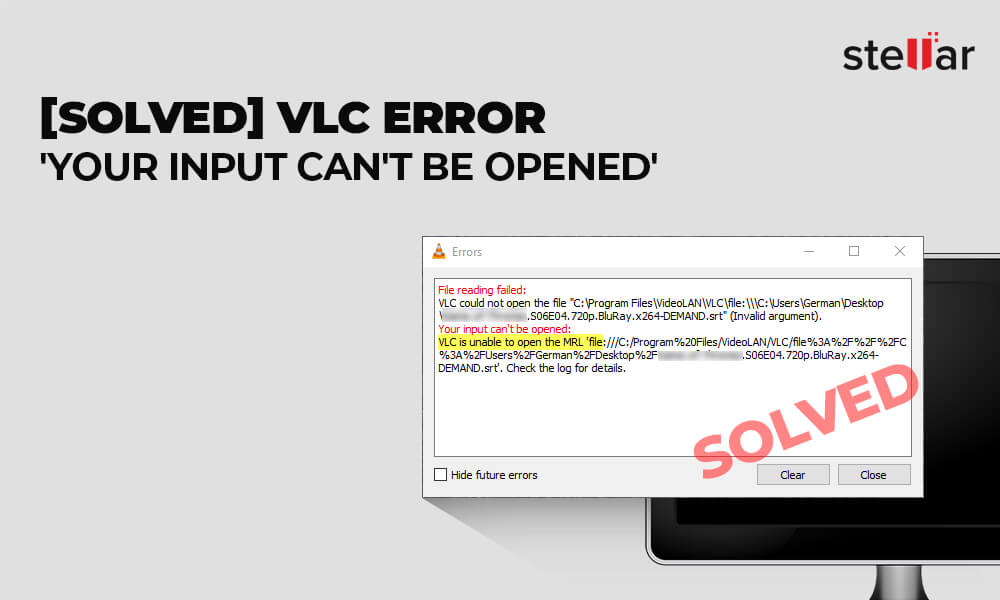
- VLC users seem to be bothered by the “Your input Cannot Open: VLC Cannot Open MRL” error message.
- C is known for its flexibility and compatibility with various formats and protocols.
- If you are currently using an outdated version of the media player, check for updates for VLC updates.
- If the problem occurs with one or more videos from the same source, chances are that video ownership is the problem.
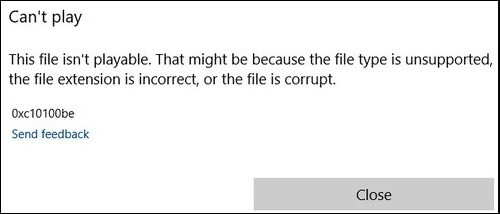
Welcome to a troubleshooting guide on resolving the frustrating VLC error message: “Your Input Can’t Be Opened.” In this article, we will explore the possible causes behind this error and provide you with simple yet effective solutions to get your favorite media player up and running smoothly again.
Causes of the “Your input can’t be opened” VLC error
To fix this error, first, ensure that the input file you’re trying to open is supported by VLC. If not, consider converting the file to a compatible format using third-party software.
If the file is not corrupted, try updating VLC to the latest version, as newer versions often include bug fixes and improved compatibility.
Additionally, check your VLC preferences to ensure that the correct settings are enabled for playing various file types.
Sometimes, antivirus software or firewall settings can interfere with VLC’s ability to open files. Temporarily disabling these software or adding VLC as an exception may resolve the issue.
If the error occurs specifically with network streams or URLs, ensure that your internet connection is stable and the URL is valid.
Methods to fix the VLC error
- Check file compatibility: Ensure that the file format is supported by VLC.
- Update VLC: Install the latest version of VLC to benefit from bug fixes and improved compatibility.
- Restart the computer: Sometimes a simple restart can resolve temporary issues.
- Repair or reinstall VLC: Use the repair or reinstall options to fix any corrupted files or configurations.
- Disable firewall or antivirus: Temporarily disable these security measures to see if they are causing the error.
- Modify file permissions: Ensure that you have the necessary permissions to access the file.
- Convert the file: If the error persists, try converting the file to a different format and then try playing it in VLC.
- Try an alternative media player: If all else fails, consider using a different media player to play the problematic file.
Update VLC Media Player
To update VLC Media Player and fix the error “Your Input Can’t Be Opened,” follow these steps:
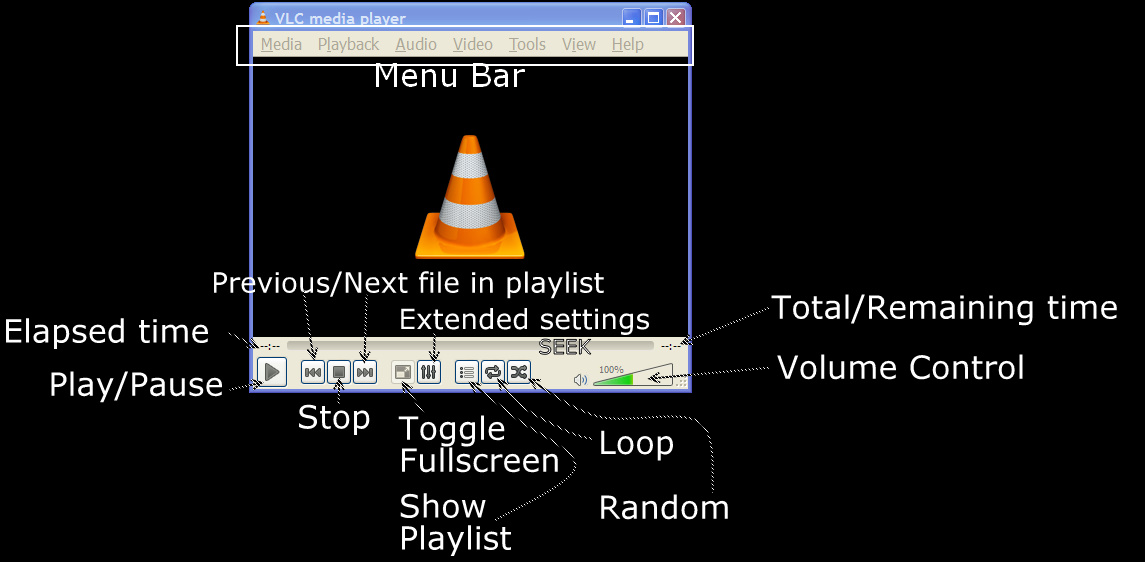
1. Open VLC Media Player on your Windows device.
2. Click on the “Help” tab in the menu bar, then select “Check for Updates.”
3. VLC will automatically check for the latest updates. If updates are available, click “Yes” to install them.
4. Once the updates are installed, restart VLC Media Player.
5. If the error persists, try opening VLC in Safe Mode. To do this, hold down the “Ctrl” key while launching VLC.
6. If the error still occurs, it could be due to conflicting antivirus software or a corrupt playlist folder. Disable your antivirus temporarily and delete any corrupt playlist folders.
7. If none of the above solutions work, uninstall VLC Media Player and reinstall it from the official website.
Reset VLC Preferences
Resetting VLC preferences can help resolve the “Your Input Can’t Be Opened” error message. Follow these steps to reset VLC preferences:
1. Close VLC player if it’s open.
2. Press the Windows key on your keyboard and type “%APPDATA%\vlc” in the search bar. Hit Enter.
3. In the folder that opens, locate the “vlcrc” file. Right-click on it and select “Rename.”
4. Change the file name to “vlcrc.bak” and press Enter.
5. Restart VLC player.
By resetting the preferences, VLC will create a new “vlcrc” file with default settings. This should resolve any issues related to the error message.
If the error persists, you may also try updating VLC to the latest version or reinstalling the software.
Change owner of the file not playing in VLC Player
To change the owner of a file that is not playing in VLC Player, follow these steps:
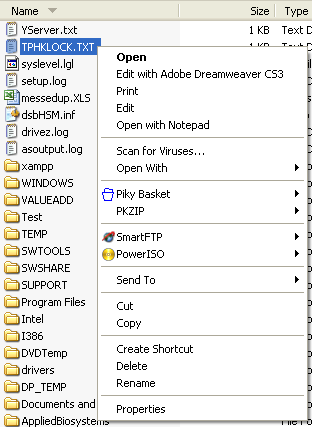
1. Right-click on the file that you are unable to play in VLC Player.
2. Select “Properties” from the drop-down menu.
3. In the Properties window, go to the “Security” tab.
4. Click on the “Advanced” button.
5. Next to the owner’s name, click on the “Change” link.
6. In the “Select User or Group” window, enter the new owner’s name or click on “Advanced” to search for a user.
7. Click on “Check Names” to validate the username.
8. Once the new owner is selected, click on “OK” to save the changes.
9. Back in the Properties window, check the box next to “Replace owner on subcontainers and objects”.
10. Click on “Apply” and then “OK” to apply the changes.
Now you should be able to play the file in VLC Player without any issues.
Turn off Windows protection apps
To turn off Windows protection apps that may be interfering with VLC, follow these steps:
1. Open Windows Security by clicking the Start button and selecting “Settings.” Then, click on “Update & Security” and choose “Windows Security” from the left-hand menu.
2. In the Windows Security window, click on “Virus & threat protection” from the left-hand menu.
3. Under the Virus & threat protection settings, click on “Manage settings.”
4. Scroll down to the “Tamper Protection” section and toggle the switch to turn it off.
5. Close the Windows Security window and restart your computer.
Once you have turned off the Windows protection apps, try playing the video again in VLC. If the error “Your input can’t be opened” persists, you may need to troubleshoot VLC further or try alternative video players.
Replace YouTube .lua script file
To replace the YouTube .lua script file in order to fix the “VLC Error Your Input Can’t Be Opened,” follow these steps:
1. Open VLC Media Player.
2. Go to the “Tools” menu and select “Preferences.”
3. In the preferences window, click on the “Show settings” option at the bottom left.
4. Expand the “Lua” category and select “Lua extensions.”
5. Locate the YouTube .lua script file that you want to replace.
6. Remove the existing script by right-clicking on it and selecting “Remove.”
7. Download the updated YouTube .lua script file from a reliable source.
8. Click on the “Add” button in the preferences window and select the downloaded .lua script file.
9. Click “Save” to apply the changes.
10. Restart VLC Media Player.
By replacing the YouTube .lua script file, you should be able to resolve the VLC error and play YouTube videos without any issues.
Reinstall VLC Player
To reinstall VLC Player and fix the error message “Your Input Can’t Be Opened,” follow these steps:
1. Go to the official VLC website and download the latest version of VLC Player for your operating system, such as Windows 10 or Windows 11.
2. Once the download is complete, locate the installer file and double-click on it to start the installation process.
3. Follow the on-screen instructions to install VLC Player on your computer. Make sure to select the appropriate options and agree to the terms and conditions.
4. After the installation is complete, launch VLC Player.
5. Click on the “Media” tab in the top menu and select “Open File” or press Ctrl + O.
6. Browse to the location of the file you want to play and select it. If you are trying to open a DVD, select the DVD drive.
7. If you are still encountering the “Your Input Can’t Be Opened” error, try opening a different file or playing a different video to see if the issue persists.
By reinstalling VLC Player, you can resolve the error and enjoy your videos without any worries.
Get a VLC Player alternative
Looking for a VLC Player alternative to fix the “Your Input Can’t Be Opened” error? Here are a few options you can try:
1. Windows Media Player: It’s a built-in media player on Windows systems that supports a wide range of file formats. Simply open the file with Windows Media Player and see if it plays without any issues.
2. PotPlayer: This powerful media player offers a user-friendly interface and supports various file formats. Download and install PotPlayer from their official website, then open your file using the player.
3. KMPlayer: Another popular VLC alternative, KMPlayer, provides a range of features and supports numerous file formats. Download and install KMPlayer, then open your file to see if it plays correctly.
Remember, each player may have its own unique features and advantages, so try different alternatives to find the one that suits your needs best.
Use a video repair software
To start, download and install MiniTool MovieMaker on your Windows 11 computer. Launch the application and follow these steps:
1. Click on the “Import Media Files” button at the top left corner of the interface.
2. Navigate to the location of the video file that you’re having trouble opening and select it.
3. Once the video is imported into MiniTool MovieMaker, drag and drop it onto the timeline.
4. Now, click on the “Export” button and choose your desired output format and settings.
5. Specify the destination folder where you want to save the repaired video and click on “Export” to start the repair process.
After the repair is complete, you can open the fixed video using VLC or any other video player without encountering the “Your Input Can’t Be Opened” error.
Change the File/Folder Path
To change the file/folder path in VLC and fix the error “Your Input Can’t Be Opened,” follow these steps:
1. Open VLC and go to the “Media” tab.
2. Select “Open File” or press Ctrl + O.
3. In the “Open” window, navigate to the location of the file or folder you want to open.
4. Click on the file or folder, and then click “Open.”
5. If the error persists, try changing the file type by selecting “Open Network Stream” under the “Media” tab.
6. Enter the correct URL or file path in the provided field, and click “Play.”
7. If you’re experiencing issues with a playlist folder, go to the “Media” tab and select “Open Playlist.”
8. Navigate to the location of the playlist folder and select it.
9. VLC will now play the videos or files within the playlist.
Change Folder or File Name
If you’re experiencing the VLC Error “Your Input Can’t Be Opened,” you may need to change the folder or file name. Follow these steps to resolve the issue:
1. Open VLC and navigate to the folder or file causing the error.
2. Right-click on the folder or file and select “Rename” from the dropdown menu.
3. Enter a new name for the folder or file, ensuring it does not contain any special characters or symbols.
4. Press Enter to save the new name.
By changing the folder or file name, you can eliminate any potential issues with VLC recognizing the input. This simple solution should help you fix the “Your Input Can’t Be Opened” error and allow you to play your videos without any worries.
Modify the Youtube.luac VLC File to Fix Issues With YouTube Video Streaming
To fix the VLC error “Your Input Can’t Be Opened” when streaming YouTube videos, you can modify the Youtube.luac VLC file. Here’s how:
1. Open the VLC installation directory on your computer.
2. Locate the Youtube.luac file in the lua folder.
3. Right-click on the file and select “Edit” to open it in a text editor.
4. Look for the function named “vlc.stream” in the file.
5. Wrap tags around the line of code that contains “if (input:is_network_stream()) then”.
6. Save the file and close the text editor.
7. Launch VLC and try playing the YouTube video again.
By modifying the Youtube.luac file, you can resolve issues with YouTube video streaming in VLC. Follow these steps to fix the “Your Input Can’t Be Opened” error and enjoy uninterrupted YouTube video playback.
Invalid File Name and Long File Path Triggers This Error
When encountering the VLC Error “Your Input Can’t Be Opened,” it may be due to an invalid file name or a long file path. These issues can prevent VLC, a popular video player, from playing your desired content.
To fix this error, follow these steps:
1. Rename the file: Ensure that the file name does not contain any special characters or symbols. Stick to alphanumeric characters and underscores.
2. Shorten the file path: Move the file to a location with a shorter file path. Avoid deeply nested folders or excessively long folder names.
3. Use the Open Network Stream feature: If you are trying to play a video from a network source, select “Open Network Stream” from the VLC menu and enter the correct MRL (Media Resource Locator) for the video.
By addressing these issues, you can resolve the VLC Error “Your Input Can’t Be Opened” and enjoy your videos without any interruptions.
9 Solutions to Fix VLC “Your input can’t be opened”
- Open VLC Media Player.
- Click on the “Tools” menu at the top of the player.
- Select “Preferences” from the dropdown menu.
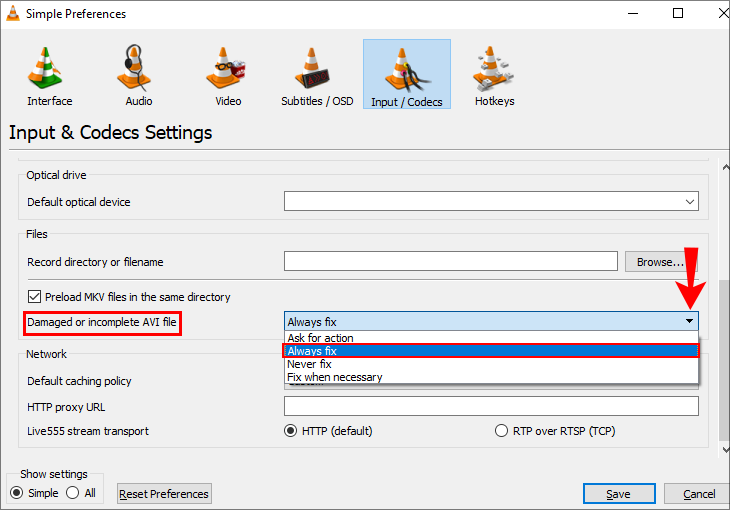
- In the Preferences window, click on the “Input & Codecs” tab.
- Scroll down to the “Files” section.
- Click on the “Clear” button next to “Input/Codecs” cache.
- Click on the “Save” button to apply the changes.
- Close VLC Media Player and reopen it to check if the error is resolved.
Repair Method 2: Updating VLC Media Player
- Open VLC Media Player.
- Click on the “Help” menu at the top of the player.
- Select “Check for Updates” from the dropdown menu.
- If an update is available, follow the prompts to download and install it.
- Once the update is complete, close VLC Media Player and reopen it to see if the error persists.
Repair Method 3: Changing File Associations
- Right-click on the media file that is giving the error.
- Select “Open With” from the dropdown menu.
- Choose “VLC Media Player” from the list of programs.
- Check the box that says “Always use this app to open .[file extension] files” (replace [file extension] with the actual file extension).
- Click “OK” to save the changes.
- Try opening the media file again in VLC Media Player to see if the error is resolved.
Repair Method 4: Disabling Firewall and Antivirus
- Open the settings or control panel of your antivirus software.
- Disable the firewall or antivirus temporarily.
- Try playing the media file again in VLC Media Player to check if the error is fixed.
- If the error is resolved, consider adding VLC Media Player to the exceptions list of your firewall or antivirus software.
- Enable the firewall or antivirus again to ensure the security of your system.
Repair Method 5: Reinstalling VLC Media Player
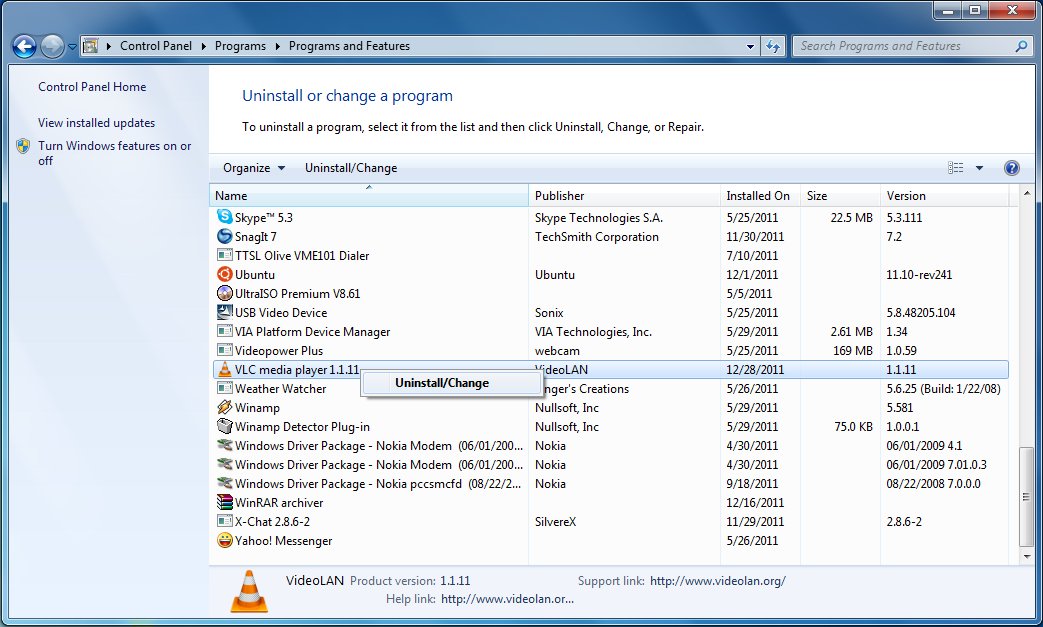
- Open the Control Panel on your computer.
- Select “Uninstall a program” or “Programs and Features” option.
- Find VLC Media Player in the list of installed programs.
- Right-click on VLC Media Player and choose “Uninstall” or “Remove” option.
- Follow the prompts to uninstall VLC Media Player.
- Once uninstalled, visit the official VLC website and download the latest version of VLC Media Player.
- Install the downloaded VLC Media Player and check if the error is resolved.
Repair Method 6: Checking File Integrity
- Right-click on the media file that is giving the error.
- Select “Properties” from the dropdown menu.
- Go to the “Details” tab.
- Check if the file size and duration are reasonable for the type of media.
- If the file size or duration seems unusual, the file may be corrupted or incomplete.
- Try downloading or obtaining a different copy of the media file to see if the error persists.
Repair Method 7: Running VLC Media Player as Administrator
- Right-click on the VLC Media Player shortcut or executable file.
- Select “Run as administrator” from the context menu.
- If prompted, confirm the action by clicking “Yes” or entering the administrator password.
- Try playing the media file again in VLC Media Player to check if the error is resolved.

Repair Method 8: Installing Codec Packs
- Search for reliable codec packs online (e.g., K-Lite Codec Pack, Combined Community Codec Pack).
- Download the preferred codec pack from a trusted source.
- Run the installer for the codec pack and follow the on-screen instructions.
- Once the installation is complete, restart VLC Media Player and try opening the media file again.
Repair Method 9: Seeking Professional Help
- If none of the above methods work, it may be beneficial to seek assistance from a professional or knowledgeable individual.
- Consult forums, online communities, or VLC support channels to find expert advice on resolving the specific error.
- Provide detailed information about the error, including any error codes or messages, to receive accurate guidance.
Save the youtube.lau File in the VLC Playlist Folder
To fix the VLC error “Your Input Can’t Be Opened,” follow these steps:
1. Locate the youtube.lau file.
2. Save the youtube.lau file in the VLC Playlist folder.
3. Open VLC Media Player.
4. Click on “Media” in the top menu bar.
5. Select “Open File” from the dropdown menu.
6. Navigate to the VLC Playlist folder.
7. Select the youtube.lau file and click “Open.”
8. VLC will now be able to play YouTube videos without the error.
By saving the youtube.lau file in the VLC Playlist folder, you ensure that VLC can access the necessary information to play YouTube videos. This simple fix resolves the “Your Input Can’t Be Opened” error and allows you to enjoy your favorite videos hassle-free.
Turn off Windows Defender Firewall
To turn off Windows Defender Firewall, follow these steps:
1. Press the Windows key + R to open the Run dialog box.
2. Type “control panel” and press Enter to open the Control Panel.
3. In the Control Panel, click on “System and Security.”
4. Click on “Windows Defender Firewall.”
5. On the left side of the window, click on “Turn Windows Defender Firewall on or off.”
6. Select the option to “Turn off Windows Defender Firewall” for both private and public networks.
7. Click “OK” to save the changes.
By turning off Windows Defender Firewall, you may be able to fix the VLC error “Your input can’t be opened.” Remember to turn the firewall back on after troubleshooting the issue to ensure your computer’s security.
Disable Antivirus Software
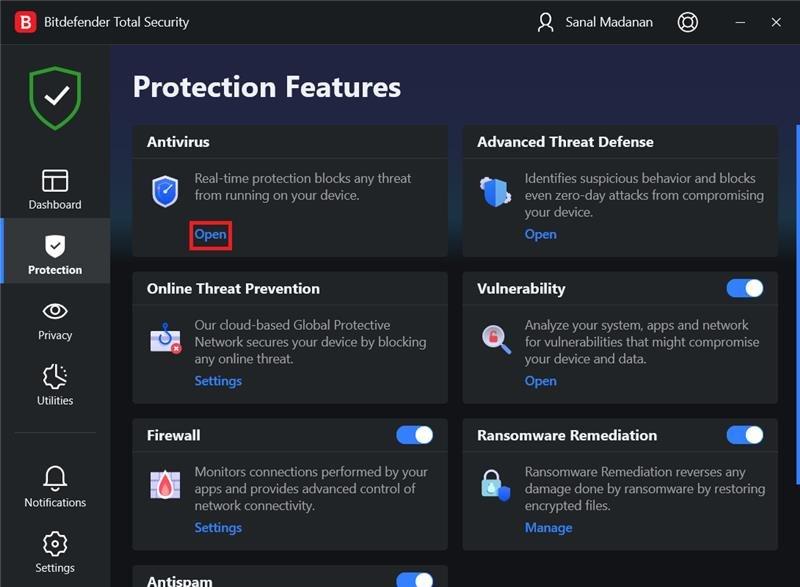
To disable antivirus software that may be causing issues with VLC, follow these steps:
1. Open your antivirus software. Look for its icon in the system tray or search for it in your Start menu.
2. Locate the settings or preferences menu within the antivirus software. This may be labeled as “Options” or “Settings.”
3. In the settings menu, search for an option related to real-time protection or scanning. This is where you can temporarily disable the antivirus software.
4. Once you’ve found the option, toggle the switch to disable real-time protection or scanning. This will prevent the antivirus software from interfering with VLC.
5. After disabling the antivirus software, reopen VLC and try playing the video again. If the “Your Input Can’t Be Opened” error persists, continue troubleshooting using other methods.
Remember to re-enable your antivirus software once you’re done troubleshooting VLC to ensure your computer remains protected.
Check for VLC Updates
To check for VLC updates and resolve the “Your Input Can’t Be Opened” error, follow these steps:
1. Open VLC on your computer.
2. In the menu bar, click on “Help” and select “Check for Updates”.
3. VLC will automatically check for any available updates.
4. If there are updates available, follow the prompts to download and install them.
5. After the update is complete, restart VLC.
6. Try playing your video or file again to see if the error is resolved.
Remember to regularly check for updates to ensure you have the latest version of VLC, as updates often include bug fixes and improvements. Keeping your media player up to date can help prevent errors like this from occurring in the future.
Change the File Ownership
To change the file ownership and fix the VLC error “Your Input Can’t Be Opened,” follow these steps:
1. Right-click on the file you want to change ownership for and select “Properties.”
2. Go to the “Security” tab and click on “Advanced.”
3. Click on the “Owner” tab and then click on “Edit.”
4. Select the user or group you want to assign ownership to and click “OK.”
5. Check the box that says “Replace owner on subcontainers and objects” and click “Apply.”
6. Click “OK” to confirm the changes.
Use Another Video Player
If you’re experiencing the VLC error “Your Input Can’t Be Opened,” there are a few alternative video players you can try. These players may be able to handle your file and allow you to play the video without any issues.
One option is to use the Windows Media Player. To do this, follow these steps:
1. Right-click on the video file and select “Open with.”
2. Choose “Windows Media Player” from the list of available options.
3. The video should now play in Windows Media Player.
Another option is to use the Media Player Classic (MPC). Here’s how you can use MPC to fix the VLC error:
1. Download and install Media Player Classic from their official website.
2. Open MPC and go to “File” > “Open File.”
3. Navigate to the location of your video file and select it.
4. The video should now play in Media Player Classic.
These alternative video players can often handle files that VLC is unable to open. Give them a try and see if they resolve the issue for you.
Download Videos from YouTube
To download videos from YouTube, follow these steps:
1. Open VLC Media Player.
2. Click on “Media” in the top menu and select “Open Network Stream.”
3. Copy the URL of the YouTube video you want to download.
4. Paste the URL into the “Please enter a network URL” box and click on “Play.”
5. Wait for VLC to start playing the video.
6. Once the video starts playing, go to “Tools” in the top menu and select “Codec Information.”
7. In the “Location” box, you will find the MRL (Media Resource Locator) of the video.
8. Copy the MRL and open a web browser.
9. Visit the website “MiniTool” and search for “Download YouTube Videos.”
10. Paste the MRL into the provided box and click on the “Download” button.
11. Choose the desired video format and quality, then click on “Download” again.
12. Wait for the video to download to your computer.
By following these steps, you can easily download videos from YouTube using VLC Media Player.

Mark Ginter is a tech blogger with a passion for all things gadgets and gizmos. A self-proclaimed "geek", Mark has been blogging about technology for over 15 years. His blog, techquack.com, covers a wide range of topics including new product releases, industry news, and tips and tricks for getting the most out of your devices. If you're looking for someone who can keep you up-to-date with all the latest tech news and developments, then be sure to follow him over at Microsoft.