- A partition is a section of a hard disk drive where you can store files.
- It looks like a separate disk drive, but it actually shares space with the main disk drive.
- Partitions are useful because they make it easy to divide up your computer’s storage space.
- Each partition requires its own operating system, so you’ll need to install different versions of those operating systems on each partition.
- There are three common causes of the problem that might cause your computer to stop finding partitions.
Introducing the Article: Troubleshooting the Enigmatic “Fix We Couldn’t Create a New Partition or Locate” Error
Using diskpart to fix the new partition error
To fix the “We Couldn’t Create a New Partition or Locate Error” when setting up Windows 10, you can use the diskpart tool in Command Prompt. Follow these steps:
1. Open Command Prompt as an administrator.
2. Type “diskpart” and press Enter.
3. Type “list disk” and press Enter to see a list of available disks.
4. Identify the disk number of the hard drive you want to partition.
5. Type “select disk [disk number]” and press Enter, replacing [disk number] with the actual number.
6. Type “clean” and press Enter to remove any existing partitions on the disk.
7. Type “create partition primary” and press Enter to create a new primary partition.
8. Type “format fs=ntfs quick” and press Enter to format the partition.
9. Type “assign letter=[drive letter]” and press Enter, replacing [drive letter] with the desired letter for the new partition.
Once you’ve completed these steps, you can continue with the Windows installation process without encountering the partition error.
Making your partition active to resolve the error
To resolve the “We Couldn’t Create a New Partition or Locate Error” on Windows 10, you can make your partition active. Follow these steps:
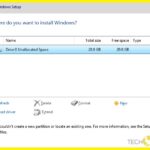
1. Open the Disk Management tool.
2. Locate the hard drive where you want to create the new partition.
3. Right-click on the partition and select “Mark Partition as Active”.
4. Confirm the action and close the Disk Management tool.
5. Restart your computer and try running the setup process again.
By making your partition active, you can overcome the error and proceed with the installation. If you encounter any issues or need further assistance, refer to the Windows 10 installation guide or seek support from Microsoft’s technical team.
Using third-party tools to fix the new partition error for Windows 10 USB
If you encounter the “We Couldn’t Create a New Partition or Locate Error” when trying to install Windows 10 from a USB, you can use third-party tools to fix this issue. Here’s how:
1. Download a third-party partitioning tool such as EaseUS Partition Master or MiniTool Partition Wizard.
2. Launch the tool and select your USB drive from the list of available storage devices.
3. Delete any existing partitions on the USB drive to start fresh.
4. Create a new primary partition on the USB drive. Set the file system to NTFS and make sure to allocate enough space.
5. Apply the changes and wait for the partitioning tool to complete the process.
6. Once the new partition is created, you can try installing Windows 10 from the USB again. The error should no longer occur.
By using third-party partitioning tools, you can easily fix the “We Couldn’t Create a New Partition or Locate Error” and proceed with your Windows 10 installation.
Setting your hard drive as the first boot device to resolve the error
To resolve the “We Couldn’t Create a New Partition or Locate Error,” you can try setting your hard drive as the first boot device. This can help with the installation process and allow you to create a new partition.
To do this, follow these steps:
1. Start by restarting your computer and accessing the BIOS settings. This can usually be done by pressing a key like F2 or Delete during the startup process.
2. Once in the BIOS settings, navigate to the “Boot” or “Boot order” section. This may vary depending on your BIOS version.
3. Look for the option to change the boot order or boot priority. Set your hard drive as the first boot device by selecting it and moving it to the top of the list.
4. Save your changes and exit the BIOS settings. Your computer will now prioritize booting from the hard drive.
By setting your hard drive as the first boot device, you may be able to resolve the error and proceed with the installation process.
Converting the partition to the GPT format to fix the new partition error
To fix the “We Couldn’t Create a New Partition or Locate Error,” you can convert the partition to the GPT format. Follow these steps:
1. Press the Windows key and X on your keyboard, then select “Disk Management” from the menu.
2. Right-click on the disk that is giving you the error and select “Convert to GPT Disk.”
3. Confirm the conversion by clicking “OK.”
4. Restart your computer to apply the changes.
Note: Converting the partition to GPT format may cause data loss, so it’s important to back up your files beforehand. Additionally, this solution may not work for all cases, so it’s recommended to seek further assistance if the error persists.
Disconnecting all other external and internal storage devices to resolve the error
To resolve the “We Couldn’t Create a New Partition or Locate Error,” try disconnecting all other external and internal storage devices. This can help ensure a smooth setup process and prevent any conflicts that may be causing the error.
To do this, follow these steps:
1. Unplug any USB drives, external hard drives, or SD cards connected to your computer.
2. Disconnect any additional internal hard drives or SSDs.
3. Restart your computer to apply the changes.
Once you have disconnected all storage devices, try creating a new partition or locating the error again. This should help resolve the issue and allow you to proceed with the setup process without any problems.
If you continue to experience difficulties, please refer to the guide provided by Microsoft or reach out to their support team for further assistance.
Using “diskpart” to create a new partition and fix the installation error
To fix the “We Couldn’t Create a New Partition or Locate Error” during installation, you can use the “diskpart” command in Windows. Here’s how:
1. Insert your installation DVD or USB drive and boot from it.
2. When the installation screen appears, press Shift + F10 to open the command prompt.
3. Type diskpart and press Enter to launch the DiskPart utility.
4. Enter list disk to view all available disks.
5. Identify the disk you want to create a new partition on by its size.
6. Type select disk [disk number] (replace [disk number] with the appropriate number) and press Enter.
7. Enter clean to remove all partitions on the selected disk.
8. Type create partition primary to create a new primary partition.
9. Type format fs=ntfs quick to format the partition as NTFS.
10. Finally, enter exit to close the DiskPart utility and continue with the installation.
By following these steps, you should be able to resolve the “We Couldn’t Create a New Partition or Locate Error” during installation and proceed with the installation process.

Mark Ginter is a tech blogger with a passion for all things gadgets and gizmos. A self-proclaimed "geek", Mark has been blogging about technology for over 15 years. His blog, techquack.com, covers a wide range of topics including new product releases, industry news, and tips and tricks for getting the most out of your devices. If you're looking for someone who can keep you up-to-date with all the latest tech news and developments, then be sure to follow him over at Microsoft.