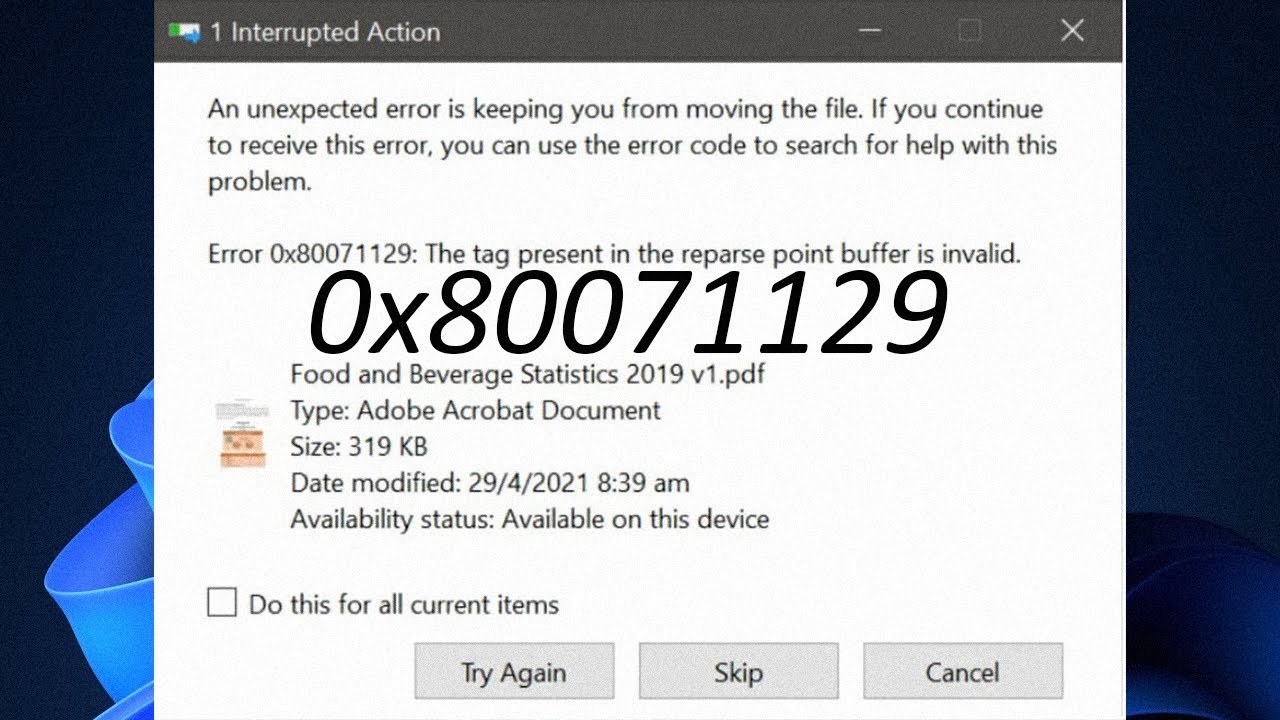
- Error code 0x80071129 is one of those errors that you don’t want to see.
- This error usually occurs due to corruption in the registry.
- Microsoft issued three security patches on Friday, Feb. 21, 2020, aimed at fixing vulnerabilities in Windows 10, Office 365, and Microsoft Edge.
- If you’re having trouble installing the Anniversary Update, try uninstalling previous versions of Windows 10.
- You can also download the latest version of Windows from Microsoft directly.
Unlock the secrets to resolving the notorious 0x80071129 OneDrive Error with ease
Understanding OneDrive Error 0x80071129
To fix the OneDrive Error 0x80071129, follow these steps:
1. Press the Windows key + R to open the Run dialog box.
2. Type “cmd” and press Enter to open the Command Prompt.
3. In the Command Prompt, type “chkdsk /f” and press Enter to initiate a CHKDSK scan.
4. If prompted, type “Y” to schedule the scan for the next system restart.
5. Restart your PC for the CHKDSK scan to run.
6. After the scan is complete, open the Command Prompt again and type “sfc /scannow” to run a system file checker.
7. Once the scan finishes, restart your PC again.
8. Open OneDrive and check if the error is resolved.
These steps should help fix the OneDrive Error 0x80071129 by resolving any system file issues that may be causing the error.
Troubleshooting OneDrive Error 0x80071129
- Open File Explorer.
- Navigate to the folder containing the problematic file.
- Right-click on the file and select Rename.
- Shorten the file name to a maximum of 255 characters.

- Click Enter to save the new file name.
Repair Method 2: Change File Location
- Open File Explorer.
- Copy the problematic file and paste it into a different location.
- Delete the original file from its current location.
- Try accessing the file from the new location.
Repair Method 3: Reset OneDrive Sync
- Press Windows Key + R to open the Run dialog box.
- Type “%localappdata%\Microsoft\OneDrive\onedrive.exe /reset” into the box.
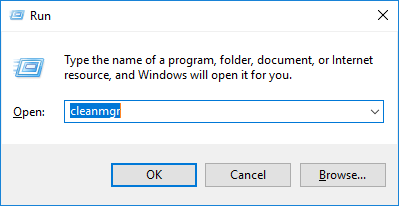
- Click OK to execute the command.
- Wait for OneDrive to reset the sync process.
- Sign in to your OneDrive account again.
Repair Method 4: Reinstall OneDrive
- Press Windows Key + R to open the Run dialog box.
- Type “appwiz.cpl” and press Enter.
- Locate Microsoft OneDrive in the list of installed programs.
- Right-click on it and select Uninstall.
- Follow the on-screen prompts to completely uninstall OneDrive.
- Download the latest version of OneDrive from the official Microsoft website.
- Install OneDrive by running the downloaded installer.
Running a CHKDSK Scan for Error Resolution
To resolve the 0x80071129 OneDrive error, you can run a CHKDSK scan on your Windows OS. This scan checks your PC system files for errors and fixes any issues it finds. Here’s how to do it:
1. Open the Command Prompt as an administrator.
2. Type “chkdsk C: /f” and press Enter. Replace “C:” with the drive letter where your OneDrive folder is located.
3. You’ll see a message asking if you want to schedule the scan for the next restart. Type “Y” and press Enter.
4. Restart your computer and wait for the CHKDSK scan to complete. This may take some time.
5. Once the scan is finished, check if the 0x80071129 error is resolved.
Running a CHKDSK scan can help fix file access issues and repair any errors in your system. It’s a useful tool for resolving a variety of Windows OS problems.
Scanning and Repairing System Files
If you’re encountering the 0x80071129 OneDrive error, you may need to scan and repair your system files. This error can occur when the reparse point buffer is invalid, causing issues with file access actions. To fix this error, follow these steps:
1. Press the Windows key + R to open the Run dialog box.
2. Type “cmd” and press Enter to open the Command Prompt.
3. In the Command Prompt, type “sfc /scannow” and press Enter to initiate the system file scan.
4. Wait for the scan to complete. It will check and repair any corrupted system files.
5. Once the scan is finished, restart your PC and check if the error is resolved.
By scanning and repairing your system files, you can resolve the 0x80071129 error and restore proper file access on OneDrive.
Resetting the OneDrive App
Resetting the OneDrive app can help resolve the 0x80071129 OneDrive error. To do this, follow these steps:
1. Close the OneDrive app and ensure it’s not running in the background.
2. Press the Windows key + R to open the Run dialog box.
3. Type “%localappdata%\Microsoft\OneDrive\onedrive.exe /reset” and press Enter.
4. The OneDrive app will reset, and any issues related to the reparse point buffer should be resolved.
5. After resetting, open the OneDrive app and sign in to your account.
6. Check if the error message persists.
Resetting the OneDrive app can fix a variety of issues, including the 0x80071129 error. If you continue to experience problems, consider seeking further assistance from Microsoft support or exploring other troubleshooting solutions.
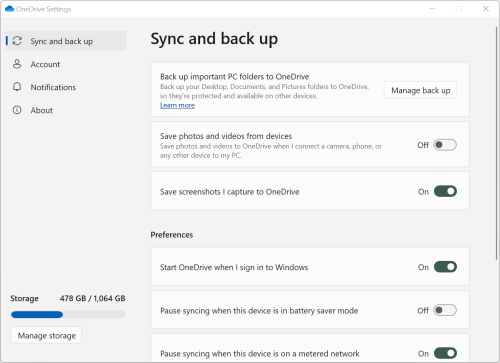
Pausing Syncing to Fix Error Code 0x80071129
To fix the 0x80071129 OneDrive error, you can try pausing syncing and following these steps:
1. Pause syncing:
– Open the OneDrive app on your Windows 11 PC.
– Click on the cloud icon in the taskbar.
– Select “More” and then click on “Pause syncing.”
2. Fix the error:
– Press the Windows key + R to open the Run dialog box.
– Type “cmd” and press Enter to open the Command Prompt.
– In the Command Prompt, type “OneDrive /reset” and press Enter.
– This will reset the OneDrive sync feature and fix any issues.
3. Restart OneDrive:
– Press the Windows key + R to open the Run dialog box again.
– Type “taskmgr” and press Enter to open Task Manager.
– In Task Manager, go to the “Processes” tab.
– Look for any “OneDrive” processes and end them by right-clicking and selecting “End task.”
After completing these steps, you should no longer encounter the 0x80071129 error when syncing your files with OneDrive.
Restoring the Original File Version
If you encounter the 0x80071129 error code while using OneDrive, you can easily fix it and restore the original file version. Here’s how:
1. Open File Explorer and navigate to the folder containing the affected file.
2. Right-click on the file and select “Properties.”
3. In the “General” tab, click on the “Previous Versions” button.
4. A list of available versions will appear. Select the version you want to restore and click “Restore.”
5. Confirm the action by clicking “OK” and wait for the process to complete.
6. Once restored, the file will be reverted to the selected version, resolving the 0x80071129 error.
Remember to regularly backup your files to prevent any data loss. Additionally, keeping your OneDrive client and Windows 11 up to date can help avoid such errors in the future.
If you still encounter issues, consider reaching out to Microsoft support for further assistance.
Removing Password Protection for Error Resolution
To resolve the 0x80071129 OneDrive error, you may need to remove password protection. This can be done by following these steps:
1. Open the OneDrive folder on your computer.
2. Right-click on the folder that is causing the error.
3. Select “Properties” from the drop-down menu.
4. Go to the “General” tab and click on the “Advanced” button.
5. Uncheck the box that says “Encrypt contents to secure data.”
6. Click “OK” to apply the changes.
By removing password protection, you can ensure that the error is resolved and you can access your files without any issues. Remember to follow these steps for each folder that is experiencing the error.
If you continue to encounter the 0x80071129 error, there may be other underlying issues with your OneDrive setup. It is recommended to reach out to Microsoft support or consult their online resources for further assistance.
Tweaking OneDrive System Tray Advanced Settings
- Customize your OneDrive experience by tweaking system tray advanced settings
- Resolve the common OneDrive error code 0x80071129 by following these steps
- Access advanced settings to fine-tune OneDrive functionality
- Optimize your OneDrive usage with these advanced tweaks
- Enhance your productivity by modifying OneDrive system tray settings
- Discover hidden features and options in OneDrive’s advanced settings
- Overcome the 0x80071129 OneDrive error with these advanced adjustments
- Maximize your OneDrive performance by customizing system tray settings
- Unlock additional capabilities in OneDrive by adjusting advanced preferences
Sign Out and Sign In Again on the OneDrive App
To fix the 0x80071129 OneDrive error on the OneDrive app, you can try signing out and signing in again. This simple action can often resolve the issue and get your OneDrive working properly.
To do this, follow these steps:
1. Open the OneDrive app on your device.
2. Tap on the **Settings** option.
3. Scroll down and select **Sign Out**.
4. Confirm the sign-out action.
5. Once signed out, tap on the **Sign In** option.
6. Enter your OneDrive account credentials and sign in.
By signing out and signing back in, you can refresh your connection to the OneDrive cloud and resolve any syncing issues that may be causing the error. This is a quick and easy fix that many users have found helpful. Give it a try and see if it resolves your 0x80071129 OneDrive error.

Mark Ginter is a tech blogger with a passion for all things gadgets and gizmos. A self-proclaimed "geek", Mark has been blogging about technology for over 15 years. His blog, techquack.com, covers a wide range of topics including new product releases, industry news, and tips and tricks for getting the most out of your devices. If you're looking for someone who can keep you up-to-date with all the latest tech news and developments, then be sure to follow him over at Microsoft.