- Sometimes it is recommended to remove registry items that do not work in Windows because they can slow down your computer.
- Microsoft introduced the Windows registry in Windows 3.1, which stored COM-based component configuration information.
- The registry is used to store settings for device drivers, kernel, user interface, etc.
- The registry stores information such as settings, parameters, and values of software and hardware on all modern Windows operating systems.
Unlock the secrets of a healthier Windows system with our expert guide on safely removing and fixing broken registry items.
Introduction to Windows Registry
Windows Registry is a crucial part of the Microsoft Windows operating system that stores important information and settings for your computer. However, over time, registry items can become broken or corrupted, leading to system issues. In this guide, we will show you how to safely remove and fix broken registry items in Windows.
Before making any changes to the registry, it’s important to back up your registry information to avoid any potential problems. To do this, follow these steps:
1. Press the Windows key + R to open the Run dialog box.
2. Type “regedit” and press Enter to open the Registry Editor.
3. In the Registry Editor, click on “File” and select “Export”.
4. Choose a location to save the backup file, give it a descriptive name, and click “Save”.
To safely remove and fix broken registry items, follow these steps:
1. Open the Registry Editor as mentioned earlier.
2. Navigate to the registry key you want to remove or fix.
3. Right-click on the key and select “Delete” to remove it. To fix a broken registry item, you can try editing the value or deleting and recreating the key.
4. Confirm any prompts that appear.
Remember, editing the registry can have serious consequences if done incorrectly. Always exercise caution and create a backup before making any changes.
For more detailed instructions and additional methods to fix broken registry items, please refer to our website’s full article.
Understanding Broken Registry Items
To fix broken registry items, you can follow these methods:
1. Run Automatic Repair: Start your computer and press the appropriate key (usually F8 or F12) to access the Advanced Boot Options menu. Select Automatic Repair to let Windows scan and fix registry issues automatically.
2. Use Registry Editing Tools: Open the Registry Editor by pressing Windows key + R, typing “regedit,” and pressing Enter. Be cautious while making changes, as deleting or modifying the wrong registry keys can cause system instability. Backup the registry before making any changes.
3. Export and Delete Registry Keys: To remove broken registry items, first export the key you want to delete by right-clicking on it and selecting Export. Then, delete the key by right-clicking and selecting Delete.
By understanding and fixing broken registry items, you can improve your system’s functionality and prevent future issues. Remember to always exercise caution and backup your registry before making any changes.
Causes of Broken Registry Items
Broken registry items in Windows can occur due to various reasons. One common cause is malware infections that can corrupt or modify registry entries. Another cause is improper installation or uninstallation of software, leaving remnants in the registry. Additionally, manual editing of the registry without proper knowledge or permissions can lead to broken items.
To safely remove and fix broken registry items, follow these steps:
1. Scan your system for malware using reputable antivirus software.
2. Use Microsoft’s Registry Editor to navigate and locate the broken registry items.
3. Take ownership of the registry key if you encounter “access denied” errors.
4. Disable registry editing tools like Microsoft Office to prevent accidental modifications.
5. Back up the registry before making any changes.
6. Use registry repair software or manually delete the broken items, if you have the necessary knowledge.
Remember, modifying the system registry is a delicate task, and it’s crucial to proceed with caution. Always make sure to back up your registry and exercise appropriate permissions and knowledge when making changes.
Methods to Fix Broken Registry Items
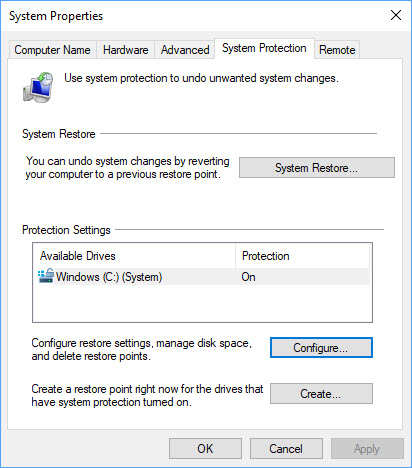
- Open the Start menu and search for System Restore.
- Click on Create a restore point from the search results.
- In the System Properties window, click on the System Protection tab.
- Click on the System Restore button.
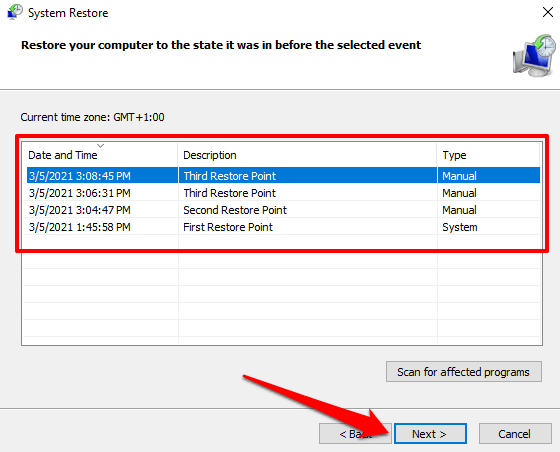
- Choose a restore point from the list and click on Next.
- Confirm your restore point selection and click on Finish.
- Wait for the system restore process to complete.
Method 2: Using Registry Editor
- Open the Start menu and search for Registry Editor.
- Click on Registry Editor from the search results.
- In the Registry Editor window, navigate to the broken registry item by following the given path.
- Right-click on the broken registry item and select Delete.

- Confirm the deletion of the registry item when prompted.
Method 3: Using Third-Party Registry Repair Tools
- Research and select a reliable third-party registry repair tool from a trusted source.
- Download and install the selected registry repair tool on your Windows computer.
- Launch the registry repair tool.
- Select the option to scan for broken registry items.
- Wait for the scan to complete and identify the broken registry items.
- Select the option to fix or repair the identified broken registry items.
- Follow any additional prompts or instructions provided by the registry repair tool.
Manual Fixes for Broken Registry Items
How to Safely Remove and Fix Broken Registry Items in Windows
| Registry Key | Issue Description | Manual Fix |
|---|---|---|
| HKEY_CURRENT_USER\Software\Microsoft\Windows\CurrentVersion\Run | Unwanted startup programs | Delete the entry related to the unwanted program. |
| HKEY_LOCAL_MACHINE\SOFTWARE\Microsoft\Windows\CurrentVersion\Run | Unwanted startup programs | Delete the entry related to the unwanted program. |
| HKEY_CLASSES_ROOT\.exe | Executable file associations not working | Modify the default value to restore the correct association. |
| HKEY_CLASSES_ROOT\.dll | DLL file associations not working | Modify the default value to restore the correct association. |
| HKEY_LOCAL_MACHINE\SOFTWARE\Microsoft\Windows\CurrentVersion\Explorer\Browser Helper Objects | Unwanted browser extensions | Delete the entry related to the unwanted extension. |
| HKEY_CURRENT_USER\Software\Microsoft\Internet Explorer\Main\Start Page | Browser homepage hijacked | Modify the value to set your desired homepage. |
Automatic Repair for Broken Registry Items
If you’re facing issues with broken registry items in Microsoft Windows, there’s an automatic repair feature that can help you fix them. Here’s how to safely remove and fix broken registry items on your system.
1. Press the Windows key + R to open the Run dialog box.
2. Type “regedit” and hit Enter to open the Registry Editor.
3. In the Registry Editor, navigate to the broken registry item you want to fix.
4. Right-click on the item and select “Export” to create a backup of the registry entry.
5. Once the backup is created, right-click on the item again and select “Delete” to remove it.
6. If you encounter any errors like “Access Denied” or “Cannot Delete,” you may need to take ownership of the registry key before deleting it. To do this, right-click on the key, select “Permissions,” and then click on “Advanced.” From there, you can change the owner to your user account and then proceed with the deletion.
7. After removing the broken registry item, close the Registry Editor.
8. Restart your computer to apply the changes.
By following these steps, you can safely remove and fix broken registry items in Windows, helping to improve system performance and stability.
System Restore for Broken Registry Items
System Restore is a useful feature in Windows that can help fix broken registry items. Here’s how to safely use it:
1. Press the Windows key + R to open the Run dialog box.
2. Type “rstrui” and press Enter to open the System Restore window.
3. Select “Choose a different restore point” and click Next.
4. Check the box next to “Show more restore points” to see a list of available restore points.
5. Choose a restore point that was created before the registry issues started and click Next.
6. Review the restore point details and click Finish to start the restoration process.
7. Windows will restart and restore your system to the selected restore point, fixing any broken registry items in the process.
Remember to back up your important files before performing a System Restore, as it can affect your saved data.
System File Checker for Broken Registry Items
System File Checker is a useful tool in Windows for fixing broken registry items. It helps identify and resolve issues that may arise due to corrupt or missing registry entries. To use the System File Checker, follow these steps:
1. Press the Windows key + R to open the Run dialog box.
2. Type “cmd” and press Enter to open the Command Prompt.
3. In the Command Prompt, type “sfc /scannow” and press Enter.
4. Wait for the scan to complete. If any issues are found, the System File Checker will attempt to repair them.
5. Once the scan is finished, restart your computer to apply any repairs made.
The System File Checker can help resolve various registry-related problems, such as errors when editing or deleting registry keys, issues with the system32 config folder, and error writing to the registry. It is a simple yet effective way to ensure the stability and proper functioning of your Windows operating system.
Resetting Windows System to Fix Broken Registry Items
Resetting your Windows system can help fix broken registry items and resolve issues with your device. Follow these steps to safely remove and fix broken registry items in Windows:
1. Back up your registry: Before making any changes, it’s crucial to back up your registry. This ensures that you can restore it if anything goes wrong.
2. Access the Registry Editor: Open the Registry Editor by pressing the Windows key + R, then type “regedit” and hit Enter.
3. Navigate to the problematic registry key: Use the left-hand navigation pane to find the key that you want to fix or remove.
4. Export the key: Right-click on the key and select “Export.” Save it to a safe location as a backup.
5. Delete the key (optional): If you want to remove the key, right-click on it and select “Delete.” Confirm the action if prompted.
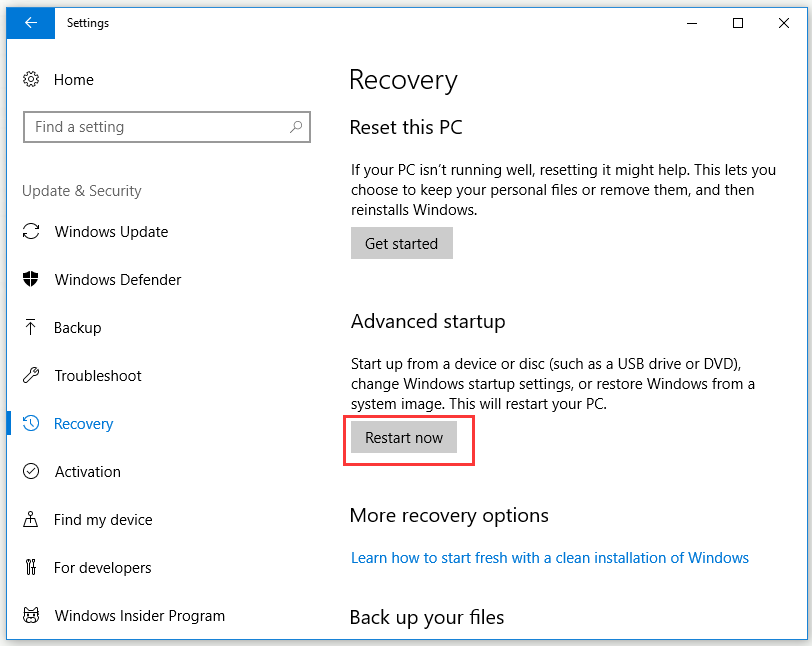
6. Reset your Windows system: To reset your Windows system, go to Settings > Update & Security > Recovery. Under the “Reset this PC” section, click on “Get started” and follow the instructions.
Remember, it’s important to be cautious when making changes to the registry as it contains critical system information. Always back up your registry and proceed with caution.

Mark Ginter is a tech blogger with a passion for all things gadgets and gizmos. A self-proclaimed "geek", Mark has been blogging about technology for over 15 years. His blog, techquack.com, covers a wide range of topics including new product releases, industry news, and tips and tricks for getting the most out of your devices. If you're looking for someone who can keep you up-to-date with all the latest tech news and developments, then be sure to follow him over at Microsoft.