- If you want to overclock or underclock your GPU, you’ve probably heard of an application called MSI Afterburner.
- It supports Nvidia and AMD GPUs and can also be used to control GPU fan speed and temperature.
- The most common culprits are undoubtedly Steam and NVIDIA overlays, which must be turned off in order for MSI’s afterburner to work properly on Windows.
Unlock the full potential of your graphics card with MSI Afterburner, but what if it fails to work on your Windows 10? Don’t fret! In this article, we will explore effective solutions to get your MSI Afterburner up and running smoothly, allowing you to push your gaming experience to new heights.
Common Issues with MSI Afterburner on Windows
1. Display Issues: Some users may experience problems with the app not displaying the statistics or overlay correctly on their screens. To fix this, try adjusting the application settings or reinstalling the software.
2. GPU Overclocking Problems: If you encounter issues with GPU overclocking or clock settings, make sure you have the latest graphics drivers installed. You can also try resetting the settings in MSI Afterburner and gradually adjusting them again.
3. Compatibility with Other Software: Certain applications, such as Vanguard or Steam Overlay, may interfere with MSI Afterburner. Consider disabling these applications or adding exceptions to ensure proper functionality.
4. Hardware Monitor Applications: If you have other hardware monitor applications installed, they might conflict with MSI Afterburner. Try closing or uninstalling these applications to see if it resolves the issue.
5. Driver Issues: Outdated or incompatible drivers can also cause problems with MSI Afterburner. Ensure that you have the latest IO drivers and display drivers installed.
Remember to always monitor your hardware and use overclocking tools responsibly to prevent any potential damage to your system.
Disable NVIDIA and Steam Overlays
To fix MSI Afterburner not working on Windows 10, you may need to disable NVIDIA and Steam overlays. These overlays can sometimes interfere with MSI Afterburner’s functionality.
To disable the NVIDIA overlay, follow these steps:
1. Open the NVIDIA control panel.
2. Go to “Manage 3D settings” and click on the “Program Settings” tab.
3. Select the application you want to disable the overlay for (e.g., CS:GO).
4. Scroll down and find the “Enable in-game overlay” option. Set it to “Off”.
To disable the Steam overlay, follow these steps:
1. Open Steam and go to your Library.
2. Right-click on the game you want to disable the overlay for (e.g., CS:GO) and select “Properties”.
3. In the Properties window, uncheck the “Enable the Steam Overlay while in-game” option.
By disabling these overlays, you can resolve any conflicts that may be causing MSI Afterburner to malfunction. Remember to restart your computer after making these changes.
Reinstalling MSI Afterburner
If you’re experiencing issues with MSI Afterburner on Windows 10, reinstalling the application may help resolve the problem. Here’s a step-by-step guide on how to reinstall MSI Afterburner:
1. First, make sure to completely uninstall the current version of MSI Afterburner from your system. You can do this by going to the Control Panel, selecting “Uninstall a program,” and then selecting MSI Afterburner from the list.
2. Next, download the latest version of MSI Afterburner from the official website.
3. Once the download is complete, locate the installation file and run it.
4. Follow the on-screen instructions to install MSI Afterburner on your system. Make sure to carefully review and customize the installation settings according to your preferences.
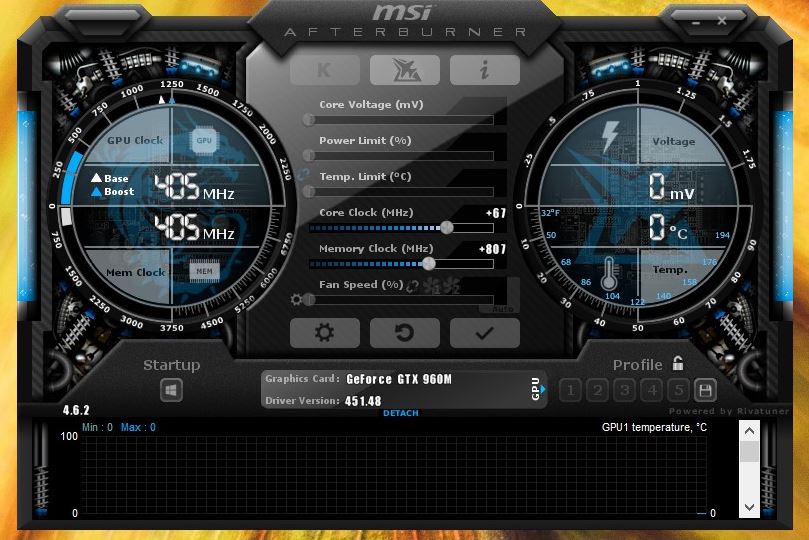
5. After the installation is complete, launch MSI Afterburner and configure it according to your needs. You can adjust settings such as core clock, power limit, fan control, and more to optimize your system’s performance.
6. If you’re using MSI Afterburner for monitoring purposes, make sure to enable the OSD (On-Screen Display) feature. This will allow you to view real-time statistics, such as GPU temperature, CPU temperature, fan speed, and more, while running games or other applications.
By reinstalling MSI Afterburner, you can potentially fix any software issues that were causing it to not work properly on your Windows 10 system.
Adjusting Game Detection Settings
1. Launch MSI Afterburner and click on the settings icon in the top-right corner of the interface.
2. In the settings window, navigate to the “Monitoring” tab.
3. Under the “Active hardware monitoring graphs” section, locate the “Framerate” option and check the box next to it.
4. Scroll down to the “Active hardware monitoring graphs” section and find the “Framerate” option. Check the box next to it.
5. Now, go to the “User interface” tab and enable the “On-Screen Display (OSD)” feature.
6. To configure OSD, click on the “On-Screen Display” button and choose the desired display position, size, and font.
7. Once you have made the necessary adjustments, click “Apply” and then “OK.”
By following these steps, you can effectively customize your game detection settings in MSI Afterburner, ensuring a smoother gaming experience on Windows 10.
Running MSI Afterburner in Compatibility Mode
If you’re experiencing issues with MSI Afterburner not working on Windows 10, running the app in Compatibility Mode can be a solution. This method can help resolve software compatibility issues between MSI Afterburner and your operating system.
To run MSI Afterburner in Compatibility Mode, follow these steps:
1. Right-click on the MSI Afterburner shortcut or executable file.
2. Select “Properties” from the context menu.
3. In the Properties window, navigate to the “Compatibility” tab.
4. Check the box that says “Run this program in compatibility mode for:”
5. From the drop-down menu, choose a compatible operating system version. For example, if you’re using Windows 10, you can try running it in compatibility mode for Windows 7 or Windows 8.
6. Click “Apply” and then “OK” to save the changes.
By running MSI Afterburner in Compatibility Mode, you may be able to overcome any software issues that were preventing it from working properly on Windows 10. Give it a try and see if it resolves your problem.
Troubleshooting in Clean Boot Mode
If you’re experiencing issues with MSI Afterburner not working on Windows 10, troubleshooting in Clean Boot Mode can help identify and resolve the problem.
To troubleshoot in Clean Boot Mode:
1. Press Windows key + R to open the Run dialog box.
2. Type msconfig and press Enter to open the System Configuration window.
3. In the General tab, select Selective startup and uncheck Load startup items.
4. Go to the Services tab, check Hide all Microsoft services, and click Disable all.
5. Click Apply and then OK.
6. Restart your computer and run MSI Afterburner to see if the issue persists.
By troubleshooting in Clean Boot Mode, you can isolate any conflicts caused by third-party applications or services that may be interfering with MSI Afterburner’s functionality. If the issue is resolved, you can gradually enable the startup items and services to pinpoint the culprit.
Remember to re-enable all services and startup items once you’ve identified the issue to restore normal system operation.
Restarting MSI Afterburner
If you’re experiencing issues with MSI Afterburner not working on Windows 10, restarting the application can often resolve the problem. Here’s a quick and simple guide on how to restart MSI Afterburner:
1. Close MSI Afterburner completely. You can do this by right-clicking on its icon in the system tray and selecting “Exit” or by using Task Manager to end the process.
2. Once the application is closed, wait a few seconds to ensure it has fully shut down.
3. Restart MSI Afterburner by double-clicking on its desktop shortcut or searching for it in the Start menu and selecting it.
4. After the application has restarted, check if the issue has been resolved. If not, you may need to try other fixes or solutions specific to your situation.
Remember, restarting MSI Afterburner is just one of many possible fixes for issues you may encounter with this overclocking utility. If the problem persists, you may want to explore additional troubleshooting methods or consult the MSI Afterburner user community for further assistance.
Enabling OSD in Rivatuner
To enable OSD (On-Screen Display) in Rivatuner, follow these steps:
1. Launch the Rivatuner application.
2. Click on the “OSD” tab.
3. Check the box next to “Enable OSD” to enable On-Screen Display.
4. Customize the OSD settings according to your preference, such as choosing which statistics to display.
5. Click on the “OK” button to save the changes.
By enabling OSD in Rivatuner, you can monitor essential system statistics while gaming or using other applications. This includes information like CPU and GPU temperatures, core clock, fan speeds, and power limits. OSD is useful for overclocking enthusiasts and general users who want to keep an eye on their system performance.
If you encounter any issues with MSI Afterburner not working on Windows 10, make sure your graphics drivers are up to date. Additionally, consider using Display Driver Uninstaller to remove any conflicting drivers. These methods can help resolve common culprits behind Afterburner’s functionality problems.
Disabling Low-Level IO Drivers
If you’re experiencing issues with MSI Afterburner not working on Windows 10, it could be due to low-level IO drivers. Disabling these drivers can help resolve the problem.
To disable low-level IO drivers, follow these steps:
1. Press the Windows key + R to open the Run dialog box.
2. Type “devmgmt.msc” and press Enter to open the Device Manager.
3. Expand the “System devices” category.
4. Look for any drivers related to MSI Afterburner or overclocking utilities.
5. Right-click on each driver and select Disable.
6. Restart your computer.
After disabling the low-level IO drivers, try running MSI Afterburner again to see if the issue is resolved. If not, you may need to consider other troubleshooting steps, such as updating your drivers or reinstalling the application. Remember to always use caution when making changes to your system configuration.
Updating Graphics Drivers
To update your graphics drivers and fix MSI Afterburner not working on Windows 10, follow these steps:
1. Identify your graphics card model and manufacturer. You can usually find this information in the “Device Manager” or by checking the documentation that came with your computer.
2. Visit the manufacturer’s website or use a trusted driver update utility to download the latest graphics drivers for your specific card model.
3. Before installing the new drivers, uninstall the existing ones. To do this, open the “Device Manager,” expand the “Display adapters” section, right-click on your graphics card, and select “Uninstall device.” Check the box that says “Delete the driver software for this device” and click “Uninstall.”
4. Restart your computer.
5. Install the newly downloaded graphics drivers. Follow the manufacturer’s instructions or use the driver update utility to complete the installation.
6. After the installation is complete, launch MSI Afterburner and check if it is working properly now.
7. If the issue persists, try updating other drivers such as the IO driver or using Display Driver Uninstaller to remove any traces of previous driver installations before reinstalling.
Remember to always download drivers from the official manufacturer’s website to ensure compatibility and security.
Disabling Other Overlays
To fix MSI Afterburner not working on Windows 10, you may need to disable other overlays. These overlays, such as Vanguard or RTSS, can interfere with the proper functioning of Afterburner.
To disable other overlays, follow these steps:
1. Open the MSI Afterburner software on your computer.
2. Click on the settings icon in the top right corner of the application.
3. In the settings menu, navigate to the “Monitoring” tab.
4. Scroll down to the “Active hardware monitoring graphs” section.
5. Uncheck any overlays or monitoring processes that are not necessary for your usage.
6. Click on the “Apply” button to save the changes.
By disabling unnecessary overlays, you can ensure that MSI Afterburner works correctly on your Windows 10 system. Additionally, this can help resolve any issues with overclocking tools, customizing application settings, or monitoring CPU and GPU stats. Remember to check your CPU and GPU temperatures, as well as the power limit, while monitoring your system’s performance.

Mark Ginter is a tech blogger with a passion for all things gadgets and gizmos. A self-proclaimed "geek", Mark has been blogging about technology for over 15 years. His blog, techquack.com, covers a wide range of topics including new product releases, industry news, and tips and tricks for getting the most out of your devices. If you're looking for someone who can keep you up-to-date with all the latest tech news and developments, then be sure to follow him over at Microsoft.