- A green checkmark on an app, file, or folder means it’s synced with OneDrive.
- A corrupted icon cache on your system can be the cause of the problem.
- If you try restarting your computer, reloading, or uninstalling, maybe the problem will reappear.
- The good news is that there is currently a fairly quick solution to this problem.
Unlock the vibrant potential of your Windows 10 desktop icons with this simple fix for the gray X dilemma.
Pausing and resuming sync, disabling file sync status, and disabling files on-demand
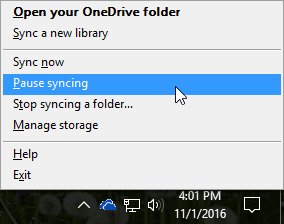
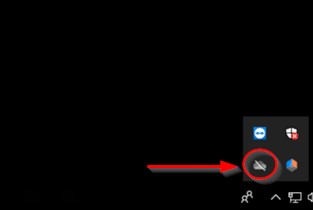
- Open the OneDrive application on your computer.
- Click on the OneDrive icon in the system tray.
- Select the More option from the drop-down menu.
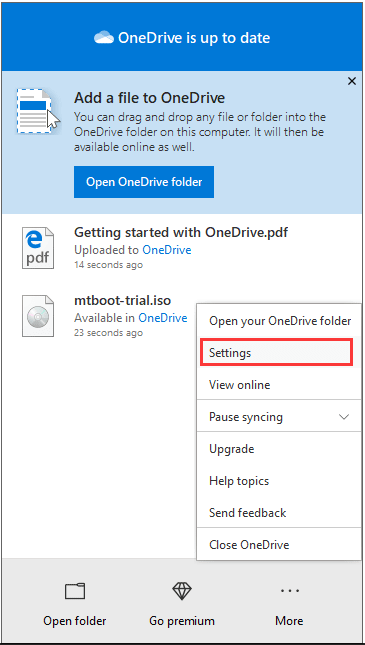
- Click on Pause syncing to temporarily stop sync.
- To resume syncing, click on the OneDrive icon in the system tray again.
- Select the More option from the drop-down menu.
- Click on Resume syncing to restart sync.
Disabling File Sync Status
- Open the OneDrive application on your computer.
- Click on the OneDrive icon in the system tray.
- Select the More option from the drop-down menu.
- Click on Settings to open the settings window.
- In the settings window, go to the Files tab.
- Under the Files On-Demand section, uncheck the box next to Show the sync status icons and right-click menu.
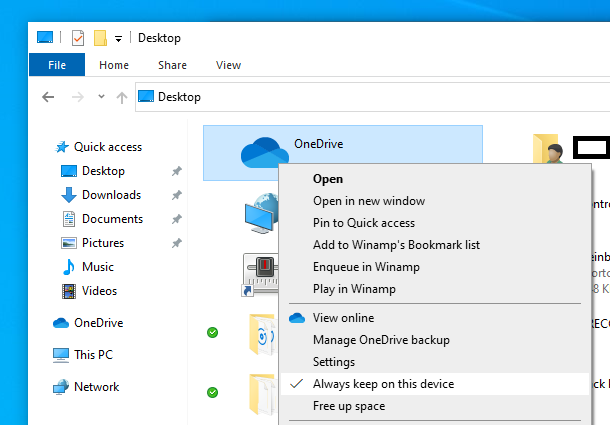
- Click on OK to save the changes.
Disabling Files On-Demand
- Open the OneDrive application on your computer.
- Click on the OneDrive icon in the system tray.
- Select the More option from the drop-down menu.
- Click on Settings to open the settings window.
- In the settings window, go to the Files tab.
- Under the Files On-Demand section, uncheck the box next to Save space and download files as you use them.
- Click on OK to save the changes.
Repairing/resetting installations and reconnecting/reinstalling cloud applications
- Open the Control Panel by clicking on the Start button and typing “Control Panel” in the search bar.
- Select Programs or Programs and Features from the Control Panel options.
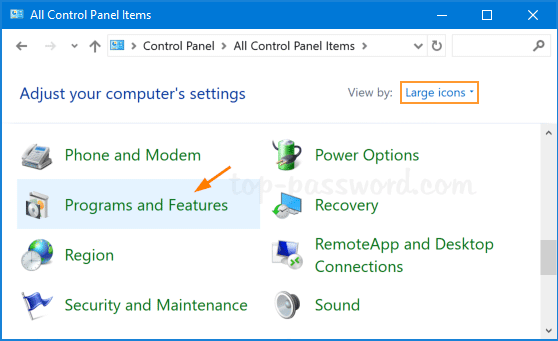
- Locate the problematic application in the list of installed programs.
- Right-click on the application and choose Repair or Change from the context menu.
- Follow the on-screen instructions to complete the repair process.
- Restart your computer to apply the changes and check if the gray X on desktop icons issue has been resolved.
Reconnecting/reinstalling cloud applications
- Open a web browser and go to the website of the cloud application provider (e.g., Microsoft 365, Dropbox, Google Drive).
- Sign in to your account using the appropriate credentials.
- Navigate to the section or page where you can manage your connected devices or view your installed applications.
- Locate the device or computer that is experiencing the gray X issue and select it.
- Choose the option to reconnect or reinstall the cloud application on that device.
- Follow the prompts and instructions provided by the cloud application provider to complete the reconnection or reinstallation process.
- Once the cloud application is successfully reconnected or reinstalled, check if the gray X on desktop icons problem has been resolved.
Using registry edits to set shell icons value and force autoreconnect of offline files
Fix Gray X on Windows 10 Desktop Icons
In this article, we will discuss how to fix the issue of gray X on Windows 10 desktop icons by using registry edits to set shell icons value and force autoreconnect of offline files.
Registry Edits for Shell Icons Value
Follow the steps below to set the shell icons value in the Windows registry:
| Registry Key | Value |
|---|---|
HKEY_CLASSES_ROOT\lnkfile |
IsShortcut |
HKEY_CLASSES_ROOT\piffile |
IsShortcut |
HKEY_CLASSES_ROOT\InternetShortcut |
IsShortcut |
HKEY_CLASSES_ROOT\WSHFile |
NeverShowExt |
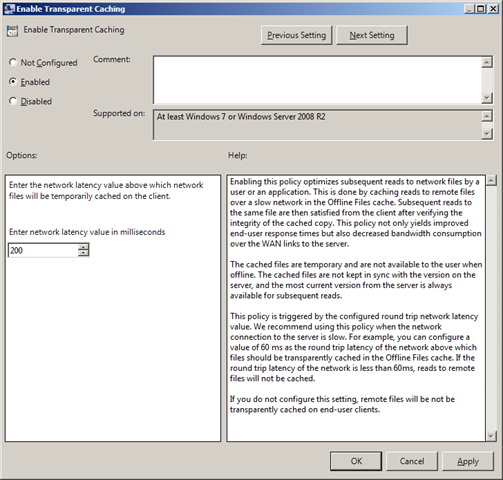
Forcing Autoreconnect of Offline Files
If the gray X issue is related to offline files, you can force autoreconnect by following these steps:
- Open the Group Policy Editor by pressing
Windows + Rand typinggpedit.msc. - Navigate to
Computer Configuration\Administrative Templates\Network\Offline Files. - Enable the policy
Enable Transparent Caching. - Restart your computer to apply the changes.
Once you have completed these steps, the gray X issue on your Windows 10 desktop icons should be resolved.
Troubleshooting access issues with gray Xs on files
If you’re experiencing access issues with gray Xs on your Windows 10 desktop icons, there are a few troubleshooting steps you can try to resolve the problem.
First, try clearing the icon cache by following these steps:
1. Press Win + R to open the Run dialog box.
2. Type cmd and press Enter to open the Command Prompt.
3. In the Command Prompt, type cd /d %userprofile%\AppData\Local and press Enter.
4. Next, type del IconCache.db /a and press Enter.
5. Finally, restart your computer to apply the changes.
If clearing the icon cache doesn’t solve the issue, you can try resetting the folder view settings:
1. Open File Explorer and navigate to the folder where the gray Xs are appearing.
2. Click on the View tab at the top.
3. In the Layout section, click on Options and then select Change folder and search options.
4. In the Folder Options window, click on the View tab.
5. Click on the Reset Folders button and then click OK.
These steps should help resolve the gray X issue on your Windows 10 desktop icons. If you continue to experience problems, it may be worth reaching out to the site owner or seeking additional support from Microsoft.

Mark Ginter is a tech blogger with a passion for all things gadgets and gizmos. A self-proclaimed "geek", Mark has been blogging about technology for over 15 years. His blog, techquack.com, covers a wide range of topics including new product releases, industry news, and tips and tricks for getting the most out of your devices. If you're looking for someone who can keep you up-to-date with all the latest tech news and developments, then be sure to follow him over at Microsoft.