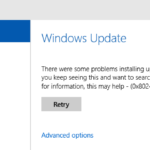
- Error code 0x800f0922 is a common problem when you try to install Windows updates.
- The update error can prevent you from installing cumulative updates, quality updates, security updates, and feature updates.
- Windows Update Troubleshooter can help identify and fix problems with updates.
- Microsoft.NET Framework 3.5 can be installed through the Control Panel, but older versions need to be enabled manually.
Troubleshooting Windows 11 installation can be a daunting task, especially when encountering error 0x800f0922. In this article, we delve into the root causes of this issue and provide effective solutions to help you successfully install Windows 11 on your PC.
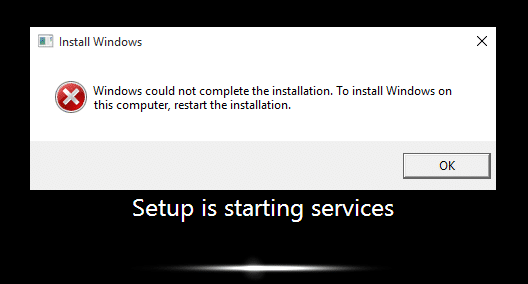
Install Error – 0x800f0922 on Windows 11 PC
If you’re encountering the install error 0x800f0922 on your Windows 11 PC, don’t worry. We have some solutions that can help you fix this issue.
First, try running the Windows Update troubleshooter to automatically detect and resolve any problems with Windows Update. To do this, follow these steps:
1. Press the Windows key + I to open the Settings app.
2. Click on “Update & Security” and then select “Troubleshoot” from the left-hand menu.
3. Scroll down and click on “Additional troubleshooters.”
4. Select “Windows Update” and click on “Run the troubleshooter.”
If the troubleshooter doesn’t resolve the issue, you can try resetting the Windows Update components. To do this, follow these steps:
1. Press the Windows key + X and select “Command Prompt (Admin)” from the menu.
2. Type the following commands and press Enter after each one:
net stop wuauserv
net stop cryptSvc
net stop bits
net stop msiserver
3. Type the following command and press Enter:
ren C:\Windows\SoftwareDistribution SoftwareDistribution.old
4. Type the following commands and press Enter after each one:
net start wuauserv
net start cryptSvc
net start bits
net start msiserver
After completing these steps, try installing the updates again. If you’re still experiencing the error, you may need to seek further assistance from Microsoft support or consider using third-party software such as MiniTool Solution to fix the issue.
Troubleshooting Windows 11 Install Error 0x800f0922
If you’re encountering the Windows 11 install error 0x800f0922, follow these troubleshooting steps:
1. Check your internet connection: Ensure that you have a stable internet connection to download and install updates.
2. Run Windows Update Troubleshooter: Use the built-in troubleshooter to automatically detect and fix common update issues. Press the Windows key, type “troubleshoot settings,” and select “Troubleshoot settings.” Click on “Windows Update” under “Get up and running” and follow the instructions.
3. Reset Windows Update components: Open an elevated Command Prompt by pressing Windows key + X and selecting “Command Prompt (Admin).” Type the following commands, pressing Enter after each one:
net stop wuauserv
net stop cryptSvc
net stop bits
net stop msiserver
ren C:\Windows\SoftwareDistribution SoftwareDistribution.old
ren C:\Windows\System32\catroot2 catroot2.old
net start wuauserv
net start cryptSvc
net start bits
net start msiserver
4. Install updates manually: If the error persists, download and install the updates manually from the Windows Update Catalog.
Use Windows Update Troubleshooter
To fix the Windows 11 PC install error 0x800f0922, you can use the Windows Update Troubleshooter. This tool helps identify and resolve common Windows update errors. Here’s how to use it:
1. Press the Windows key + I to open the Settings app.
2. Go to Update & Security.
3. Select Troubleshoot from the left-hand menu.
4. Click on Additional troubleshooters.
5. Scroll down and click on Windows Update.
6. Click on Run the troubleshooter.
7. Follow the on-screen instructions to diagnose and fix any issues with Windows Update.
If the troubleshooter doesn’t resolve the error, you can try other methods like manually resetting the Windows Update components or using the DISM tool. Remember to always back up your important files before making any changes to your system. For more detailed instructions, you can refer to articles by experts like Matthew Adams and Vlad Turiceanu.
Enable Microsoft .NET Framework 3.5
To fix Windows 11 PC install error 0x800f0922, you need to enable Microsoft .NET Framework 3.5. Here’s how:
1. Press the Windows key + R to open the Run dialog box.
2. Type “appwiz.cpl” and press Enter to open the Programs and Features window.
3. Click on “Turn Windows features on or off” on the left side of the window.
4. In the Windows Features dialog box, scroll down and locate “.NET Framework 3.5 (includes .NET 2.0 and 3.0)”.
5. Check the box next to it, then click OK.
6. Windows will now download and install the necessary files to enable .NET Framework 3.5.
7. Once the installation is complete, restart your computer.
Enabling .NET Framework 3.5 should resolve the error 0x800f0922 and allow you to proceed with your Windows 11 installation.
Disable Firewall to Fix Install Error – 0x800f0922 on Windows 11
To fix the Windows 11 PC install error 0x800f0922, you can try disabling the firewall temporarily. Here’s how:
1. Press the Windows key + R to open the Run dialog box.
2. Type “control” and press Enter to open the Control Panel.
3. In the Control Panel, click on “System and Security” and then “Windows Security.”
4. Click on “Firewall & network protection.”
5. Under “Active network,” click on the network profile you’re currently using.
6. Toggle the switch to turn off the “Windows Firewall.”
7. Try installing Windows 11 again.
After the installation is complete, remember to re-enable the firewall for security purposes. If disabling the firewall doesn’t resolve the issue, you can explore other troubleshooting methods or seek further assistance from Microsoft support.
Verify Integrity of System Files in Windows 11
To fix Windows 11 PC install error 0x800f0922, you can verify the integrity of system files. Here’s how:
1. Open the Command Prompt as an administrator. You can do this by right-clicking on the Start button and selecting “Command Prompt (Admin).”
2. In the Command Prompt window, type “sfc /scannow” and press Enter. This command will scan your system for any corrupted or missing files and automatically fix them if possible.
3. Wait for the scan to complete. This may take some time, so be patient.
4. Once the scan is finished, restart your computer.
5. After the restart, try installing the Windows 11 update again. Hopefully, the error 0x800f0922 will no longer occur.
By verifying the integrity of system files, you can resolve many Windows update errors, including error code 0x800f0922.
Reset Windows Update Components
To fix the Windows 11 PC install error 0x800f0922, you can try resetting the Windows Update components. Follow these steps:
1. Press the Windows key + X and select “Command Prompt (Admin)” or “Windows PowerShell (Admin)” from the menu.
2. In the command prompt, type “net stop wuauserv” and press Enter.
3. Next, type “net stop cryptSvc” and press Enter.
4. Then, type “net stop bits” and press Enter.
5. After that, type “net stop msiserver” and press Enter.
6. Now, rename the SoftwareDistribution and Catroot2 folders by typing the following commands one by one and pressing Enter after each:
– “ren C:\Windows\SoftwareDistribution SoftwareDistribution.old”
– “ren C:\Windows\System32\catroot2 Catroot2.old”
7. Finally, restart the Windows Update services by typing the following commands one by one and pressing Enter after each:
– “net start wuauserv”
– “net start cryptSvc”
– “net start bits”
– “net start msiserver”
This should reset the Windows Update components and help resolve the error 0x800f0922. If you continue to experience issues, it may be best to seek further assistance from Microsoft support or consult online forums for additional troubleshooting steps.
Start the App Readiness Service
To fix the Windows 11 PC install error 0x800f0922, one potential solution is to start the App Readiness Service. This service is responsible for ensuring that your apps are ready and compatible with the Windows OS. Here’s how you can start the service:
1. Press the Windows key + R to open the Run dialog box.
2. Type “services.msc” and press Enter to open the Services window.
3. Scroll down and locate the “App Readiness” service.
4. Right-click on the service and select “Properties.”
5. Set the “Startup type” to “Automatic” and click “Apply” and then “OK.”
6. Right-click on the service again and select “Start.”
By starting the App Readiness Service, you may be able to resolve the error 0x800f0922 and proceed with your Windows 11 installation without any further issues. Remember to restart your computer after making these changes.
Free up Disk Space
- Remove unnecessary files: Delete temporary files, downloaded program files, and recycle bin contents to reclaim disk space.
- Uninstall unused programs: Identify and remove applications that you no longer use or need, freeing up valuable disk space.
- Clear the cache: Empty the cache of web browsers, as well as other applications, to free up space occupied by temporary files.
- Use Storage Sense: Enable Storage Sense to automatically clean up unused files and optimize storage on your Windows 11 PC.

- Disable hibernation: Turn off hibernation mode to recover disk space occupied by the hibernation file.
- Move files to external storage: Transfer large files like videos, photos, or documents to an external hard drive or cloud storage.
- Compress files and folders: Reduce the size of files and folders using compression techniques to save disk space.
- Remove duplicate files: Identify and delete duplicate files that unnecessarily occupy disk space.
- Clear system restore points: Free up disk space by deleting older system restore points while keeping the most recent one.
- Disable Windows features and apps: Turn off unnecessary Windows features and uninstall pre-installed apps to free up disk space.
Manually Download and Install Windows 11 Updates
- Check for internet connectivity issues.
- Ensure you have sufficient storage available on your PC.
- Verify if the Windows Update service is running properly.
- Temporarily disable any third-party antivirus or firewall software.
- Restart your computer to resolve any temporary issues.
- Download the Windows 11 update manually from the official Microsoft website.
- Save the downloaded update file to a specific location on your PC.
- Open the downloaded update file to initiate the installation process.
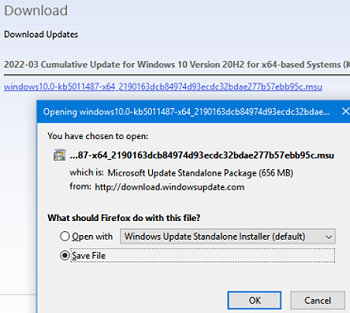
- Follow the on-screen prompts to complete the installation.
- Restart your PC once the installation is successfully finished.
Back up Your Windows 11 PC
To fix Windows 11 PC install error 0x800f0922, it is important to back up your PC before proceeding. Here are some steps to help you back up your Windows 11 PC:
1. Click on the Start button and select Settings.
2. In the Settings window, click on Update & Security.
3. Click on Backup in the left-hand menu.
4. Under the Backup section, click on Add a drive and select the external drive or network location where you want to back up your files.
5. Once you have selected the backup location, click on More options to customize your backup settings.
6. You can choose what files and folders to include in the backup, set a backup schedule, and configure other advanced options.
7. After customizing your backup settings, click on Back up now to start the backup process.
Remember to regularly back up your PC to ensure your data is protected in case of any issues or errors.

Mark Ginter is a tech blogger with a passion for all things gadgets and gizmos. A self-proclaimed "geek", Mark has been blogging about technology for over 15 years. His blog, techquack.com, covers a wide range of topics including new product releases, industry news, and tips and tricks for getting the most out of your devices. If you're looking for someone who can keep you up-to-date with all the latest tech news and developments, then be sure to follow him over at Microsoft.