- The “Disk Overload” error in uTorrent is often caused by incorrect settings of the program.
- The most common cause of this problem is the way that uTorrent loads data inconsistently.
- This approach puts a lot of stress on the hard drive because it has to write hundreds of chunks at the same time.
- Another common scenario is when partial file mode is enabled, causing the disk to skip a large number of files.
Are you tired of encountering the frustrating uTorrent Disk Overloaded Error on your Windows 10/7 system? Look no further! In this article, we will provide you with simple yet effective solutions to fix this issue and get your uTorrent back on track. So, sit back, relax, and let’s dive into the world of uTorrent troubleshooting.
Enable File Pre-Allocation
To fix the uTorrent Disk Overloaded Error in Windows 10/7, you can enable File Pre-Allocation. This feature helps with disk usage and reduces the chance of encountering the error. Follow these steps to enable File Pre-Allocation:
1. Open uTorrent and go to the “Options” menu.
2. Select “Preferences” from the drop-down menu.
3. In the Preferences window, click on the “Advanced” section.
4. Look for the “Disk Cache” section.
5. Enable the “Enable Disk Cache” option.
6. Set the “Override automatic cache size” option to the desired value (e.g. 512 MB).
7. Set the “Pre-allocate all files” option to “Yes”.
8. Click “Apply” and then “OK” to save the changes.
Enabling File Pre-Allocation can help prevent the uTorrent Disk Overloaded Error by allocating disk space in advance for downloaded files. This ensures smoother downloads and reduces the strain on your hard disk.
Update uTorrent to the latest version
To fix the uTorrent Disk Overloaded Error in Windows 10/7, follow these steps:
1. Update uTorrent: Ensure you have the latest version of uTorrent installed. Visit the official uTorrent website and download the latest version.
2. Adjust Disk Cache size: Open uTorrent and go to Options > Preferences. In the Preferences window, click on “Advanced” and find the “diskio.smart_hash” option. Set its value to “false”. Next, find the “diskio.smart_sparse_hash” option and set its value to “false” as well.
3. Disable Windows Disk Write Cache: Press Win + R, type “devmgmt.msc” and hit Enter. In the Device Manager window, expand “Disk drives” and right-click on your hard drive. Go to the “Policies” tab and uncheck the “Enable write caching on the device” option. Click OK.
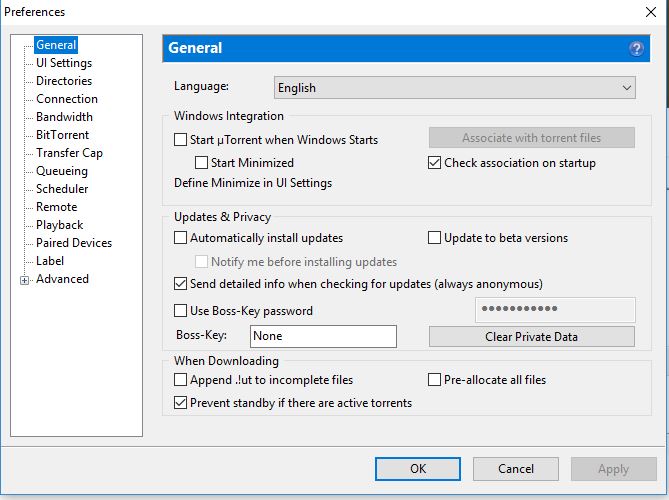
4. Adjust uTorrent cache settings: In uTorrent, go to Options > Preferences. Under the “General” section, set the “Disk Cache Size” to a lower value, such as 32MB. Click OK to save the changes.
5. Disable File Pre-allocation: In uTorrent, go to Options > Preferences. Under the “Files” section, uncheck the “Append .!ut to incomplete files” option. Click OK.
Disable diskio.use_partfile
To fix the uTorrent Disk Overloaded Error in Windows 10/7, you can disable the diskio.use_partfile feature. This feature allows uTorrent to store data temporarily on your hard drive when there is not enough memory available. However, it can sometimes cause disk overload issues.
To disable diskio.use_partfile:
1. Open uTorrent and go to Options > Preferences.
2. In the Preferences window, select “Advanced” from the left-hand menu.
3. In the Filter box, type “diskio.use_partfile”.
4. Double-click on the “diskio.use_partfile” option to change its value to “false”.
5. Click “Apply” and then “OK” to save the changes.
By disabling this feature, uTorrent will no longer use the partfile method and will rely solely on memory for data storage. This should help resolve any disk overload issues you may be experiencing.
Remember to restart uTorrent for the changes to take effect.
python

import utorrentapi
# Create a connection to uTorrent
client = utorrentapi.UTorrentAPI('localhost', 8080)
client.authenticate('username', 'password') # Replace with your uTorrent credentials
# Get the list of torrents
torrent_list = client.list()
# Iterate over each torrent and check for disk overloaded error
for torrent in torrent_list:
if torrent['error'] == 4: # 4 represents the disk overloaded error
# Pause the torrent
client.stop(torrent['hash'])
print(f"Paused torrent '{torrent['name']}' due to disk overload.")
# Close the connection
client.close()
Please note that you need to have the `utorrentapi` library installed (`pip install utorrentapi`) and replace the `’localhost’`, `8080`, `’username’`, and `’password’` placeholders with the appropriate values for your uTorrent setup.
This code snippet connects to your local uTorrent instance, retrieves the list of torrents, and checks for the disk overloaded error (error code 4). If any torrents have this error, it pauses them and prints a message indicating which torrent was paused.
Remember to adapt this code to your specific requirements and environment.
Adjust the Disk Cache
- Open uTorrent on your Windows 10/7 computer.
- Click on the Options tab at the top of the uTorrent window.
- Select Preferences from the drop-down menu.
- In the Preferences window, click on the Advanced category on the left-hand side.
- Scroll down the list of options until you find the diskio.use_partfile setting.
- Set the value of diskio.use_partfile to false by double-clicking on it.
- Next, locate the diskio.sparse_files setting in the list.
- Double-click on diskio.sparse_files to change its value to false.
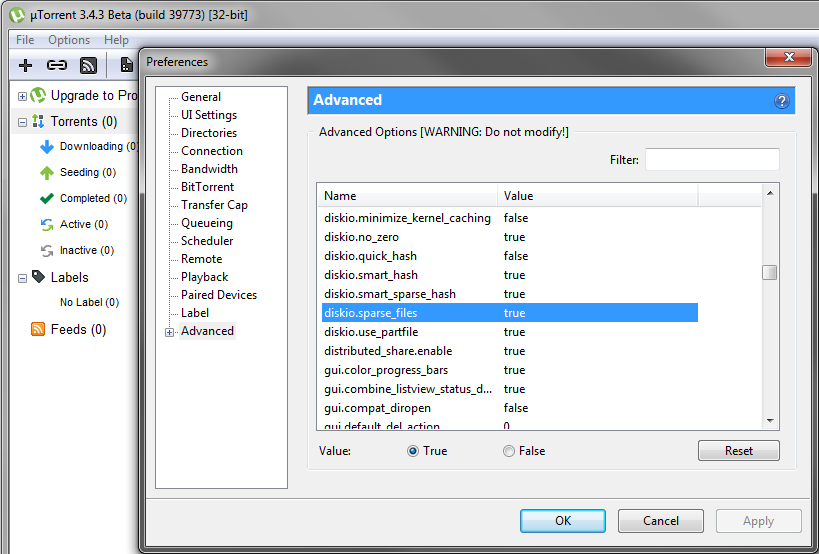
- Now, find the diskio.smart_hash setting and double-click on it.
- Change the value of diskio.smart_hash to false.

- Finally, locate the diskio.smart_sparse_hash setting and double-click on it.
- Set the value of diskio.smart_sparse_hash to false.
- Click on the Apply button to save the changes.
- Close the Preferences window.
- Restart uTorrent for the changes to take effect.

Mark Ginter is a tech blogger with a passion for all things gadgets and gizmos. A self-proclaimed "geek", Mark has been blogging about technology for over 15 years. His blog, techquack.com, covers a wide range of topics including new product releases, industry news, and tips and tricks for getting the most out of your devices. If you're looking for someone who can keep you up-to-date with all the latest tech news and developments, then be sure to follow him over at Microsoft.