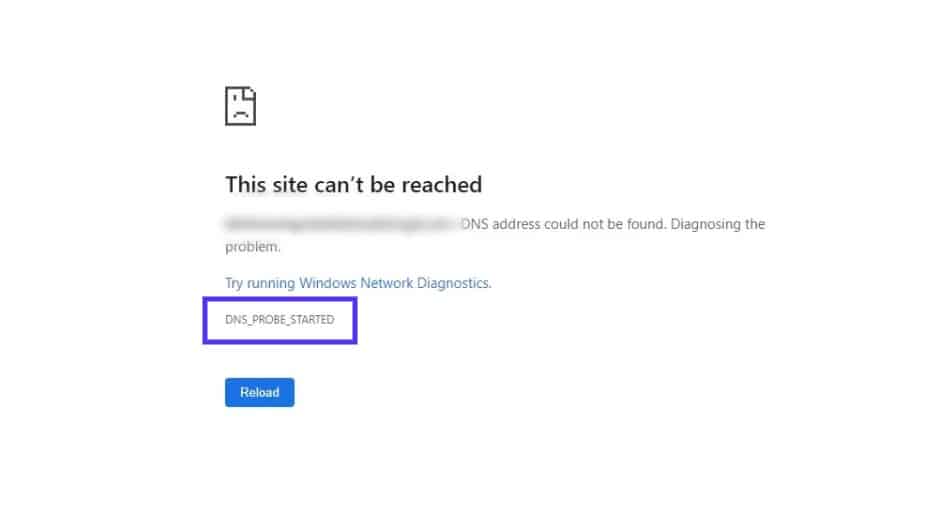
- Some people reported that when they visit the site, they receive an error message stating “DNS PROBE STARTED” What does it mean? Does your browser stop working? Don’t worry, this problem occurs to many people every day.
- Some internet service providers (ISPs) restrict access to certain types of data, including DNS queries.
- If you see this error, it could mean one of three things: Your computer does not know how to resolve the hostname.
Unraveling the Mysteries of DNS Probe Started Error: Troubleshooting Techniques Revealed
Understanding the DNS_PROBE_STARTED Error
If you’re encountering the DNS_PROBE_STARTED error in Google Chrome, it means there’s an issue with your internet connection or DNS settings. This error message indicates that Chrome is having trouble resolving the DNS for the website you’re trying to access.
To fix this error, follow these steps:
1. Open the Windows Settings by pressing the Windows key + I.
2. Go to Troubleshoot and click on Internet Connections.
3. Run the Internet Connections troubleshooter, which will help identify and fix any network-related issues.
If the troubleshooter doesn’t solve the problem, you can try the following methods:
1. Reset your router: Unplug it from the power source, wait for a few seconds, and then plug it back in.
2. Flush DNS and reset TCP/IP: Open the Command Prompt as an administrator and run the following commands: ipconfig /release, ipconfig /flushdns, and ipconfig /renew.
3. Change your DNS servers: Use reliable public DNS servers like Google DNS (8.8.8.8 and 8.8.4.4) or Cloudflare DNS (1.1.1.1 and 1.0.0.1).
Common Causes of DNS_PROBE_STARTED Error
- Incorrect DNS settings: One of the most common causes of the DNS_PROBE_STARTED error is incorrect DNS settings. Ensure that your DNS settings are properly configured.
- Network connectivity issues: If you are facing the DNS_PROBE_STARTED error, it could be due to network connectivity issues. Check your internet connection and make sure it is stable.
- Firewall or antivirus interference: Sometimes, firewalls or antivirus software can interfere with the DNS resolution process and cause the DNS_PROBE_STARTED error. Temporarily disable them to see if the error persists.
- Browser cache and cookies: Accumulated cache and cookies in your browser can also lead to the DNS_PROBE_STARTED error. Clear your browser cache and cookies to resolve the issue.
- IP address conflicts: Conflicts with IP addresses on your network can result in the DNS_PROBE_STARTED error. Ensure that your devices have unique IP addresses assigned to them.
- DNS server issues: The error can also occur if there are problems with the DNS server you are trying to connect to. Contact your Internet Service Provider (ISP) or switch to a different DNS server to check if this resolves the issue.
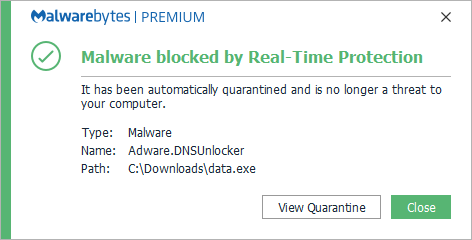
- Malware or adware: Malicious software or unwanted adware can tamper with your DNS settings and lead to the DNS_PROBE_STARTED error. Scan your system for malware and adware using reliable antivirus software.
- Operating system issues: In some cases, issues with your operating system can trigger the DNS_PROBE_STARTED error. Keep your operating system up to date and apply any necessary patches or fixes.
- Router configuration: Misconfigured router settings can cause the DNS_PROBE_STARTED error. Check your router’s configuration and ensure that DNS settings are properly set.
- ISP problems: If none of the above solutions work, it is possible that your Internet Service Provider (ISP) is experiencing issues with their DNS servers. Contact your ISP to inquire about any ongoing problems.

Methods to Fix the DNS_PROBE_STARTED Error
If you encounter the DNS_PROBE_STARTED error while browsing on Google Chrome, there are a few methods you can try to resolve it.
First, make sure your internet connection is stable and working properly. You can use the Internet Connections troubleshooter in Windows 11 to diagnose and fix any network issues.
If that doesn’t solve the problem, you can try changing your DNS settings. Open the Network Connections settings in Windows Settings and locate your active network connection. Right-click on it and select “Properties.” In the Properties window, go to the “Internet Protocol Version 4 (TCP/IPv4)” or “Internet Protocol Version 6 (TCP/IPv6)” section and click on “Properties.”
In the next window, select the “Use the following DNS server addresses” option and enter the IP addresses of reliable DNS servers, such as Google’s Public DNS (8.8.8.8 and 8.8.4.4). Click “OK” to save the changes.
If the error persists, you can also try clearing your browser’s cache and cookies, or disabling any VPNs or browser extensions that might be causing conflicts.
python

import socket
def dns_probe(domain):
try:
ip_address = socket.gethostbyname(domain)
print(f"DNS probe for '{domain}' successful.")
print(f"IP address: {ip_address}")
except socket.gaierror:
print(f"DNS probe failed for '{domain}'.")
# Example usage
dns_probe("example.com")
The above code defines a `dns_probe` function that takes a domain name as input and attempts to resolve its IP address using DNS. It uses Python’s `socket` module to perform the DNS lookup. If the lookup is successful, it prints the IP address; otherwise, it indicates a failure.
Please note that this code only demonstrates a basic DNS probe and does not cover all possible scenarios or error handling. It’s important to consider additional factors, such as caching, record types, timeouts, and security best practices, when implementing a robust DNS probing tool.
Changing the DNS Server
Changing the DNS server can help fix the DNS Probe Started Error. Follow these steps to make the necessary changes:
Step 1: Right-click on the network icon in the system tray and select “Open Network & Internet Settings.”
Step 2: In the Settings window, click on “Change Adapter Options.”
Step 3: Right-click on your active network connection and select “Properties.”
Step 4: In the Properties window, scroll down and double-click on “Internet Protocol Version 4 (TCP/IPv4).”
Step 5: Select the option to “Use the following DNS server addresses.”
Step 6: Enter the preferred DNS server and alternate DNS server addresses. You can use public DNS servers like Google (8.8.8.8, 8.8.4.4) or Cloudflare (1.1.1.1, 1.0.0.1).
Step 7: Click “OK” to save the changes.
By changing the DNS server, you can resolve the DNS Probe Started Error and regain internet connectivity. Remember to restart your device after making the changes for them to take effect.
Refreshing the DNS
Step 1: Open the Command Prompt by pressing Windows Key + R, then type “cmd” and hit Enter.
Step 2: In the Command Prompt, type “ipconfig /flushdns” and press Enter. This will clear the DNS cache.
If you’re using Windows 11, you can also try using the Network Troubleshooter to fix the error. Here’s how:
Step 1: Go to Settings and click on “Troubleshoot” in the left-hand menu.
Step 2: Under “Find and fix other problems,” click on “Network troubleshooter” and follow the instructions.
If the DNS Probe Started error persists, you can try resetting your router or checking your network connections. Additionally, make sure your DNS settings are correct and consider using a reliable DNS server like Google DNS or Cloudflare DNS.
Clearing Browser Cache and Cookies
To clear browser cache and cookies, follow these steps:
1. Open your Chrome browser and click on the three dots in the top-right corner.
2. Select “Settings” from the drop-down menu.
3. Scroll down and click on “Advanced” to expand the options.
4. Under the “Privacy and security” section, click on “Clear browsing data.”
5. In the pop-up window, select the time range for which you want to clear the data. For example, you can choose “All time” to clear everything.
6. Make sure the checkboxes for “Browsing history” and “Cookies and other site data” are selected.
7. Click on the “Clear data” button to remove the cache and cookies from your browser.
Clearing browser cache and cookies can help resolve various DNS probe started errors, such as DNS_PROBE_FINISHED_NO_INTERNET or DNS_PROBE_FINISHED_BAD_CONFIG.
Uninstalling and Reinstalling Network Driver(s)
Uninstalling and reinstalling network drivers can help fix the DNS Probe Started error. Here’s how:
1. Press the Windows key + X and select Device Manager.
2. Expand the Network adapters section.
3. Right-click on your network adapter and select Uninstall device.
4. Tick the box that says “Delete the driver software for this device” and click Uninstall.
5. Restart your computer.
6. Once your computer restarts, Windows will automatically reinstall the network driver.
7. Test if the DNS Probe Started error is resolved by opening a web browser and navigating to a website.
If the error persists, you can try other solutions such as resetting the TCP/IP stack or changing the DNS settings. Remember to always backup your important files before making any changes to your system.
For more detailed instructions and additional solutions, you can visit the Microsoft support website or other reputable sources like MiniTool or MBReviews.
Disabling Antivirus and Firewall Software
To fix the DNS Probe Started error, you may need to disable your antivirus and firewall software temporarily. These security measures can sometimes interfere with your internet connection. Follow these steps to disable them:
Step 1: Disable Antivirus Software
1. Right-click on the antivirus software icon in the system tray and select “Disable” or “Pause Protection.”
2. If there is no option to disable or pause, open the antivirus software and look for a settings menu or options to temporarily disable it.
3. Disable all antivirus features that may be blocking your internet connection.
Step 2: Disable Firewall Software
1. Press the Windows key + R, type “control panel,” and hit Enter.
2. In the Control Panel, search for “Firewall” and click on “Windows Defender Firewall.”
3. Click on “Turn Windows Defender Firewall on or off” from the left-hand menu.
4. Select “Turn off Windows Defender Firewall” for both private and public networks.
5. Click “OK” to save the changes.
After disabling antivirus and firewall software, check if the DNS Probe Started error is resolved. Remember to enable your security measures once you have identified the issue.
Restarting the Router/Modem
Restarting your router or modem can often resolve DNS Probe Started errors. Follow these steps to restart your device:
1. Locate the power source of your router or modem.
2. Disconnect the power cable from the device.
3. Wait for about 30 seconds to ensure a complete power cycle.
4. Reconnect the power cable to your router or modem.
5. Allow a few minutes for the device to fully restart.
Once your router or modem has restarted, check if the DNS Probe Started error still persists. If the issue continues, you may need to further troubleshoot your network settings or seek assistance from your internet service provider.
Remember, restarting your router or modem is a simple and effective solution for many connectivity issues.

Mark Ginter is a tech blogger with a passion for all things gadgets and gizmos. A self-proclaimed "geek", Mark has been blogging about technology for over 15 years. His blog, techquack.com, covers a wide range of topics including new product releases, industry news, and tips and tricks for getting the most out of your devices. If you're looking for someone who can keep you up-to-date with all the latest tech news and developments, then be sure to follow him over at Microsoft.