- This problem usually occurs on Windows 10 PCs, but it’s not limited to that operating system.
- The problem occurs with both internal and external microphones, so it doesn’t matter if you’re using a laptop or a computer.
Silencing the silent glitch: Unveiling effective remedies for mic self-muting on Windows 10 PCs.
Privacy & Transparency in Microphone Settings
To address the mic self-muting issue on your Windows 10 PC, we understand the importance of privacy and transparency. We want to provide straightforward solutions to help you resolve this issue.
If your microphone is not functioning properly, there are a few steps you can take to fix it. First, check your sound settings by right-clicking on the speaker icon in the taskbar and selecting “Open Sound Settings.” From there, click on “Sound Control Panel” and navigate to the “Recording” tab. Ensure that your microphone is set as the default recording device.
If the issue persists, you can try updating your device drivers. Open the Device Manager by pressing the Windows key + X, then select “Device Manager.” Expand the “Audio inputs and outputs” section and right-click on your microphone. Choose “Update driver” and follow the on-screen instructions.
Additionally, performing a system scan with the Windows Defender Security Center can help identify any potential issues affecting your microphone.
By following these simple steps, you can troubleshoot mic self-muting issues and enjoy uninterrupted audio on your PC. We value your privacy and strive to provide transparent solutions for a seamless user experience.
Dealing with Automatic Microphone Re-adjustments
If you’re experiencing automatic microphone re-adjustments or self-muting issues on your Windows 10 PC, here are some solutions to help you resolve the problem.
First, open Command Prompt and run a system scan using the sfc /scannow command. This will check for any corrupted system files and fix them if necessary.
Next, open Task Manager and check for any applications or processes that may be interfering with your microphone. Close any unnecessary apps and processes that could be causing the issue.
You can also try updating your device drivers by going to the Device Manager and selecting the microphone device. Right-click and choose “Update driver” to ensure you have the latest drivers installed.
If none of these methods work, try adjusting the microphone settings in the Properties menu. Right-click on the microphone icon in the taskbar, select “Sounds,” go to the “Recording” tab, and click on your microphone. Then, click on “Properties” and navigate to the “Levels” tab. Adjust the volume as needed.
By following these steps, you should be able to resolve the mic self-muting issue on your Windows 10 PC. If you continue to experience problems, consider reaching out to Microsoft support for further assistance.
Fixing Misconfigured Microphone Settings
To fix misconfigured microphone settings on your Windows 10 PC, follow these steps:
1. Open Command Prompt by pressing the Windows key + R, typing “cmd,” and hitting Enter.
2. In the Command Prompt window, type “ms-settings:sound” and press Enter. This will open the Sound settings.
3. In the Sound settings, locate the microphone you’re using (e.g., headset mic, laptop microphone, external mic).
4. Click on the microphone you want to fix and select “Properties.”
5. In the Properties window, go to the “Levels” tab and make sure the microphone volume is set appropriately.
6. Also, check the “Enhancements” tab and ensure that no enhancements are enabled.
7. If your microphone automatically mutes itself, go to the “Advanced” tab and uncheck the “Allow applications to take exclusive control of this device” option.
8. Finally, click “Apply” and then “OK” to save the changes.
By following these steps, you should be able to resolve microphone issues and fix the mic self-muting problem on your Windows 10 PC.
Changing Advanced Microphone Settings
To change advanced microphone settings on your Windows 10 PC, follow these steps:
1. Right-click on the Volume icon in the taskbar and select “Open Sound settings.”
2. Under the “Input” section, click on the “Device properties” link of your microphone.
3. In the microphone properties window, go to the “Additional device properties” section.
4. Click on the “Levels” tab to adjust the microphone volume.
5. You can also click on the “Enhancements” tab to apply audio enhancements like noise suppression or echo cancellation.
6. If you’re using a headset mic, ensure that the “Mute” button on the headset is not activated.
7. If your microphone automatically mutes or you’re facing other issues, try updating your audio drivers or checking for any conflicting applications in the Task Manager.
By following these steps, you can easily change the advanced microphone settings on your Windows 10 PC and resolve any mic self-muting issues you may be experiencing.
Addressing Microphone Driver Issues
- Open Device Manager by pressing Windows key + X and selecting Device Manager from the menu.
- Expand the Audio inputs and outputs or Sound, video and game controllers category.
- Right-click on your microphone device and select Update driver.
- Choose the Search automatically for updated driver software option.
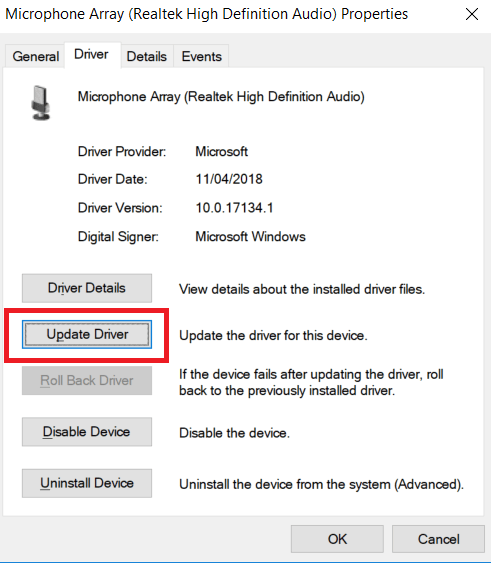
- Wait for Windows to search for the latest driver and install it.
- Restart your computer and check if the microphone self-muting issue is resolved.
Repair Method 2: Rollback Microphone Driver
- Open Device Manager by pressing Windows key + X and selecting Device Manager from the menu.
- Expand the Audio inputs and outputs or Sound, video and game controllers category.
- Right-click on your microphone device and select Properties.
- Go to the Driver tab and click on Roll Back Driver.
- Follow the on-screen instructions to complete the rollback process.
- Restart your computer and check if the microphone self-muting issue is resolved.

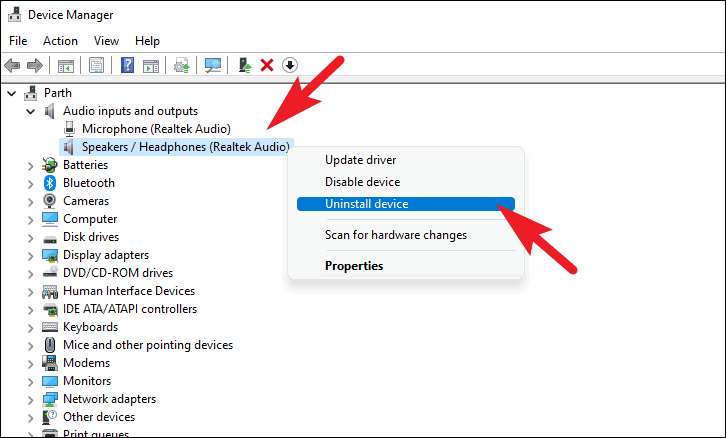
Repair Method 3: Uninstall and Reinstall Microphone Driver
- Open Device Manager by pressing Windows key + X and selecting Device Manager from the menu.
- Expand the Audio inputs and outputs or Sound, video and game controllers category.
- Right-click on your microphone device and select Uninstall device.
- Confirm the uninstallation and wait for the process to complete.
- Restart your computer.
- Windows will automatically reinstall the microphone driver.
- Check if the microphone self-muting issue is resolved.
Repair Method 4: Disable Exclusive Mode for Microphone
- Right-click on the speaker icon in the system tray and select Recording devices.
- Double-click on your microphone device.
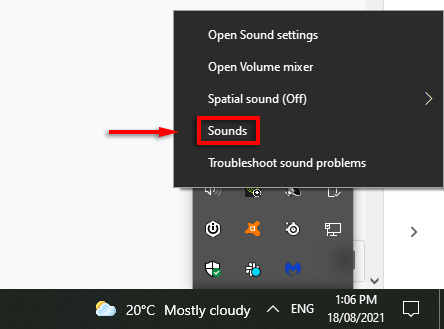
- Go to the Advanced tab.
- Uncheck the Allow applications to take exclusive control of this device option.
- Click Apply and then OK.
- Restart your computer and check if the microphone self-muting issue is resolved.
Performing a Clean Boot to Resolve Microphone Muting
Performing a Clean Boot can help resolve microphone muting issues on your Windows 10 PC. This method allows you to start your PC with only essential programs and services, eliminating any conflicts that may be causing the problem.
To perform a Clean Boot:
1. Press the Windows key + R to open the Run dialog box.
2. Type “msconfig” and press Enter.
3. In the System Configuration window, go to the Services tab.
4. Check the “Hide all Microsoft services” box, then click “Disable all”.
5. Next, go to the Startup tab and click “Open Task Manager”.
6. Disable all startup items by right-clicking each one and selecting “Disable”.
7. Close Task Manager and click “OK” in the System Configuration window.
8. Restart your PC.
Once your PC has restarted, check if the microphone muting issue has been resolved. If it has, you can gradually enable services and startup items to identify the specific program or service causing the problem. Remember to restart your PC after enabling each item to pinpoint the culprit.

Mark Ginter is a tech blogger with a passion for all things gadgets and gizmos. A self-proclaimed "geek", Mark has been blogging about technology for over 15 years. His blog, techquack.com, covers a wide range of topics including new product releases, industry news, and tips and tricks for getting the most out of your devices. If you're looking for someone who can keep you up-to-date with all the latest tech news and developments, then be sure to follow him over at Microsoft.