- Wireless networking problems in Windows 10 are usually easy to fix.
- The most common cause of the “No Internet Secured” connection error is a change in Internet Protocol (IP) configuration settings.
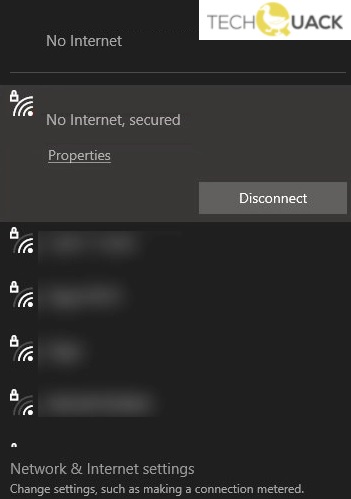
- The error is related to a wireless connection or configuration problem.
- Let’s take a look at eight solutions to fix the ‘No Internet, secure” error in the Windows 10 taskbar window.
Troubleshooting internet connectivity issues can be frustrating, especially when encountering the “No Internet Secured” error on Windows 10 and 11. In this article, we will explore effective methods to resolve this error and regain seamless internet access on your Windows devices.
Understanding the “No Internet, Secured” Error
If you’re encountering the “No Internet, Secured” error on your Windows 10 or 11 device, there are a few steps you can take to fix the issue.
First, check if the problem is with your router. Restart it by unplugging the power cable, waiting for a few seconds, and then plugging it back in.
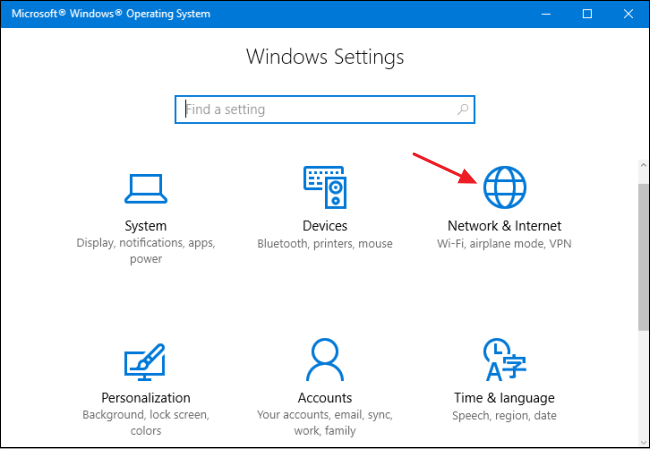
Next, try resetting your network adapter. Right-click on the network icon in the taskbar and select “Open Network & Internet settings.” Under the “Network status” section, click on “Network reset” and follow the prompts.
If that doesn’t work, you can try forgetting the problematic network. Right-click on the network icon again, select “Open Network & Internet settings,” and click on “Manage known networks.” Find the network causing the issue, click on it, and select “Forget.” Then reconnect to the network and see if the error persists.
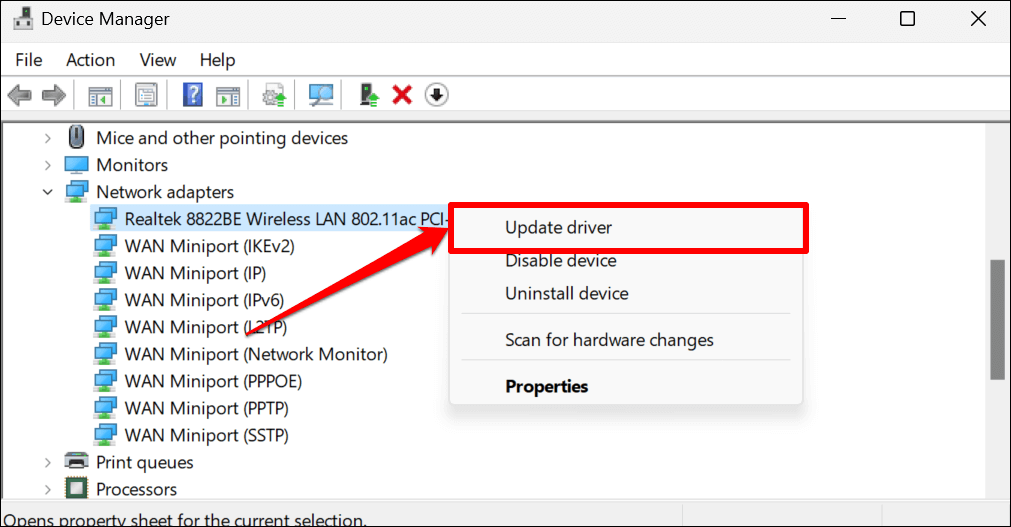
If none of these steps work, you can also try updating your network adapter driver. Open the Device Manager, expand the “Network adapters” category, right-click on your adapter, and select “Update driver.”
These steps should help you resolve the “No Internet, Secured” error and restore your internet connection.
Resetting the Windows 10 Network Configuration
If you’re experiencing a “No Internet Secured” error on your Windows 10 or 11 computer, resetting the network configuration can help resolve the issue. Follow these steps to fix the problem:
1. Open the Start menu and click on the “Settings” icon (a gear symbol).
2. In the Settings window, select “Network & Internet.”
3. Click on the “Status” tab in the left-hand menu.
4. Scroll down and click on the “Network reset” option.
5. A warning message will appear. Click on the “Reset now” button to proceed.
6. Your computer will restart, and the network settings will be reset to their default values.
7. After the restart, reconnect to your WiFi network using the proper credentials.
By resetting the network configuration, you can often resolve connectivity issues and eliminate the “No Internet Secured” error. Give it a try if you’re experiencing this problem.
Checking the Network Configuration
To check your network configuration and fix the “No Internet Secured” error in Windows 10 and 11, follow these steps:
1. Open the taskbar by clicking on the world symbol in the bottom-right corner of your screen.
2. Locate the Wi-Fi network icon and right-click on it.
3. Select “Open Network & Internet Settings” from the dropdown menu.
4. In the Settings window, click on “Network & Internet” in the left-hand menu.
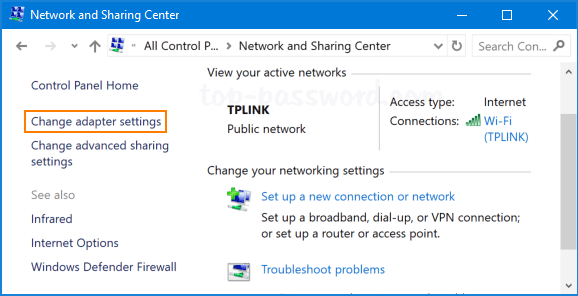
5. Scroll down and click on “Change adapter options” under the “Advanced network settings” section.
6. A new window will open, displaying your network connections. Right-click on your wireless network and select “Properties”.
7. In the Properties window, scroll down to the “This connection uses the following items” section and double-click on “Internet Protocol Version 4 (TCP/IPv4)”.
8. Ensure that both the “Obtain an IP address automatically” and “Obtain DNS server address automatically” options are selected. Click “OK” to save the changes.
9. Restart your laptop and check if the “No Internet Secured” error persists. If it does, try troubleshooting your network connection or consider contacting your network provider for further assistance.
Remember, these steps may vary slightly depending on your specific laptop model and Windows version.
python

import urllib.request
def check_internet_connection():
try:
urllib.request.urlopen('http://www.google.com', timeout=1)
print("Internet connection is active.")
except urllib.error.URLError:
print("No internet connection.")
check_internet_connection()
This code uses the `urlopen` function from the `urllib.request` module to attempt opening a connection to a specified URL (in this case, Google’s homepage). If the connection is successful within the given timeout (1 second in the example), it prints “Internet connection is active.” Otherwise, it prints “No internet connection.”
Please note that this sample code only checks the general internet connectivity and does not specifically address the “no internet secured” error on a Wi-Fi connection.
Setting a Fixed DNS Server
To set a fixed DNS server and fix the “No Internet Secured” error in Windows 10 and 11, follow these steps:
1. Right-click on the network icon (world symbol) in the system tray and select “Open Network & Internet Settings.”
2. In the Settings window, click on “Change adapter options.”
3. Locate the network connection you are using (e.g., WiFi, Ethernet) and right-click on it, then select “Properties.”
4. In the Properties window, scroll down and double-click on “Internet Protocol Version 4 (TCP/IPv4).”
5. Select the option “Use the following DNS server addresses.”
6. Enter the preferred DNS server address (e.g., 8.8.8.8) and alternate DNS server address (e.g., 8.8.4.4).
7. Check the “Validate settings upon exit” box and click “OK” to save the changes.
8. Restart your computer and check if the “No Internet Secured” error is resolved.
By setting a fixed DNS server, you can resolve network errors and ensure a stable and secure internet connection.
Disabling 5Ghz to Resolve the Error
To resolve the “No Internet Secured” error in Windows 10 and 11, you can try disabling the 5GHz frequency on your WiFi network. This error often occurs due to a conflict between the wireless network and your device.
Here’s a simple method to fix the issue:
1. Access your network router’s settings by typing its IP address into a web browser.
2. Look for the wireless settings section and find the 5GHz frequency option.
3. Disable the 5GHz frequency by unchecking the corresponding box or selecting a different option.
4. Save the changes and restart your router.
By disabling the 5GHz frequency, you may experience a slightly slower WiFi connection, but it should resolve the “No Internet Secured” error. Remember to reconnect your devices to the network after making these changes.
If this solution doesn’t work, there are other troubleshooting steps available in the full guide on how to fix the “No Internet Secured” error in Windows 10 and 11.
Reinstalling and Updating the Network Adapter
To reinstall and update the network adapter, follow these steps:
1. Press the Windows key + X and select “Device Manager” from the menu.
2. In the Device Manager window, expand the “Network adapters” category.
3. Right-click on your network adapter and select “Uninstall device.”
4. Check the box that says “Delete the driver software for this device” and click “Uninstall.”
5. Restart your computer.
6. Once your computer restarts, it will automatically reinstall the network adapter driver.
7. To update the driver, right-click on the network adapter in Device Manager and select “Update driver.”
8. Choose the option to search for updated driver software automatically.
9. Windows will search for and install any available driver updates for your network adapter.
10. After the update is complete, restart your computer once again.
This method should resolve the “No Internet Secured” error and restore your internet connection. If you continue to experience issues, consider checking your network router or contacting your internet service provider for further assistance.
Disabling Wi-Fi Sharing/Hotspot Software
To disable Wi-Fi sharing or hotspot software and fix the “No Internet Secured” error in Windows 10 and 11, follow these steps:
1. Open the Start menu and type “Network Connections” in the search bar. Click on the “View Network Connections” option.
2. Right-click on the Wi-Fi network you are connected to and select “Properties” from the drop-down menu.
3. In the Wi-Fi Properties window, click on the “Sharing” tab.
4. Uncheck the box that says “Allow other network users to connect through this computer’s Internet connection.”
5. Click “OK” to save the changes.
By disabling Wi-Fi sharing, you are preventing any software or devices from using your computer’s Internet connection, which can help resolve the “No Internet Secured” error. Remember to restart your computer after making these changes for them to take effect.
If you continue to experience the error, it may be worth checking if there are any network driver updates available or troubleshooting your router settings.
Dealing with Windows 10 Build 2004 No Internet Access Bug
If you’re experiencing the “No Internet Secured” error on your Windows 10 or 11 device, there are a few steps you can take to fix it.
First, try restarting your modem, router, and device to see if that resolves the issue. If not, check your network settings to ensure everything is configured correctly.
If the problem persists, you can try resetting your network settings. Press the Windows key + R to open the Run dialog, then type “cmd” and press Enter. In the Command Prompt, type “netsh winsock reset” and press Enter. Restart your device after the process completes.
If none of these solutions work, you may need to update your network drivers or contact your Internet Service Provider for further assistance. Remember to always double-check your network cables and ensure you have a stable internet connection.
Removing or Disabling Internet Security Software
If you’re encountering the “No Internet Secured” error on your Windows 10 or 11 device, it could be due to your internet security software interfering with your connection. To resolve this issue, you need to remove or disable the internet security software temporarily. Here’s how you can do it:
1. Press the Windows key + R to open the Run dialog box.
2. Type “appwiz.cpl” and hit Enter to open the Programs and Features window.
3. Locate your internet security software from the list of installed programs.
4. Right-click on it and select “Uninstall” or “Change.”
5. Follow the on-screen instructions to remove the software from your system.
Alternatively, you can disable the software temporarily by following these steps:
1. Locate the internet security software’s icon in the system tray (usually located in the bottom-right corner of the screen).
2. Right-click on the icon and look for an option like “Disable” or “Turn off protection.”
3. Click on that option to disable the software temporarily.
By removing or disabling your internet security software, you can troubleshoot the “No Internet Secured” error and potentially restore your internet connection. Remember to re-enable or reinstall the software once you’ve addressed the issue.
For more detailed instructions or alternative solutions, you can refer to guides on websites like LazyAdmin or the Microsoft support page.
Optimizing Power Plan Settings
To optimize power plan settings and fix the “No Internet Secured” error in Windows 10 and 11, follow these steps:
1. Open the Power Options menu by right-clicking the Start button and selecting “Power Options.”
2. In the Power Options window, select the power plan you’re currently using or want to modify.
3. Click on “Change plan settings” next to the selected power plan.
4. In the next window, click on “Change advanced power settings.”
5. Look for the “Wireless Adapter Settings” option and expand it.
6. Expand the “Power Saving Mode” option and set it to “Maximum Performance” for both on battery and plugged in modes.
7. Expand the “Sleep” option and set the “Allow hybrid sleep” and “Hibernate after” settings to “Never.”
8. Click “Apply” and then “OK” to save the changes.
9. Restart your computer to apply the new power plan settings.
Following these steps should help resolve the “No Internet Secured” error and optimize your power plan settings for a stable internet connection.
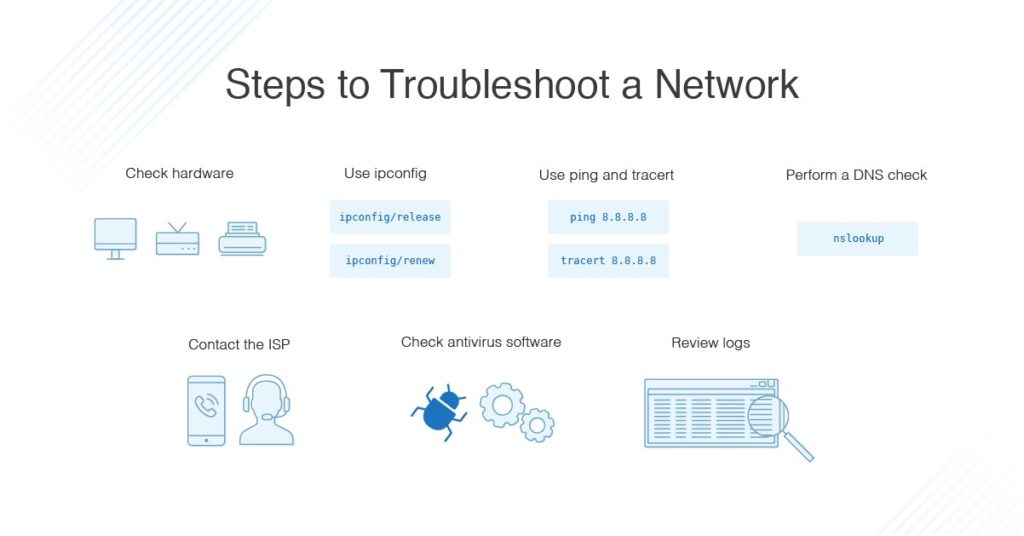
Troubleshooting Wired and Wireless Network Problems
- Check network cables and connections:
- Ensure all cables are securely plugged in.
- Inspect cables for any damage or fraying.
- If using a wired connection, try using a different Ethernet cable.
- Restart your modem and router:
- Power off your modem and router.
- Wait for about 30 seconds.
- Power on your modem, and once it is fully operational, power on your router.
- Disable and re-enable network adapter:
- Open the Network Connections settings.
- Locate your network adapter, right-click on it, and select Disable.
- Wait for a few seconds, right-click on the adapter again, and select Enable.
- Update network adapter driver:
- Go to the manufacturer’s website for your network adapter.
- Search for the latest driver for your specific adapter model.
- Download and install the updated driver.
- Reset TCP/IP stack:
- Open Command Prompt as an administrator.
- Type the command: netsh int ip reset
- Press Enter and wait for the process to complete.
- Restart your computer.
- Disable security software temporarily:
- If you have any antivirus or firewall software, temporarily disable it.
- Check if the internet connection issue is resolved.
- If it is, consider adjusting the settings of your security software or contacting their support for further assistance.
- Perform a network reset:
- Open Settings and go to Network & Internet.
- Scroll down and click on Network reset.
- Click on Reset now and confirm the action.
- Wait for the process to complete and restart your computer.
- Contact your internet service provider (ISP):
- If none of the above steps resolve the issue, reach out to your ISP for assistance.
- They might be experiencing network outages or other problems that are affecting your internet connection.

Mark Ginter is a tech blogger with a passion for all things gadgets and gizmos. A self-proclaimed "geek", Mark has been blogging about technology for over 15 years. His blog, techquack.com, covers a wide range of topics including new product releases, industry news, and tips and tricks for getting the most out of your devices. If you're looking for someone who can keep you up-to-date with all the latest tech news and developments, then be sure to follow him over at Microsoft.