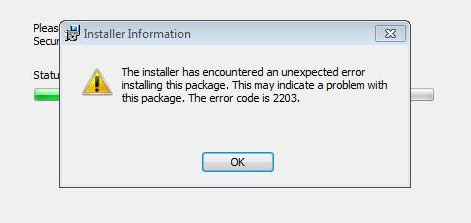
- The malfunction reported by error code 2203 can be caused by several different factors.
- The most common causes include incorrect system settings or incorrect entries in system elements.
- These problems can be resolved by using special software that restores system components and corrects system settings to restore stability.
- This Techquack article details what this problem means, what its possible causes are, and how to fix it.
Unlock the doors to seamless software installation on Windows 10 as we unravel the mysteries behind Error Code 2203.
Troubleshooting Error Code 2203 on Windows 10
If you encounter Error Code 2203 while installing a program on Windows 10, there are a few steps you can take to fix it.
Step 1: Check Permissions
Make sure you have the necessary permissions to install the program. Right-click on the installation folder and select “Properties.” Go to the “Security” tab and ensure that your user account has full control access.
Step 2: Clear Temp Folder
Clear the temporary folder on your computer. Press Windows key + R, type “%temp%”, and hit Enter. Delete all the files and folders in the temp folder.
Step 3: Disable Security Software
Temporarily disable any security software, such as antivirus or firewall, as they may interfere with the installation process. Remember to re-enable them after the installation is complete.
By following these steps, you should be able to resolve Error Code 2203 and successfully install your program on Windows 10. For more detailed instructions, you can visit thegeekpage.com.
Resolving Access Issues and Error Code 2203
To resolve access issues and fix error code 2203 when installing a program on Windows 10, follow these steps:
1. Take Ownership of the Installation Folder:
– Right-click on the installation folder and select “Properties.”
– Go to the “Security” tab and click on “Advanced.”
– Next to the owner’s name, click on “Change.”
– Enter your username and click “Check Names” to verify it.
– Click “OK” and check the box that says “Replace owner on subcontainers and objects.”
– Click “Apply” and then “OK” to save the changes.
2. Disable Antivirus or Security Software:
– Temporarily disable any antivirus or security software running on your PC.
– This can help avoid any conflicts during the installation process.
3. Run the Installer as an Administrator:
– Right-click on the installer file and select “Run as administrator.”
– This will give the installer the necessary admin access to make changes.
4. Check System Configuration:
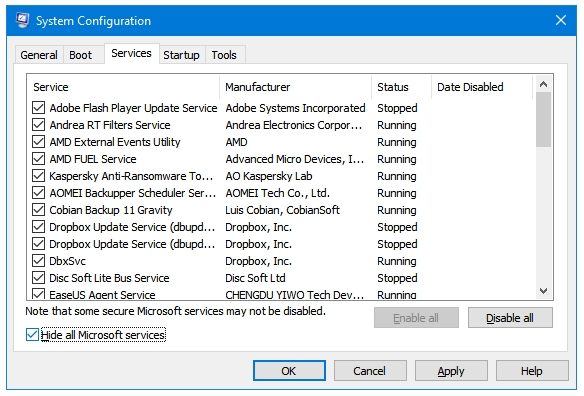
– Press “Windows + R” and type “msconfig” to open the System Configuration window.
– Go to the “Services” tab and check the box that says “Hide all Microsoft services.”
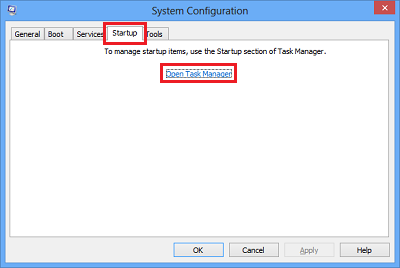
– Click “Disable all” and then go to the “Startup” tab.
– Click “Open Task Manager” and disable all startup items.
– Close the Task Manager and click “OK” in the System Configuration window.
– Restart your computer for the changes to take effect.
By following these steps, you should be able to fix error code 2203 and successfully install your desired program on Windows 10.
Methods to Resolve Error Code 2203 during Program Installation
- Right-click on the program installation file.
- Select “Run as administrator” from the context menu.
- If prompted for confirmation, click “Yes” to allow the program to make changes to your computer.
- Follow the on-screen instructions to complete the installation process.
Method 2: Disable Antivirus Software
- Open the antivirus software installed on your computer.
- Go to the settings or preferences section.
- Look for an option to disable or turn off the antivirus protection temporarily.
- Disable the antivirus software and confirm the changes.
- Attempt to install the program again.
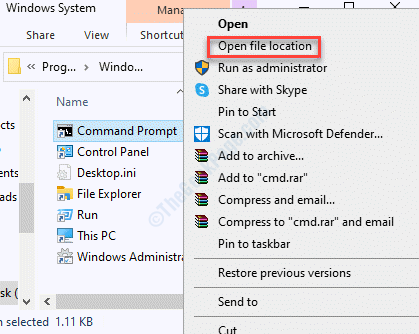
Method 3: Check System Integrity
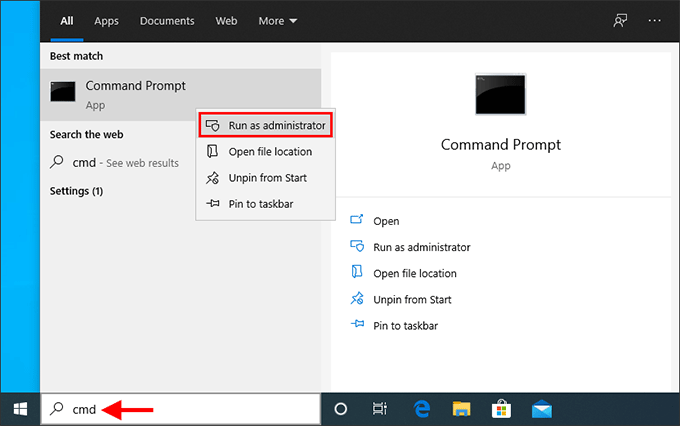
- Press the Windows key and type “Command Prompt” in the search bar.
- Right-click on “Command Prompt” and select “Run as administrator.”
- In the command prompt window, type the following command and press Enter: sfc /scannow
- Wait for the system scan to complete. This may take some time.
- If any issues are found, the system will attempt to fix them automatically.
Method 4: Clean Boot Windows
- Press the Windows key and type “msconfig” in the search bar.
- Open the “System Configuration” window.
- Go to the “Services” tab.
- Check the box that says “Hide all Microsoft services.”
- Click on “Disable all” to disable all non-Microsoft services.
- Go to the “Startup” tab.
- Click on “Open Task Manager.”
- In the Task Manager window, disable all startup items by right-clicking on each item and selecting “Disable.”
- Close the Task Manager and go back to the “System Configuration” window.
- Click on “Apply” and then “OK.”
- Restart your computer.
- Attempt to install the program again.
Steps to Fix Error Code 2203 on Windows 10
Step 1: Check if you have administrative access. To do this, right-click on the program installer and select “Run as administrator.”
Step 2: Change the ownership of the directory where you are installing the program. Right-click on the directory, select “Properties,” go to the “Security” tab, and click “Advanced.” Then, click on “Change” next to the owner’s name, enter your username, and click “Check Names.” Once your username is verified, click “OK” to save the changes.
Step 3: Disable any security software temporarily. This could include antivirus programs, firewall, or any security solution you may have. Make sure to enable them again once the installation is complete.
Step 4: Clear your temporary files. Press Windows + R, type “%temp%” (without quotes), and press Enter. Delete all the files in the folder that opens.
Step 5: Try installing the program again. If the error persists, try installing the program in Safe Mode or contact the program’s support for further assistance.
Remember to always back up your important files before making any changes to your system.

Mark Ginter is a tech blogger with a passion for all things gadgets and gizmos. A self-proclaimed "geek", Mark has been blogging about technology for over 15 years. His blog, techquack.com, covers a wide range of topics including new product releases, industry news, and tips and tricks for getting the most out of your devices. If you're looking for someone who can keep you up-to-date with all the latest tech news and developments, then be sure to follow him over at Microsoft.