- If you see the message “Default Gateway Not Available” when troubleshooting your Internet connection, the problem is either due to an incorrect IP address or ISP configuration settings.
- Perhaps your network adapter drivers are outdated, or your router is using a Wi-Fi frequency that is not compatible with your computer.
In the vast realm of internet connectivity, encountering obstacles is not uncommon. One such hurdle that can disrupt our online endeavors is the “Default Gateway is Not Available” issue. In this article, we will delve into the causes behind this predicament and explore effective ways to resolve it, ensuring a seamless browsing experience for all.
Introduction to the default gateway not available issue
If you are experiencing the “Default Gateway Is Not Available” issue on your Windows PC, there are a few steps you can take to fix it.
First, try restarting your computer and router. Sometimes, a simple reboot can resolve connectivity issues.
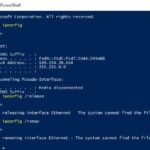
If that doesn’t work, you can try resetting your TCP/IP settings. Open the Command Prompt as an administrator and type “netsh int ip reset” followed by pressing Enter.
Another possible solution is to check your network adapter settings. Open the Device Manager, find your network adapter, right-click on it, and select “Properties.” Go to the “Power Management” tab and uncheck the option that says “Allow the computer to turn off this device to save power.”
If none of these steps work, it may be a driver issue. Check for driver updates for your network adapter on the manufacturer’s website.
Rebooting as a first step to fix the issue
To fix the “Default Gateway is Not Available” issue, one of the first steps you can take is to reboot your PC and router. Rebooting can help reset any temporary glitches or conflicts that may be causing the problem.
First, turn off your PC and unplug your router from the power source. Wait for a few minutes, then plug your router back in and turn on your PC. This simple step can often resolve the issue and restore your internet connection.
If rebooting doesn’t solve the problem, you can try resetting your router to its factory settings. Look for a small reset button on the back or bottom of your router, press and hold it for about 10 seconds until the lights on the router blink. This will reset your router’s settings to their default configuration.
If the issue persists, you may need to check your TCP/IP settings. Open the Command Prompt as an administrator by pressing the Windows key + X and selecting “Command Prompt (Admin)” from the menu. In the Command Prompt window, type “netsh int ip reset” and press Enter. This will reset the TCP/IP stack and can help resolve network-related issues.
If none of these solutions work, it’s possible that the problem lies with your router or network provider. Contact your network administrator or Internet Service Provider for further assistance.
Remember, these steps can vary depending on your specific setup and version of Windows. If you need more detailed instructions, you can refer to the article by Milan Stanojevic on Windows Report for more information.
Changing Power Management settings for the network adapter
To fix the “Default Gateway Is Not Available” issue with your network adapter, you can change the power management settings. Here’s how:
1. Go to the Start menu and search for “Device Manager.”
2. Open Device Manager and find the network adapter you’re having trouble with.
3. Right-click on the network adapter and select “Properties.”
4. In the Properties window, go to the “Power Management” tab.
5. Uncheck the box that says “Allow the computer to turn off this device to save power.”
6. Click “OK” to save the changes.
By disabling power management for the network adapter, you can prevent it from being turned off to save power, which may resolve the issue. Remember to apply these settings for both your Wi-Fi and Ethernet adapters if you’re experiencing the problem on both.
If you’re still facing the issue after changing the power management settings, try other troubleshooting steps such as updating your network adapter drivers or resetting your TCP/IP stack.
python

import wmi
def check_default_gateway():
c = wmi.WMI()
for interface in c.Win32_NetworkAdapterConfiguration(IPEnabled=True):
if interface.DefaultIPGateway:
default_gateway = interface.DefaultIPGateway[0]
print(f"Default Gateway: {default_gateway}")
return True
return False
if __name__ == "__main__":
if check_default_gateway():
print("Default gateway is available.")
else:
print("Default gateway is not available.")
Please note that this code only checks for the presence of a default gateway on Windows using the `wmi` module. Adapting it to other platforms or implementing further troubleshooting capabilities would require additional knowledge about your specific requirements.
Updating network adapter drivers
Locate your network adapter under the “Network adapters” section and right-click on it. Select “Update driver” from the context menu.
You’ll be presented with two options: “Search automatically for updated driver software” or “Browse my computer for driver software.” Choose the first option to let Windows automatically search and install the latest driver. If Windows is unable to find an updated driver, choose the second option and manually locate the driver file you downloaded from the manufacturer’s website.
After updating the driver, restart your computer to apply the changes. This should help resolve the “Default Gateway Is Not Available” error and restore your internet connection.
Remember to periodically check for driver updates to ensure your network adapter is running smoothly.
Running the Network Troubleshooter
To fix the “Default Gateway Is Not Available” issue on your Windows 10 computer, you can use the Network Troubleshooter tool.
First, go to the Start menu and search for “Network Troubleshooter.” Click on the “Network Troubleshooter” option in the search results.
The Network Troubleshooter will automatically detect and fix common network issues, including problems with the default gateway.
If the troubleshooter is unable to resolve the issue, you can try resetting your home router. To do this, unplug the router from the power source, wait for a few seconds, and then plug it back in.
You can also check your router settings to ensure that the default gateway is configured correctly.
If none of these solutions work, you may need to contact your network administrator or Internet service provider for further assistance.
Resetting the network
To reset the network and fix the “Default Gateway Is Not Available” issue, follow these steps:
1. Open the Command Prompt as an administrator. Press the Windows key, type “Command Prompt,” right-click on it, and select “Run as administrator.”
2. In the Command Prompt window, type “netsh winsock reset” and press Enter. This command will reset the Winsock catalog, which can help resolve network issues.
3. Restart your computer to apply the changes.
4. If the issue persists, try resetting the TCP/IP stack. In the Command Prompt window, type “netsh int ip reset” and press Enter. Restart your computer after the process is complete.
5. If resetting Winsock and TCP/IP doesn’t resolve the issue, try updating your network adapter drivers. Visit the website of your computer manufacturer or network adapter manufacturer to find the latest drivers for your specific model.
Resetting network connections via CMD
If you’re experiencing the “Default Gateway Is Not Available” issue on your Windows computer, you can try resetting network connections using the Command Prompt (CMD). This method can help resolve connectivity problems and is relatively easy to perform. Here’s how you can do it:
1. Press the Windows key + R to open the Run dialog box.
2. Type “cmd” and press Enter to open the Command Prompt.
3. In the Command Prompt window, type the following command and press Enter: netsh winsock reset
4. Wait for the process to complete and restart your computer.
5. After the restart, check if the issue is resolved.
Resetting network connections can fix various network-related problems, including the “Default Gateway Is Not Available” error. This method resets the TCP/IP stack and can resolve issues caused by corrupted network settings. Give it a try and see if it helps you regain access to the internet.
Using Outbyte Driver Updater
Fixing the Default Gateway Is Not Available Issue can be a frustrating task, but with the help of Outbyte Driver Updater, it becomes much easier.
First, ensure that your home router is working properly and that there are no issues with your network settings.
Next, download and install Outbyte Driver Updater from their official website.
Once installed, launch the program and let it scan your computer for outdated or missing drivers.
Update any drivers that are flagged as outdated or missing.
Outbyte Driver Updater will also provide you with recommendations for other drivers that may need updating.
Apply these recommendations to ensure that everything is up to date.
After updating your drivers, restart your computer to apply the changes.
This should resolve the Default Gateway Is Not Available issue and restore your internet connection.
For more detailed instructions and troubleshooting options, refer to the Outbyte Driver Updater user guide or contact their support team.
Resetting TCP/IP with the Netsh command
Resetting TCP/IP with the Netsh command can help fix the “Default Gateway Is Not Available” issue. Follow these steps to resolve the problem:
1. Open the Command Prompt as an administrator.
2. Type “netsh int ip reset” and press Enter.
3. Wait for the command to complete its execution.
4. Restart your computer.
This process will reset the TCP/IP stack and resolve any potential network issues. It’s a simple and effective solution that can help you regain access to the internet.
Remember to restart your computer after executing the command to ensure the changes take effect. If you’re still experiencing the issue after resetting TCP/IP, you may need to check your router settings or contact your internet service provider for further assistance.
Setting IPv4 settings
1. Press the Windows key + R to open the Run dialog box.
2. Type “ncpa.cpl” and press Enter to open the Network Connections window.
3. Right-click on your Wi-Fi or Ethernet adapter and select “Properties.”
4. In the Properties window, scroll down and double-click on “Internet Protocol Version 4 (TCP/IPv4).”
5. Select the option “Use the following IP address” and enter the IP address, Subnet mask, and Default gateway provided by your network administrator.
6. Optionally, you can also enter the DNS server addresses provided by your network administrator.
7. Click “OK” to save the changes and close the window.
This should fix the “Default Gateway Is Not Available” issue by manually setting the IPv4 settings for your network connection. If you’re still experiencing the problem, you may need to contact your network administrator for further assistance.
Disabling and enabling the network
To disable or enable the network on your computer, follow these steps:
1. Press the Windows key + R to open the Run dialog box.
2. Type “ncpa.cpl” and hit Enter to open the Network Connections window.
3. Right-click on the network adapter you want to disable or enable.
4. Select “Disable” or “Enable” from the context menu.
5. If prompted, enter your administrator password or confirm the action.
6. The network adapter will now be disabled or enabled accordingly.
By following these steps, you can easily disable or enable your network adapter to troubleshoot the “Default Gateway Is Not Available” issue. Remember to re-enable the adapter once you have resolved the problem.
Note: The steps provided here are applicable to Windows 10, Windows 8, and Windows 7. For Windows 11, the process may vary slightly.
If you continue to experience network connectivity issues, we recommend reaching out to your network administrator or seeking further assistance from technical support.
Using AnyViewer to connect to an external PC without troubles
Using AnyViewer to Connect to an External PC Without Troubles
If you’re facing the “Default Gateway is Not Available” issue on your Windows computer, you can use AnyViewer to connect to an external PC and resolve the problem. AnyViewer is a powerful tool that allows you to remotely access and control another computer. Here’s how to use it:
1. Download and install AnyViewer from the official website.
2. Launch AnyViewer on both your computer and the external PC you want to connect to.
3. On the external PC, provide the ID and password displayed by AnyViewer.
4. On your computer, enter the ID provided by the external PC and click “Connect.”
5. Once connected, you can troubleshoot and fix the “Default Gateway is Not Available” issue.
By following these steps, you can easily connect to an external PC and resolve the gateway error. AnyViewer provides a seamless remote connection experience, allowing you to efficiently troubleshoot network issues.

Mark Ginter is a tech blogger with a passion for all things gadgets and gizmos. A self-proclaimed "geek", Mark has been blogging about technology for over 15 years. His blog, techquack.com, covers a wide range of topics including new product releases, industry news, and tips and tricks for getting the most out of your devices. If you're looking for someone who can keep you up-to-date with all the latest tech news and developments, then be sure to follow him over at Microsoft.