
- Wsappx is one of those unknown services you see in Task Manager.
- The high CPU load you will see is the result of this process either installing or updating one of the Windows applications.
- If you try to disable this process through Windows services, you may see a message saying that other applications are affected.
- Windows 10 will begin searching your computer and the Internet for the latest driver software for your device.
Tackling wsappx High CPU and Memory Usage: Optimizing Windows 10 Performance
Understanding Wsappx and its Impact on CPU and Memory Usage
Wsappx is a system process in Windows 10 that is responsible for managing the installation, updates, and uninstallation of apps from the Microsoft Store. However, sometimes you may notice that the Wsappx process is consuming a high amount of CPU and memory resources, which can significantly impact your computer’s performance.
To fix the high CPU and memory usage caused by Wsappx, you can try the following solutions:
1. Fix 1: Reset Windows Store Cache
– Press Windows + R, type “wsreset.exe” and hit Enter.
– This will reset the Windows Store cache and may resolve the issue.
2. Fix 2: Disable Wsappx Services
– Press Windows + R, type “services.msc” and hit Enter.
– Locate and double-click on “AppX Deployment Service” and “Client License Service”.
– Set their startup type to “Disabled” and click OK.
By implementing these fixes, you can resolve the high CPU and memory usage caused by the Wsappx process in Windows 10. Remember to restart your computer after applying the fixes to see if the issue has been resolved.
Steps to Take When Experiencing High CPU Usage Caused by Wsappx
1. Open Task Manager by pressing Ctrl + Shift + Esc.
2. In the Processes tab, locate “wsappx” in the list.
3. Right-click on “wsappx” and select “End Task.”
4. If the CPU usage decreases, the issue is resolved. If not, continue to the next step.
5. Open the Registry Editor by typing “regedit” in the Windows Search bar and pressing Enter.
6. Navigate to “HKEY_LOCAL_MACHINE\SYSTEM\CurrentControlSet\Services\AppXSvc.”
7. Double-click on “Start” and change the value to “4” to disable the Windows Universal app installations.
8. Restart your computer to apply the changes.
9. If the CPU usage persists, try running Windows Update and installing any available updates.
10. If the problem still persists, consider performing a clean boot to troubleshoot any conflicting background services.
11. If none of the above solutions work, it may be necessary to seek further assistance from Microsoft support or a qualified technician.
Performing a Virus Scan to Address Wsappx-Related CPU Issues
If you’re experiencing high CPU usage due to the Wsappx process, a virus scan might help resolve the issue. Follow these steps to perform a virus scan on your Windows 10 computer:
1. Open the Windows Security app by typing “Windows Security” in the search bar and selecting it from the results.
2. In the Windows Security app, click on “Virus & threat protection” in the left-hand menu.
3. Click on the “Quick scan” option to start a scan of your computer for viruses and malware.
4. Wait for the scan to complete and take appropriate actions based on the scan results.
Performing a virus scan can help identify and remove any malicious software that could be causing high CPU usage. This can potentially resolve Wsappx-related CPU issues on your Windows 10 computer.
Updating Windows to Resolve High CPU Usage Caused by Wsappx
To resolve high CPU usage caused by Wsappx in Windows 10, follow these steps:
Fix 1: Use the Task Manager to End Wsappx Sub-Processes
1. Press Ctrl+Shift+Esc to open the Task Manager.
2. Go to the “Processes” tab.
3. Look for “AppXSVC” in the process list.
4. Right-click on “AppXSVC” and select “End Task”.
5. Repeat this process for any other Wsappx-related processes.
Fix 2: Disable Windows Store and App Updates
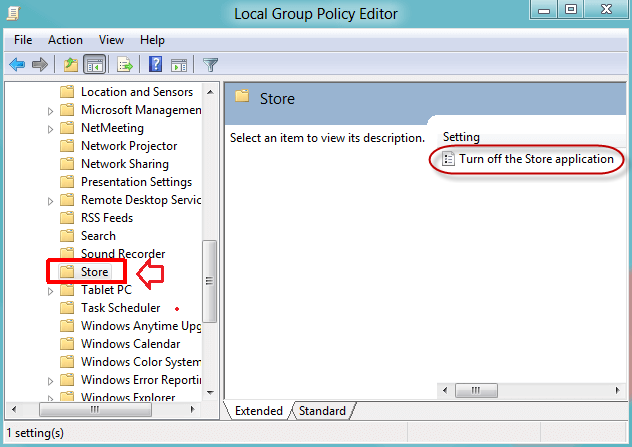
1. Press Win+R and type “gpedit.msc” to open the Local Group Policy Editor.
2. Navigate to “Computer Configuration” > “Administrative Templates” > “Windows Components” > “Store”.
3. Double-click on “Turn off the Store application” policy.
4. Select “Enabled” and click “Apply” then “OK”.
Uninstalling Recently Installed Apps to Reduce CPU Load from Wsappx
To reduce CPU load from Wsappx and fix high CPU and memory usage in Windows 10 computers, uninstall recently installed apps that may be causing the issue. Follow these steps:
1. Open the Start menu and go to “Settings”.
2. Click on “Apps” and then select “Apps & features”.
3. Scroll through the list of installed apps and identify the recently installed ones that might be causing the problem.
4. Click on the app and select “Uninstall”.
5. Follow the prompts to complete the uninstallation process.
By removing these apps, you can alleviate the strain on your CPU and improve system performance. Remember to regularly check and uninstall any unnecessary or problematic apps to keep your PC running smoothly.
Note: If you’re using Windows 8 or Windows 11, the steps may vary slightly, but the overall process remains the same.
If uninstalling apps doesn’t resolve the issue, you can explore other troubleshooting methods, such as checking for Windows updates, optimizing virtual memory settings, or scanning for malware.
Allocating More Virtual Memory to Manage Wsappx CPU Usage
To fix wsappx high CPU and memory usage in Windows 10 computers, you can try allocating more virtual memory. This can help manage the CPU usage and improve overall performance. Here’s how:
1. Open the Start menu and type “performance” to access the Performance options.
2. Select “Adjust the appearance and performance of Windows.”
3. In the Performance Options window, go to the Advanced tab.
4. Click on “Change” under the Virtual Memory section.
5. Uncheck the box that says “Automatically manage paging file size for all drives.”
6. Select the drive where Windows is installed and choose “Custom size.”
7. Set the Initial size and Maximum size values according to your system’s requirements. Make sure the values are within the recommended range.
8. Click “Set” and then “OK” to save the changes.
By allocating more virtual memory, you can provide additional resources for managing the wsappx CPU usage. This can help resolve high CPU issues and improve the performance of your Windows 10 computer.
Disabling Microsoft Store for Decreased CPU Usage by Wsappx
To address high CPU and memory usage caused by Wsappx in Windows 10, you can disable Microsoft Store. This will help decrease CPU usage and resolve the issue. Here’s how to do it:
1. Press the Windows key + R to open the Run dialog box.
2. Type “gpedit.msc” and hit Enter to open the Local Group Policy Editor.
3. In the editor, navigate to “Computer Configuration” > “Administrative Templates” > “Windows Components” > “Store”.
4. Double-click on “Turn off the Store application” policy.
5. Select “Enabled” and click on “Apply” and then “OK”.
By disabling the Microsoft Store, you prevent the Wsappx process from consuming excessive CPU resources. Remember to restart your computer for the changes to take effect.
Note: This solution is applicable for Windows 10 computers. If you are using Windows 11 or Windows 8, the steps may vary slightly.
For more troubleshooting solutions and tips, you can check out Sherly’s article on fixing wsappx high CPU and memory usage in Windows 10 computers.
Preventing Automatic Store App Updates for Improved CPU Performance
To fix the wsappx high CPU and memory usage in Windows 10 computers, preventing automatic store app updates can help improve CPU performance. Here are some workable solutions:
1. Open the Microsoft Store and click on the three-dot menu in the top right corner. Select “Downloads and updates.”
2. Under “App updates,” switch the toggle button to the off position to prevent automatic updates for all store apps.
3. To further optimize CPU performance, disable unnecessary background services. Press “Ctrl + Shift + Esc” to open the Task Manager. Look for processes like “svchost.exe” or “Windows Update” that consume a lot of CPU resources. Right-click on them and select “End task.”
4. Additionally, you can disable the Windows Universal appx deployment service. Press “Win + R” to open the Run dialog box. Type “services.msc” and press Enter. Locate “AppX Deployment Service” and double-click on it. Change the startup type to “Disabled” and click “OK.”
5. Lastly, ensure that your computer has enough free disk space. Use the Disk Cleanup tool or delete unnecessary files to free up disk space, which can help reduce high disk usage.
Removing Bloatware and Restricting Background Apps to Alleviate Wsappx CPU Load
To fix wsappx high CPU and memory usage in Windows 10 computers, you can take a few steps to remove bloatware and restrict background apps. This will help alleviate the CPU load caused by the wsappx process.
First, uninstall unnecessary programs from your PC that may be contributing to the high CPU usage. Open the Control Panel, go to “Programs” and then “Uninstall a program.” Remove any software that you don’t use or recognize.
Next, restrict the number of background apps running on your computer. Press “Ctrl + Shift + Esc” to open the Task Manager. Navigate to the “Startup” tab and disable any non-essential applications from running in the background.
You can also use the Computer Policy Editor or Registry Editor to limit the wsappx process. Type “gpedit.msc” in the Run dialog box to open the Computer Policy Editor. Navigate to “Computer Configuration” > “Administrative Templates” > “Windows Components” > “Store.” Enable the “Turn off the Store application” policy.
Alternatively, open the Registry Editor by typing “regedit” in the Run dialog box. Navigate to “HKEY_LOCAL_MACHINE\SOFTWARE\Policies\Microsoft\Windows\Store.” Create a new DWORD value named “RemoveWindowsStore” and set its value to “1.”
Additional Solutions to Try for High CPU and Memory Usage by Wsappx
- Open “Run” by pressing Windows Key + R.
- Type gpedit.msc and press Enter.
- In the Local Group Policy Editor, navigate to Computer Configuration > Administrative Templates > Windows Components > Store.
- Double-click on “Turn off the Store application” policy.
- Select “Enabled” and click “Apply” then “OK”.
- Restart your computer for the changes to take effect.
Method 2: Use Windows App Troubleshooter
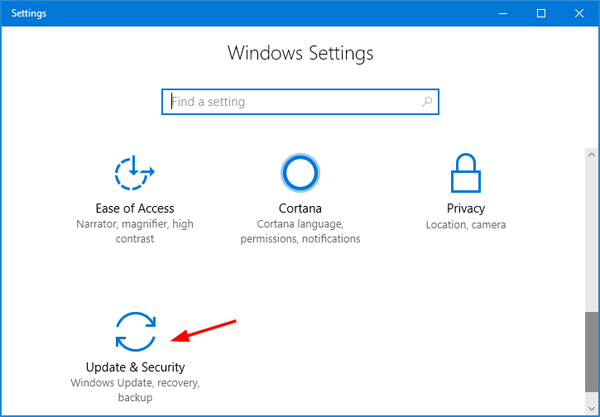
- Open Settings by pressing Windows Key + I.
- Click on “Update & Security”.
- Go to “Troubleshoot” in the left-hand menu.
- Scroll down and click on “Windows Store Apps”.
- Click on “Run the troubleshooter” and follow the on-screen instructions.
- Restart your computer after the troubleshooting process is complete.

Method 3: Reset Windows Store Cache
- Open Command Prompt as an administrator by right-clicking on the Start menu and selecting “Command Prompt (Admin)”.
- Type the following command and press Enter: wsreset.exe

- Wait for the process to complete. It may take a few minutes.
- Once the process is finished, restart your computer.
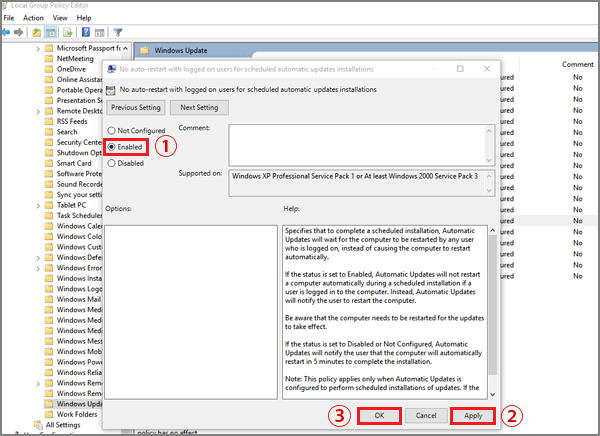
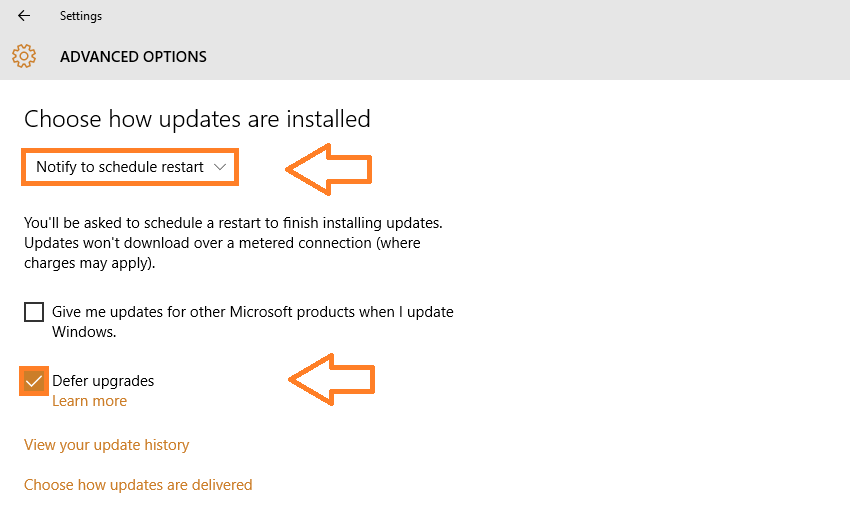
Method 4: Disable Automatic Updates
- Open Settings by pressing Windows Key + I.
- Click on “Update & Security”.
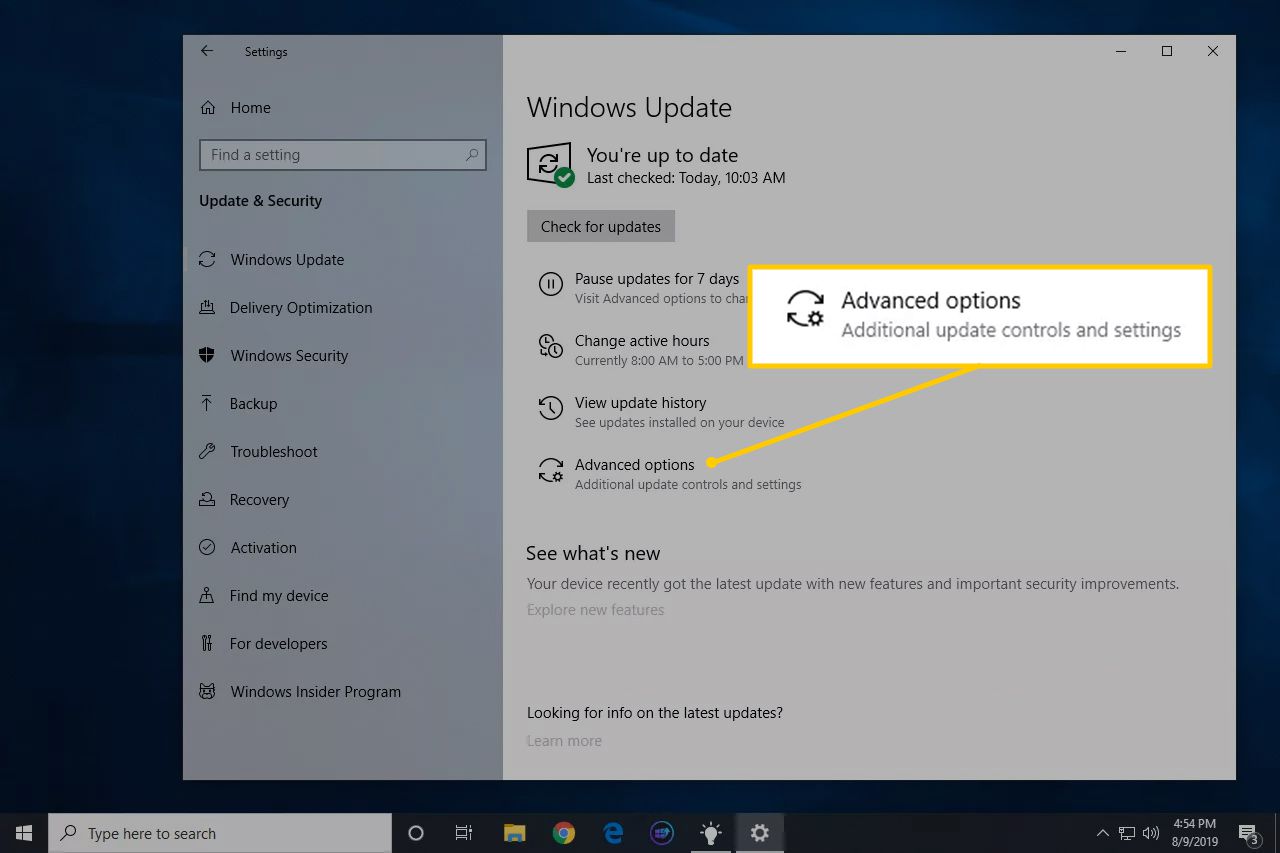
- Go to “Windows Update” in the left-hand menu.
- Click on “Advanced options”.
- Under the “Choose how updates are installed” section, select “Notify to schedule restart”.
- Restart your computer to apply the changes.
Managing CPU Load in Windows 10 to Optimize Performance
To manage CPU load and optimize performance in Windows 10, there are several workable solutions you can try. First, open the Task Manager by pressing Ctrl+Shift+Esc and check the process list for any tasks consuming a lot of CPU. If you find the “wsappx” process using high CPU and memory, you can try the following steps:
1. Disable Windows Store: Press Windows key+R, type “services.msc”, and hit Enter. Locate “Windows Store Service” and right-click to select “Properties”. Change the startup type to “Disabled” and click Apply.
2. Use Registry Editor: Press Windows key+R, type “regedit”, and hit Enter. Navigate to “HKEY_LOCAL_MACHINE\SOFTWARE\Microsoft\Windows\CurrentVersion\AppModel\StateChange”. Delete any entries related to “PackageID” and restart your computer.
3. Update Windows: Type “Windows Update” in the Windows search bar, click on it, and select “Check for updates”. Install any available updates, as they may contain fixes for high CPU usage issues.
By following these steps, you can effectively resolve the wsappx high CPU and memory usage issue in Windows 10.

Mark Ginter is a tech blogger with a passion for all things gadgets and gizmos. A self-proclaimed "geek", Mark has been blogging about technology for over 15 years. His blog, techquack.com, covers a wide range of topics including new product releases, industry news, and tips and tricks for getting the most out of your devices. If you're looking for someone who can keep you up-to-date with all the latest tech news and developments, then be sure to follow him over at Microsoft.