- Computer hardware has to work hard to perform its tasks.
- Sometimes they have to interrupt other tasks.
- This is similar to children interrupting their parents, but getting an adult’s attention can be enjoyable or disruptive.
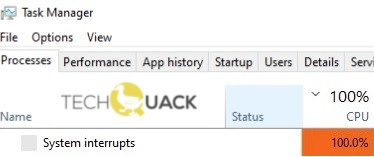
- If system interruptions are taking up more than 5-10% of the CPU, we have a problem.
- This could be due to a hardware or driver problem.
Uncovering the Hidden Culprit: Taming System Interrupts’ Havoc on Windows CPU Performance
Understanding “System Interrupts” and its Impact on CPU Usage
System interrupts can cause high CPU usage on Windows systems, affecting overall performance. These interrupts occur when the operating system needs to communicate with hardware devices or when there are issues with device drivers.
To fix high CPU usage caused by system interrupts, follow these steps:
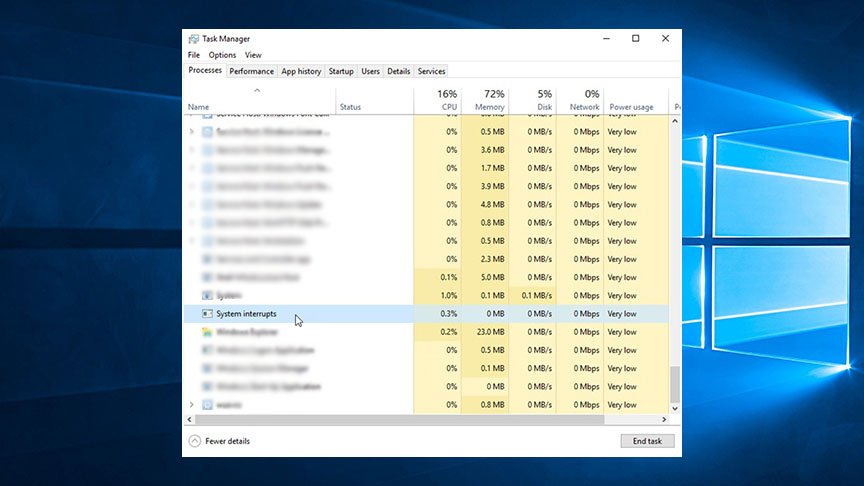
1. Open the Task Manager by pressing Ctrl + Shift + Esc and go to the “Performance” tab.
2. Check the CPU usage graph. If you see spikes or high usage under the “System” section, it indicates a problem with system interrupts.
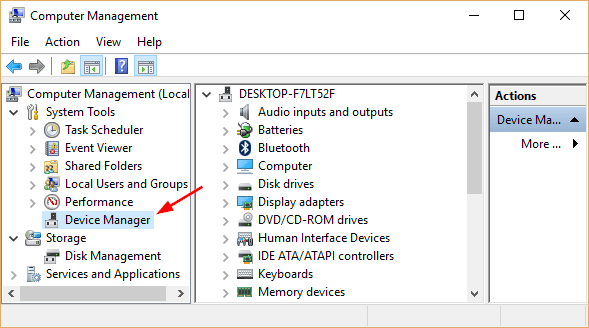
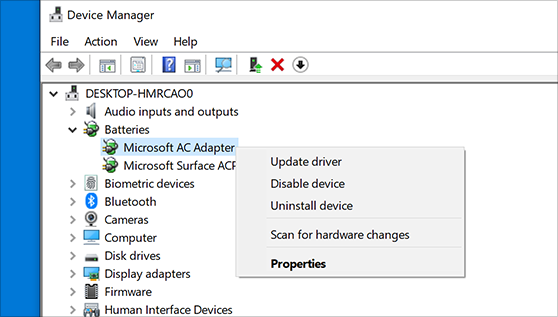
3. Update your device drivers. Right-click on the Windows Start menu, select “Device Manager,” and expand the relevant hardware categories. Right-click on the device and select “Update driver.”
4. Disable unnecessary devices. In the Device Manager, right-click on a device and select “Disable” to see if it reduces system interrupts and CPU usage.
5. Update your BIOS. Check the manufacturer’s website for any available BIOS updates.
6. Scan for malware. Use a reliable antivirus program to scan your system for any potential malware infections.
Resolving High CPU Usage Caused by System Interrupts
If you’re experiencing high CPU usage caused by system interrupts in Windows, there are a few steps you can take to resolve the issue.
First, open the Task Manager by pressing Ctrl + Shift + Esc and go to the “Performance” tab. Look for high CPU usage under the “CPU” section. If you see high percentages attributed to “System Interrupts,” it means there’s an issue with your computer hardware or device drivers.
To fix this, start by updating your device drivers. Right-click on the “Start” menu, select “Device Manager,” and expand the categories to find the problematic devices. Right-click on each device and select “Update driver.”
If updating the drivers doesn’t solve the problem, you can try disabling specific hardware components temporarily. Go back to the Device Manager, right-click on the component, and select “Disable device.” Monitor your CPU usage to see if the problem persists.
Remember to re-enable any disabled components once you’ve identified the culprit.
Disconnecting or Disabling External Devices
Disconnecting or disabling external devices can help resolve high CPU usage caused by system interrupts in Windows. This issue often occurs when there is a conflict between the operating system and the connected hardware.
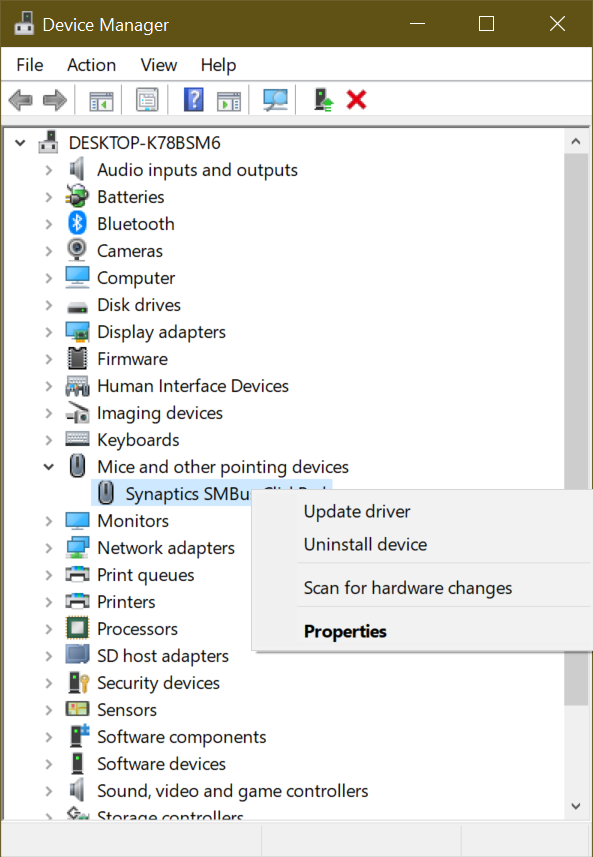
To start, open the Device Manager by pressing the Windows key + X and selecting “Device Manager” from the menu.
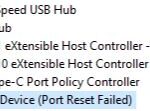
In the Device Manager, locate the devices under categories such as “USB controllers” or “Network adapters” that may be causing the high CPU usage. Right-click on each device and choose “Disable” to temporarily turn it off.
If disabling the devices doesn’t solve the issue, try disconnecting them physically from your computer.
Once the devices are disabled or disconnected, monitor the CPU usage in the Task Manager or a system monitoring tool to see if the problem persists.
If the high CPU usage is resolved, it indicates that one or more of the devices were causing the issue. You can then try updating the device drivers or seeking further assistance from the hardware manufacturer.
python

import psutil
# Function to check if the CPU usage is high due to interrupts
def check_interrupts(cpu_threshold):
cpu_percent = psutil.cpu_percent(interval=1, percpu=False)
interrupts = psutil.cpu_stats().interrupts
if cpu_percent > cpu_threshold:
print("High CPU Usage: {}%".format(cpu_percent))
print("Interrupts Count:", interrupts)
# Perform additional actions or troubleshooting steps here
# Main program
if __name__ == '__main__':
cpu_threshold = 80 # Define your desired CPU usage threshold here
while True:
check_interrupts(cpu_threshold)
In this code, we are using the psutil library to monitor CPU usage and retrieve the count of interrupts. The `check_interrupts` function compares the CPU usage against a threshold value (80% in this example) and displays a message if it exceeds the threshold. You can modify this function to include additional actions or troubleshooting steps specific to your requirements.
Please note that this sample code only serves as a starting point and may not directly solve the problem of high CPU usage caused by system interrupts on every Windows PC. Debugging and resolving such issues may require in-depth analysis, driver updates, or hardware troubleshooting.
Checking and Updating Hardware Drivers
To check and update hardware drivers in Windows:
1. Open the Device Manager by right-clicking on the Start button and selecting “Device Manager.”
2. In the Device Manager window, expand the categories to find the hardware component for which you want to update the driver.
3. Right-click on the specific hardware component and select “Update driver.”
4. Choose the option to automatically search for updated driver software. Windows will search online and install the latest driver if available.
5. If Windows doesn’t find an updated driver, you can also visit the manufacturer’s website to manually download and install the driver.
6. After updating the driver, restart your computer to apply the changes.
Updating hardware drivers can help resolve issues like high CPU usage caused by system interrupts. Keeping your drivers up to date ensures optimal performance and compatibility with your Windows operating system.
Disabling Internal Devices to Reduce CPU Usage
To reduce CPU usage caused by system interrupts in Windows, you can disable internal devices. This will help alleviate the strain on your CPU and improve overall system performance.
To do this, follow these steps:
1. Open the Device Manager by pressing the Windows key + X and selecting “Device Manager” from the menu.
2. Expand the “System devices” category.
3. Look for any devices with names that include terms like “interrupt controller” or “system timer”.
4. Right-click on each of these devices and select “Disable device”.
5. Confirm the action when prompted.
By disabling these internal devices, you are preventing them from generating interrupts that can consume CPU resources. However, keep in mind that this may affect the functionality of certain hardware components. If you experience any issues, simply re-enable the devices using the same process.
Identifying and Addressing Failing Hardware
If you are experiencing high CPU usage caused by system interrupts in Windows, it may indicate a failing hardware component. Here are some steps you can take to address this issue:
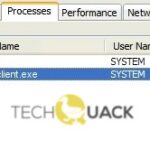
1. Use the System Task Manager: Open the System Task Manager by pressing Ctrl+Shift+Esc. Look for the “Processes” tab and sort the list by CPU usage to identify the program causing the high usage.
2. Update Device Drivers: Outdated or faulty device drivers can cause hardware interrupts. To update your drivers, go to the Device Manager, right-click on the device, and select “Update driver.”
3. Check for Hardware Issues: Run a diagnostic test on your computer hardware to identify any failing components. You can use built-in Windows tools or third-party software to perform these tests.
4. Replace Faulty Hardware: If the diagnostic test reveals failing hardware, you may need to replace the component causing the high CPU usage.
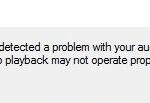
Disabling Sound Effects to Improve CPU Performance
To improve CPU performance and fix high CPU usage caused by system interrupts in Windows, consider disabling sound effects. Sound effects can sometimes consume a significant amount of CPU resources, leading to high CPU usage and system slowdowns.
To disable sound effects, follow these steps:
1. Open the Windows Control Panel.
2. Select “Sound” or “Sound and Audio Devices.”
3. In the “Playback” tab, select the audio device you are currently using.
4. Click on “Properties.”
5. In the “Enhancements” tab, check the box that says “Disable all enhancements.”
6. Click “Apply” and then “OK” to save the changes.
Disabling sound effects can alleviate the strain on your CPU caused by audio processing, resulting in improved performance and reduced system interrupts. Remember to also check for other potential causes of high CPU usage, such as outdated device drivers or background programs consuming excessive resources.
Updating BIOS to Optimize System Interrupts
To optimize system interrupts in Windows and fix high CPU usage caused by them, updating your BIOS is a recommended solution. Here’s how you can do it:
1. Start by accessing your computer’s BIOS settings. Restart your computer and look for the key or combination of keys to enter the BIOS. This is usually displayed during the boot process.
2. Once in the BIOS, navigate to the “Advanced” or “System” tab (the exact wording may vary depending on your BIOS version).
3. Look for an option related to “Interrupts” or “Interrupt Request (IRQ)” settings. It may be located under “PCIe/PCI/PnP Configuration” or a similar section.
4. Enable “Interrupt Moderation” or a similar feature if available. This helps in optimizing system interrupts and reducing CPU usage.
5. Save the changes and exit the BIOS. Your computer will restart.
By updating your BIOS and adjusting the interrupt settings, you can improve system performance and reduce high CPU usage caused by system interrupts. Remember to always be cautious when making changes to your BIOS settings.
Preliminary Workarounds for System Interrupts Issue
- Check for Hardware Issues
- Step 1: Inspect all physical connections of hardware components to ensure they are securely connected.

- Step 2: Test each hardware component individually on a different system to identify any faulty components.
- Step 3: Update the drivers for all hardware components by visiting the manufacturer’s website or using a dedicated driver update software.
- Update BIOS and Firmware
- Step 1: Identify the motherboard manufacturer and model.
- Step 2: Visit the manufacturer’s website and download the latest BIOS and firmware updates.
- Step 3: Follow the manufacturer’s instructions to update the BIOS and firmware.
- Disable Unnecessary Devices
- Step 1: Open Device Manager by pressing Win+X and selecting Device Manager from the menu.
- Step 2: Expand each category and identify devices that are not essential for your system.
- Step 3: Right-click on the unnecessary device and select Disable to disable it.
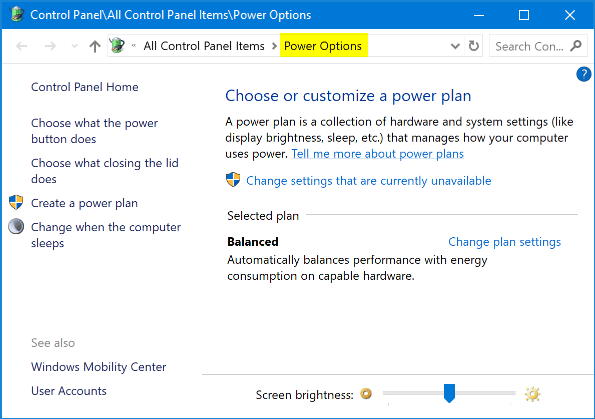
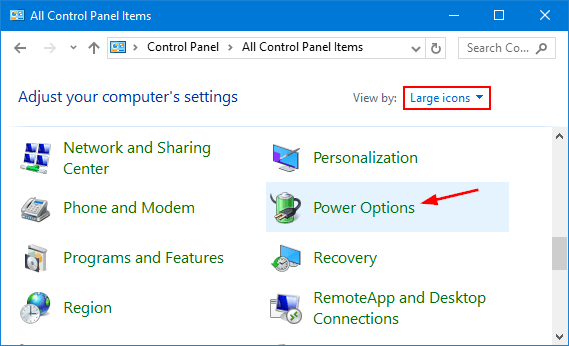
- Adjust Power Settings
- Step 1: Open the Power Options by pressing Win+X and selecting Power Options from the menu.
- Step 2: Select the currently active power plan and click on Change plan settings.
- Step 3: Adjust the advanced power settings and set the processor power management to 100% minimum and maximum.
- Scan for Malware
- Step 1: Install a reliable antivirus or antimalware software if not already installed.
- Step 2: Update the antivirus or antimalware software to ensure the latest virus definitions are used.
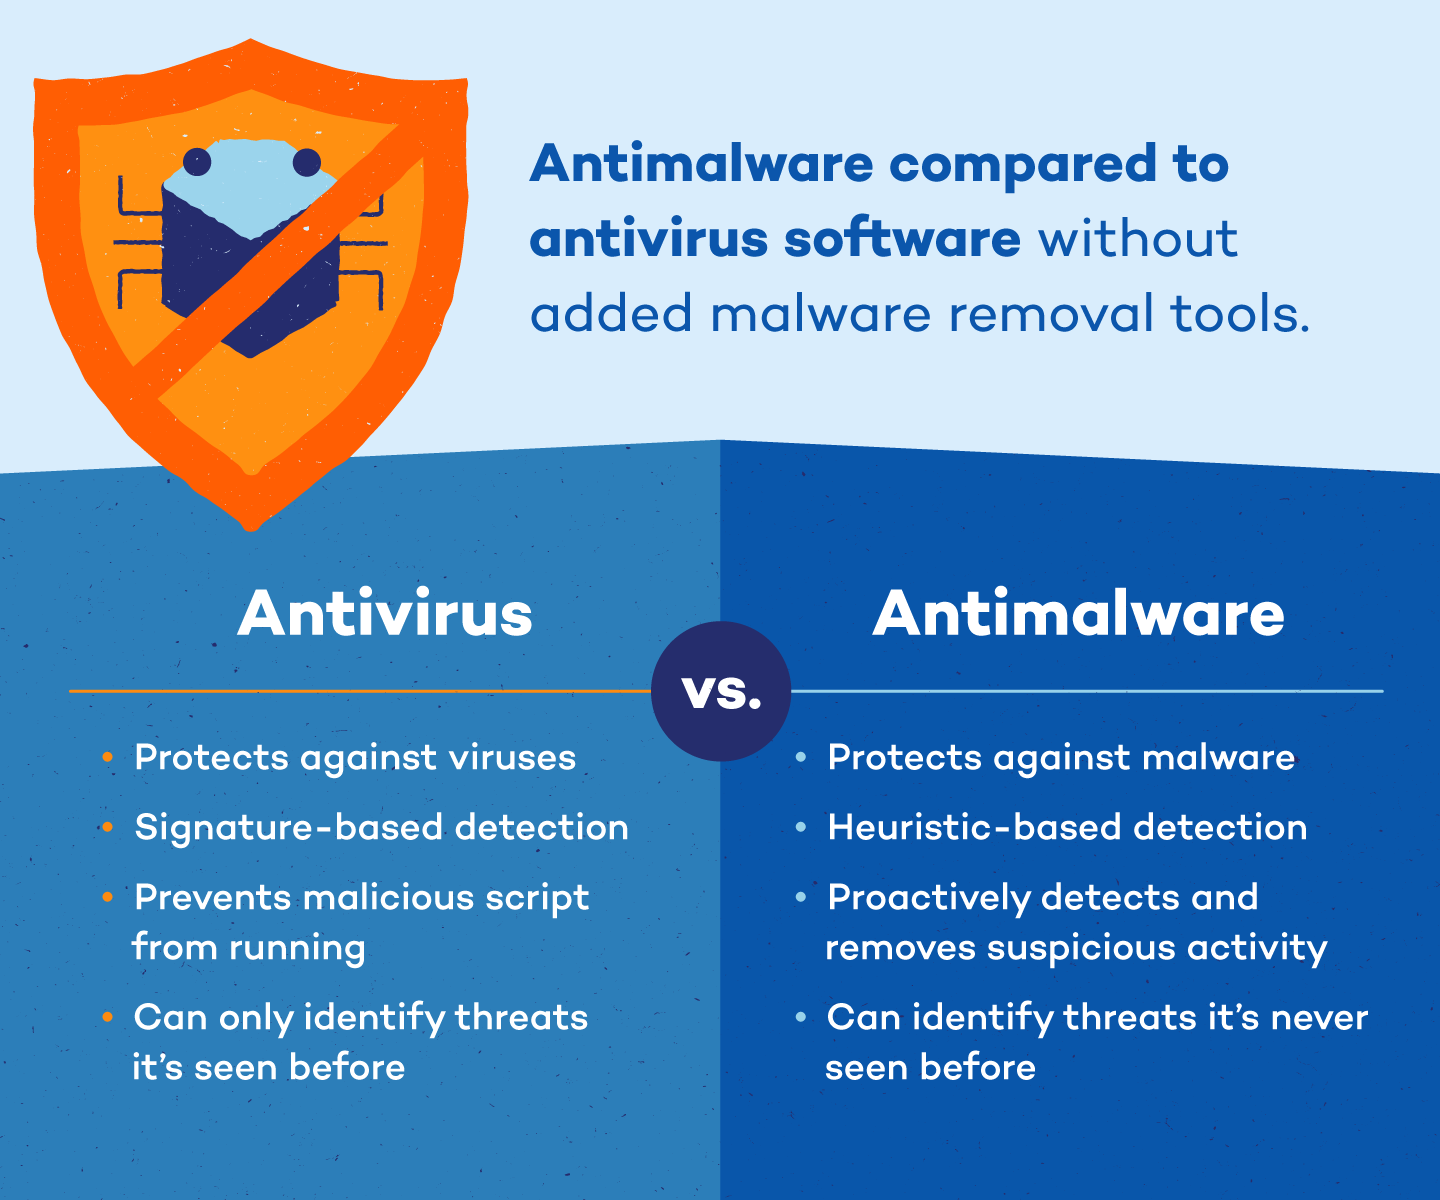
- Step 3: Perform a full system scan and follow the software’s instructions to remove any detected malware.
- Perform a Clean Boot
- Step 1: Press Win+R to open the Run dialog box.
- Step 2: Type msconfig and press Enter to open the System Configuration window.
- Step 3: In the General tab, select Selective startup and uncheck Load startup items.
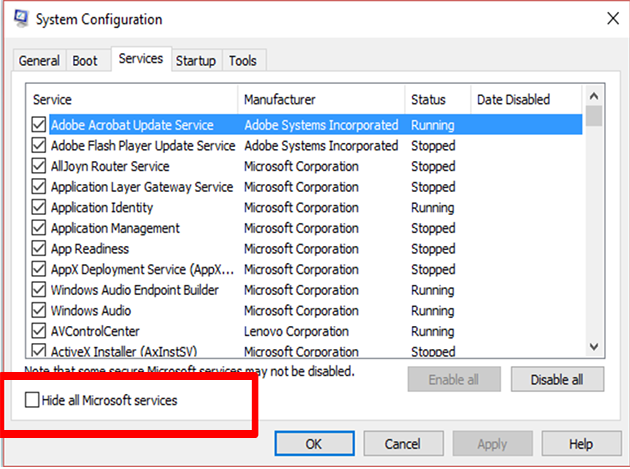
- Step 4: Go to the Services tab, check Hide all Microsoft services, and click on Disable all.
- Step 5: Click on Apply and then OK.
- Step 6: Restart the computer and observe if the system interrupts issue persists.
Additional Solutions for Managing System Interrupts and CPU Usage
- Step 1: Update Drivers
- Open Device Manager by pressing Win+X and selecting Device Manager.
- Expand the categories and locate the devices with exclamation marks or question marks.
- Right-click on each problematic device and select Update driver.
- Choose the option to automatically search for updated driver software.
- Follow the on-screen instructions to complete the driver update process.
- Step 2: Disable Unnecessary Devices
- Open Device Manager by pressing Win+X and selecting Device Manager.
- Expand the categories and locate the devices that are not in use or causing issues.
- Right-click on each unnecessary device and select Disable device.
- Confirm the disabling of the device.
- Repeat this process for all unnecessary devices.
- Step 3: Adjust Power Settings
- Open the Control Panel by pressing Win+R and typing control panel.
- Select Power Options from the list of available options.
- Choose the power plan you are currently using and click on Change plan settings.
- Click on Change advanced power settings.
- Expand the Processor power management category.
- Set the Maximum processor state to a lower value (e.g., 80%).

- Click Apply and then OK to save the changes.
- Step 4: Disable USB Selective Suspend Setting
- Open the Control Panel by pressing Win+R and typing control panel.
- Select Power Options from the list of available options.
- Click on Change plan settings for the power plan you are currently using.
- Click on Change advanced power settings.
- Expand the USB settings category.
- Expand the USB selective suspend setting category.
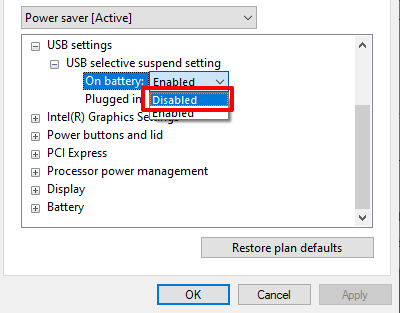
- Set both On battery and Plugged in options to Disabled.
- Click Apply and then OK to save the changes.
- Step 5: Perform a Clean Boot
- Press Win+R to open the Run dialog box.
- Type msconfig and press Enter to open the System Configuration window.
- Select the Services tab.
- Check the box next to Hide all Microsoft services.
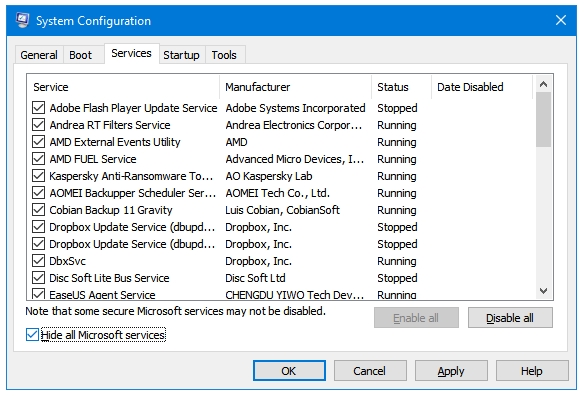
- Click on Disable all.
- Select the Startup tab.
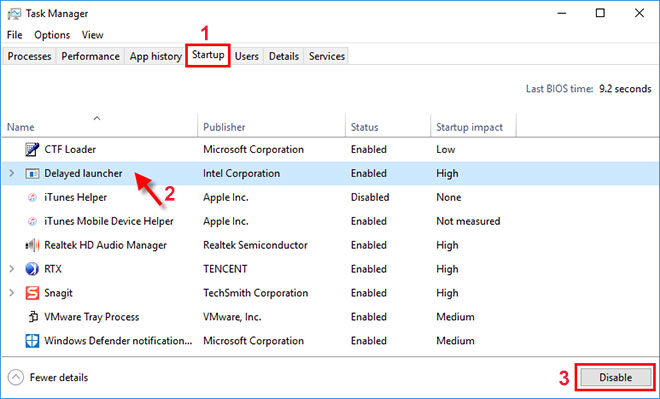
- Click on Open Task Manager.
- Disable all the startup programs by selecting each one and clicking on Disable.
- Close the Task Manager and click OK on the System Configuration window.
- Restart your computer for the changes to take effect.

Mark Ginter is a tech blogger with a passion for all things gadgets and gizmos. A self-proclaimed "geek", Mark has been blogging about technology for over 15 years. His blog, techquack.com, covers a wide range of topics including new product releases, industry news, and tips and tricks for getting the most out of your devices. If you're looking for someone who can keep you up-to-date with all the latest tech news and developments, then be sure to follow him over at Microsoft.