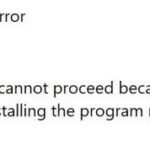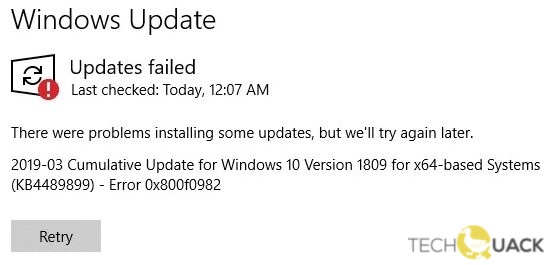
- Several users reported that Windows 10 update error 0X800F0982 shows up on their screen when they try to install the latest Windows updates.
- This problem often occurs with updates KB4493509, KB4489899, and KB4509899.
- There can be several reasons for this error, and some of them are due to corruption or some changes in the Windows update key in the registry editor.
- When the task reaches 100%, restart your computer and update it.
- When the operating system is rebooted, install the pending updates.
Discover effective solutions to troubleshoot the pesky Windows 10 Update Error 0x800f0982 and ensure seamless system updates for enhanced performance.
Resolving Windows 10 Update Error 0x800f0982: Troubleshooting Steps
To troubleshoot Windows 10 Update Error 0x800f0982, follow these steps:
1. Run the Windows Update Troubleshooter. Search for “Windows Update Troubleshooter” in the start menu, then select and run it.
2. Reset the Windows Update components. Open Command Prompt as an administrator and enter the following commands (press Enter after each command):
– net stop wuauserv
– net stop cryptSvc
– net stop bits
– net stop msiserver
– Ren C:\Windows\SoftwareDistribution SoftwareDistribution.old
– Ren C:\Windows\System32\catroot2 Catroot2.old
– net start wuauserv
– net start cryptSvc
– net start bits
– net start msiserver
3. Use the DISM tool. Open Command Prompt as an administrator and enter the following command (press Enter after each command):
– DISM.exe /Online /Cleanup-image /Restorehealth
4. Install the latest cumulative update manually. Go to the Microsoft Update Catalog website and search for the latest cumulative update for your Windows version.
5. Restart your computer and try updating Windows again.
If you’re still experiencing the error, it’s recommended to seek further assistance from Microsoft support or consult the Windows 10 community forums.
Running Windows Update Troubleshooter and Resetting WU Component
Running Windows Update Troubleshooter:
1. Press the Windows key + I to open the Settings app.
2. Click on Update & Security.
3. Go to the Troubleshoot tab on the left-hand side.
4. Scroll down and click on Windows Update.
5. Click on Run the troubleshooter and follow the on-screen instructions.
6. Restart your computer and check if the issue is resolved.
Resetting WU Component:
1. Press the Windows key + X and select Command Prompt (Admin).
2. Type the following commands and press Enter after each one:
net stop wuauserv
net stop cryptSvc
net stop bits
net stop msiserver
3. Rename the SoftwareDistribution and catroot2 folders. To do this, type the following commands and press Enter after each one:
ren C:\Windows\SoftwareDistribution SoftwareDistribution.old
ren C:\Windows\System32\catroot2 catroot2.old
4. Restart the wuauserv, cryptSvc, bits, and msiserver services. Type the following commands and press Enter after each one:
net start wuauserv
net start cryptSvc
net start bits
net start msiserver
5. Restart your computer and check for Windows updates again.
Note: These steps can help resolve the 0x800f0982 error and other update-related issues. If you need further assistance, please refer to Microsoft’s official support articles or consult the Windows community.
Starting Windows Modules Installer Service and Clearing SoftwareDistribution Folder
To troubleshoot Windows 10 Update Error 0x800f0982, you can try starting the Windows Modules Installer Service and clearing the SoftwareDistribution folder.
To start the Windows Modules Installer Service, follow these steps:
1. Press the Windows key + R to open the Run dialog box.
2. Type “services.msc” and press Enter.
3. In the Services window, scroll down and locate the Windows Modules Installer Service.
4. Right-click on it and select Start from the context menu.
To clear the SoftwareDistribution folder, follow these steps:
1. Press the Windows key + R to open the Run dialog box.
2. Type “cmd” and press Ctrl + Shift + Enter to open an elevated Command Prompt.
3. In the Command Prompt, type “net stop wuauserv” and press Enter to stop the Windows Update service.
4. Next, type “net stop cryptSvc” and press Enter to stop the Cryptographic Services.
5. Then, type “net stop bits” and press Enter to stop the Background Intelligent Transfer Service.
6. Finally, type “ren C:\Windows\SoftwareDistribution SoftwareDistribution.old” and press Enter to rename the SoftwareDistribution folder.
After completing these steps, restart your device and try installing the Windows updates again.
Forcing Update Installation via PowerShell
To force the installation of updates on Windows 10 using PowerShell, follow these steps:
1. Press the Windows key + X, and select “Windows PowerShell (Admin)” to open PowerShell with administrative privileges.
2. In the PowerShell window, type “Get-WindowsUpdate” and press Enter. This command will check for available updates.
3. To install all pending updates, type “Install-WindowsUpdate” and press Enter. This will initiate the update installation process.
4. If you encounter the error message “0x800f0982,” you can try the following solution:
– Type “Get-WindowsUpdate -KBArticleID KB4493509” and press Enter. This command will search for the specific update causing the error.
– Type “Add-WindowsCapability -Online -Name NetFx3~~~~” and press Enter. This will add the missing component needed for the update installation.
5. After the installation is complete, restart your device by clicking the Start button and selecting “Restart” from the power options.
Following these steps should help troubleshoot the Windows 10 update error 0x800f0982 and ensure that updates are installed successfully.
Downloading Required Updates from Microsoft Update Catalog
To troubleshoot Windows 10 Update Error 0x800f0982, you can try downloading the required updates from the Microsoft Update Catalog. Here’s how:
1. Open your preferred web browser and go to the Microsoft Update Catalog website.
2. In the search bar, type in the KB number of the update you need. For example, if you’re looking for KB4493509, enter that in the search bar.
3. Press Enter or click the Search button to find the specific update.
4. From the search results, locate the correct update for your Windows version and edition.
5. Click on the Download button next to the update to start the download.
6. Once the download is complete, navigate to the downloaded file and run it to install the update.
7. Follow any on-screen instructions that may appear during the installation process.
By downloading the required updates from the Microsoft Update Catalog, you can ensure that you have the necessary files to troubleshoot and fix the Windows 10 Update Error 0x800f0982.
Resolving Access Issues and Unblock Troubleshooting on thegeekpage.com
To resolve access issues and unblock troubleshooting for Windows 10 Update Error 0x800f0982 on thegeekpage.com, follow these steps:
Step 1: Restart your computer and try updating again. Sometimes a simple restart can fix the issue.
Step 2: Disable any antivirus software temporarily and check if the update installs successfully. If it does, consider adding an exception for Windows Update in your antivirus settings.
Step 3: Run the Windows Update troubleshooter. Press the Windows key + I to open Settings, then go to Update & Security > Troubleshoot. Select Windows Update and click Run the troubleshooter.
Step 4: Reset the Windows Update components. Open Command Prompt as an administrator and run the following commands one by one:
net stop wuauserv
net stop cryptSvc
net stop bits
net stop msiserver
Then, run the following commands:
ren C:\Windows\SoftwareDistribution SoftwareDistribution.old
ren C:\Windows\System32\catroot2 catroot2.old
Finally, restart the services by running these commands:
net start wuauserv
net start cryptSvc
net start bits
net start msiserver
Step 5: If the above steps don’t work, try running the Deployment Image Servicing and Management (DISM) tool. Open Command Prompt as an administrator and run the following command:
dism.exe /online /cleanup-image /restorehealth
Step 6: If all else fails, consider using the Media Creation Tool to perform a clean installation or contact Microsoft Support for further assistance.
Remember to back up your important files before attempting any troubleshooting steps.

Mark Ginter is a tech blogger with a passion for all things gadgets and gizmos. A self-proclaimed "geek", Mark has been blogging about technology for over 15 years. His blog, techquack.com, covers a wide range of topics including new product releases, industry news, and tips and tricks for getting the most out of your devices. If you're looking for someone who can keep you up-to-date with all the latest tech news and developments, then be sure to follow him over at Microsoft.