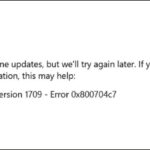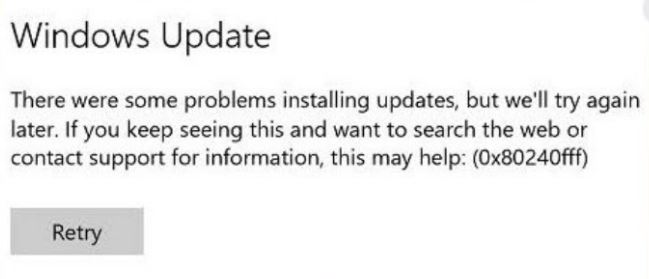
- Windows users get error codes like 0x80240fff when trying to install the new system on their devices.
- Microsoft explains that this error can be related to matching product and category names.
- The problem can occur when the Windows firewall stops working properly, when hard drive errors occur, or when corrupted files remain on your computer.
- If you encounter similar problems, such as Windows 10 not updating with error codes, try the following recommended methods.
Unraveling the Enigma: Unmasking the Windows Update Error 0x80240fff
Troubleshooting Windows Update Error 0x80240ffff
If you are encountering Windows Update Error 0x80240ffff, there are a few steps you can take to troubleshoot and resolve the issue.
First, try running the Windows Update Troubleshooter. This tool can automatically detect and fix common Windows Update problems. To do this, follow these steps:
1. Press the Windows key + I to open the Settings app.
2. Click on “Update & Security” and then select “Troubleshoot” from the left-hand menu.
3. Scroll down and click on “Windows Update” under Get up and running.
4. Click on “Run the troubleshooter” and follow the on-screen instructions.
If the troubleshooter doesn’t resolve the issue, you can try resetting the Windows Update components. To do this, follow these steps:
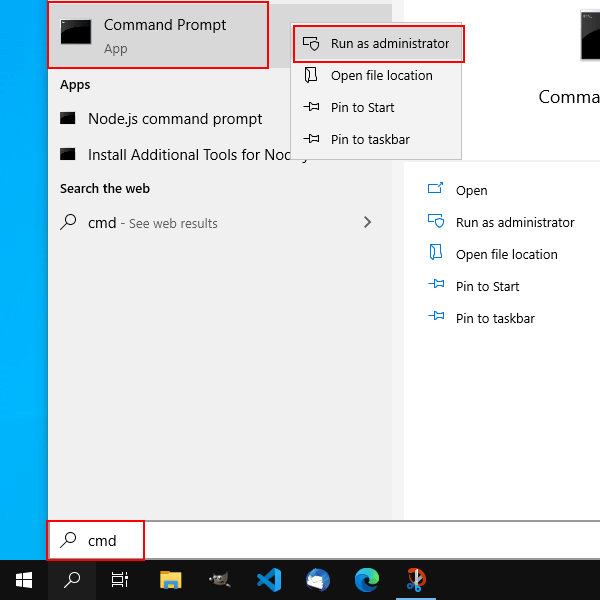
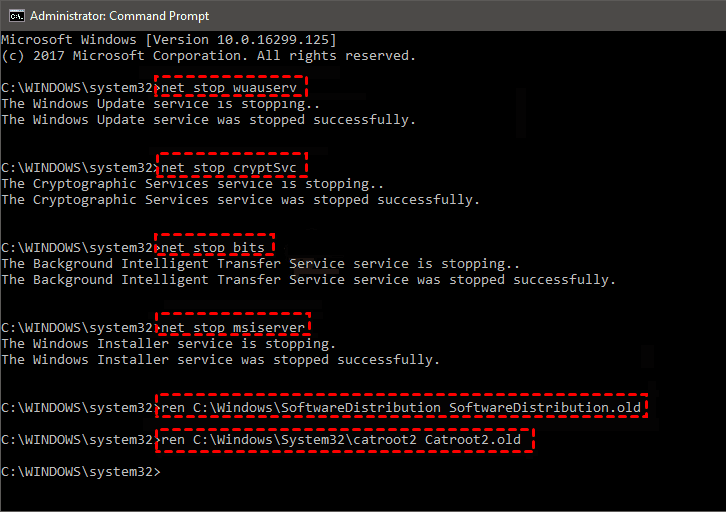
1. Open a Command Prompt as an administrator.
2. Type the following commands, pressing Enter after each one:
net stop wuauserv
net stop cryptSvc
net stop bits
net stop msiserver
3. Type the following command to rename the SoftwareDistribution and Catroot2 folders:
ren C:\Windows\SoftwareDistribution SoftwareDistribution.old
ren C:\Windows\System32\catroot2 Catroot2.old
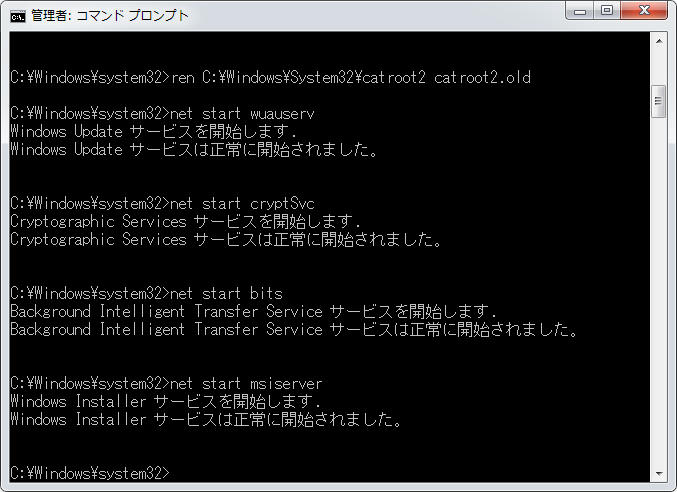
4. Type the following commands to restart the Windows Update services:
net start wuauserv
net start cryptSvc
net start bits
net start msiserver
5. Close the Command Prompt and restart your computer.
If the error persists, you may need to seek further assistance from Microsoft Support or the Windows community.
Backup and Data Protection Before Updating Windows 10
1. It’s crucial to back up your data before updating Windows 10 to avoid potential loss.
2. Use the built-in Windows Backup feature or a third-party tool to create a backup of your important files and folders.
3. Additionally, ensure your system is protected by enabling Windows Defender or any other antivirus software.
4. If you encounter error code 0x80240fff during the update process, there are a few steps you can take to resolve it.
5. First, run the Windows Update Troubleshooter tool to automatically detect and fix common update errors.
6. If the issue persists, try resetting Windows Update components by following the steps provided by Microsoft.
7. Remember to always keep your system and software up to date to benefit from the latest features and security enhancements.
Restarting Background Intelligent Transfer Services to Resolve Error 0x80240ffff
To resolve error code 0x80240ffff in Windows Update, you can try restarting the Background Intelligent Transfer Service (BITS). Here’s how:
1. Press the Windows Key + R to open the Run dialog box.
2. Type “services.msc” and press Enter to open the Services window.
3. Scroll down and locate “Background Intelligent Transfer Service” in the list.
4. Right-click on it and select “Restart” from the context menu.
5. If the service is not running, select “Start” instead.
6. Close the Services window and check if the error is resolved.
Restarting BITS can help resolve issues related to Windows Update. If you continue to experience problems, it may be necessary to troubleshoot further or contact Microsoft support for assistance.
Additional Solutions for Fixing Windows Update Error 0x80240ffff
-
Reset Windows Update Components
- Open the Command Prompt as an administrator by pressing Windows key + X and selecting Command Prompt (Admin).
- Type the following commands, pressing Enter after each one:
- net stop wuauserv
- net stop cryptSvc
- net stop bits
- net stop msiserver
- net stop wuauserv
- Type the following commands to rename the SoftwareDistribution and Catroot2 folders:
- ren C:\Windows\SoftwareDistribution SoftwareDistribution.old
- ren C:\Windows\System32\catroot2 Catroot2.old
- Type the following commands to restart the Windows Update services:
- net start wuauserv
- net start cryptSvc
- net start bits
- net start msiserver
- Restart your computer and try updating Windows again.
-
Run Windows Update Troubleshooter
- Press the Windows key and type Troubleshoot. Select Troubleshoot from the search results.
- In the Troubleshoot window, click on Additional troubleshooters.
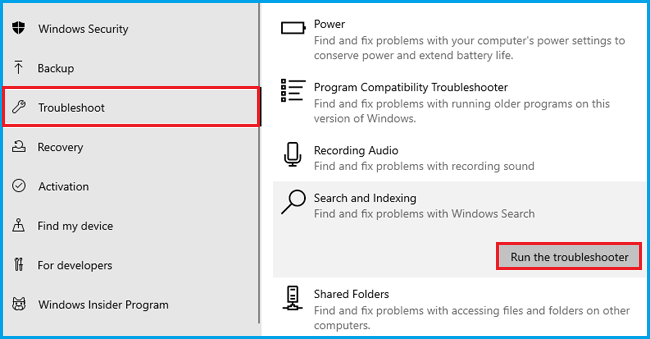
- Scroll down and click on Windows Update. Then click on Run the troubleshooter.
- Follow the on-screen instructions to complete the troubleshooting process.
- Restart your computer and check if the Windows Update error is resolved.
-
Disable Third-party Antivirus Software
- Open the Settings app by pressing Windows key + I.
- Click on Update & Security.
- Click on Windows Security in the left panel.
- Click on Virus & threat protection.
- Under Virus & threat protection settings, click on Manage settings.
- Toggle off the switch for your third-party antivirus software.
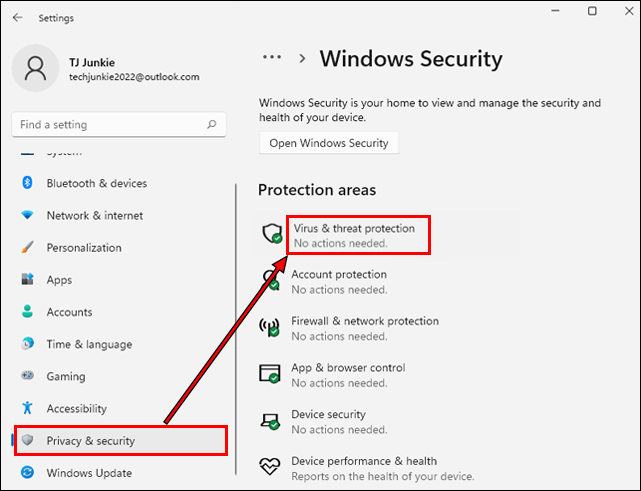
- Restart your computer and try updating Windows again.
Defer Windows Updates to Prevent Error 0x80240ffff
To prevent error code 0x80240fff when updating Windows, you can defer Windows updates. Here’s how:
1. Open the Windows Settings by pressing the Windows key + I.
2. Click on “Update & Security.”
3. In the left-hand menu, click on “Windows Update.”
4. Click on “Advanced options.”
5. Under the “Pause updates” section, toggle the switch to turn it on.
6. This will defer the updates for a certain period of time.
7. When you’re ready to update, toggle the switch off.
By deferring updates, you can prevent the error from occurring while you address any underlying issues. Remember to regularly check for updates to keep your system secure and up to date.

Mark Ginter is a tech blogger with a passion for all things gadgets and gizmos. A self-proclaimed "geek", Mark has been blogging about technology for over 15 years. His blog, techquack.com, covers a wide range of topics including new product releases, industry news, and tips and tricks for getting the most out of your devices. If you're looking for someone who can keep you up-to-date with all the latest tech news and developments, then be sure to follow him over at Microsoft.