
- Microsoft’s latest Windows 10 update is causing CPU overload at startup, and Cortana may be the culprit.
- As reported in Windows Latest, the updated version of Cortana causes CPU jumps of 30-40% and takes up system memory.
- The latest problem is the SearchUI.exe, which is part of Microsoft Cortana, a service that most people don’t use anyway.
Unleash the full potential of your device with our ultimate fix for Cortana’s overwhelming CPU, memory, and network usage.
Causes of Excessive CPU, Memory, and Network Usage by Cortana
Excessive CPU, memory, and network usage by Cortana can cause slowdowns and affect the performance of your PC. To fix this issue, follow these steps:
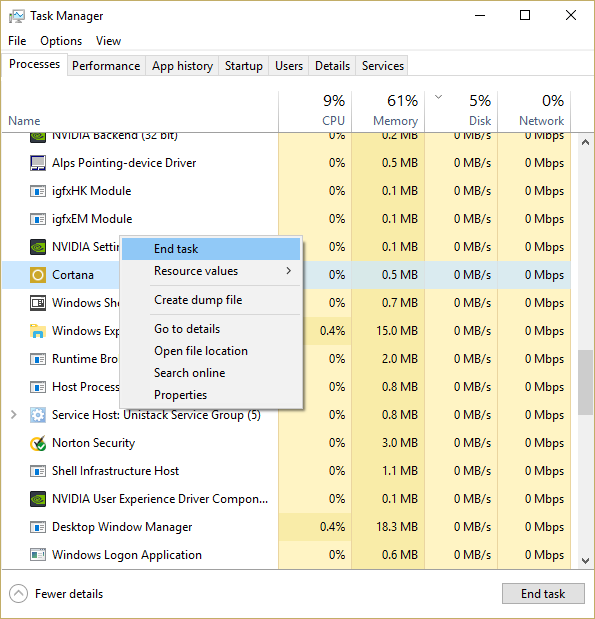
1. Open the Task Manager by pressing Ctrl+Shift+Esc.
2. In the Processes tab, locate “Microsoft.Windows.Cortana_cw5n1h2txyewy” and select it.
3. Click on “End Task” to stop the Cortana process.
4. If the problem persists, try disabling Cortana temporarily. Right-click on the Taskbar and select “Taskbar settings.” Scroll down and toggle off “Use Cortana.”
5. Check for any updates for Windows 10 and install them.
6. Run a full system scan using Windows Defender or any trusted antivirus software to ensure there are no malicious files causing the issue.
7. Restart your computer and see if the problem is resolved.
If you continue to experience excessive CPU, memory, and network usage by Cortana, it is recommended to contact Microsoft Support for further assistance.
Command Prompt Method to Disable Cortana
To disable Cortana using the Command Prompt method, follow these steps:
1. Open the Command Prompt as an administrator. To do this, type “Command Prompt” in the search bar, right-click on “Command Prompt” in the results, and select “Run as administrator”.
2. In the Command Prompt window, type “regedit” and press Enter. This will open the Registry Editor.
3. In the Registry Editor, navigate to the following location: “HKEY_LOCAL_MACHINE\SOFTWARE\Policies\Microsoft\Windows\Windows Search“. If the “Windows Search” key does not exist, you will need to create it.
4. Right-click on the “Windows Search” key, select “New”, and then click on “DWORD (32-bit) Value”. Name the new value “AllowCortana“.
5. Double-click on the “AllowCortana” value and set its data to “0“. This will disable Cortana.
6. Close the Registry Editor and restart your computer for the changes to take effect.
By following these steps, you can disable Cortana and resolve excessive CPU, memory, and network usage issues.
Deleting the SearchUI.exe File as a Solution
To fix Cortana’s excessive CPU, memory, and network usage, you can try deleting the SearchUI.exe file. This file is responsible for Cortana’s search functionality, and deleting it can help resolve performance issues.
Here’s how you can delete the SearchUI.exe file:
1. Open the File Explorer on your Windows 10 PC.
2. Navigate to the following location: C:\Windows\SystemApps\Microsoft.Windows.Cortana_cw5n1h2txyewy
3. Find the SearchUI.exe file in this folder.
4. Right-click on the SearchUI.exe file and select “Delete” from the context menu.
5. Confirm the deletion when prompted.
Deleting the SearchUI.exe file may improve your PC’s performance by reducing the amount of resources Cortana consumes. However, it’s important to note that this solution may disable some Cortana features. If you rely heavily on Cortana’s functionalities, we recommend considering alternative ways to optimize Cortana’s performance or seeking support from Microsoft.
powershell

Get-AppxPackage -allusers Microsoft.549981C3F5F10 | Foreach {Add-AppxPackage -DisableDevelopmentMode -Register "$($_.InstallLocation)\AppXManifest.xml"}
2. Limit Cortana’s permissions:
– Open Cortana settings by right-clicking on the Cortana icon.
– Navigate to “Permissions & History.”
– Disable permissions like “Location,” “Contacts,” and “Browsing history” if they are not necessary.
3. Terminate Cortana’s processes:
– Open Task Manager (Ctrl + Shift + Esc).
– Under the “Processes” tab, find “Cortana” and right-click on it.
– Select “End task” to terminate Cortana’s processes.
Please note that the code provided here is for PowerShell and primarily disables or terminates Cortana-related processes. However, it’s crucial to understand the potential consequences and implications of making such changes to your system. Always create system backups and ensure you understand the implications of the modifications before implementing them.
Remember, it’s highly recommended to consult official documentation or seek professional assistance to address performance issues with specific software like Cortana.
Troubleshooting Corrupt Files to Fix Cortana’s Memory Usage
If you’re experiencing excessive CPU, memory, or network usage from Cortana, it could be due to corrupt files. To fix this issue, follow these steps:
1. Open the Command Prompt by typing “cmd” in the search bar and selecting “Command Prompt” from the results.
2. Type the following command: sfc /scannow and press Enter. This will scan your system for corrupt files and repair them if necessary.
3. Wait for the scan to complete. It may take some time, so be patient.
4. Once the scan is finished, restart your computer and check if the excessive usage from Cortana has been resolved.
By troubleshooting corrupt files, you can help improve Cortana’s performance and reduce excessive resource usage. If the issue persists, consider reaching out to our support team for further assistance.
Making Changes in the Registry Editor to Address Cortana’s Memory Usage
To address excessive CPU, memory, and network usage caused by Cortana, you can make changes in the Registry Editor. Please note that modifying the registry can have unintended consequences, so proceed with caution and create a backup before making any changes.
1. Press the Windows key + R to open the Run dialog box.
2. Type “regedit” and press Enter to open the Registry Editor.
3. Navigate to the following location: HKEY_LOCAL_MACHINE\SOFTWARE\Policies\Microsoft\Windows\Windows Search.
4. Right-click on the Windows Search folder and select New > DWORD (32-bit) Value.
5. Name the new value “AllowCortana” and set its value to 0.
6. Restart your computer for the changes to take effect.
This will disable Cortana’s memory-intensive features and help reduce its resource usage. If you want to enable Cortana again in the future, simply delete the “AllowCortana” value from the registry. Remember to always exercise caution when making changes to the registry.
Removing or Modifying the Search.exe File to Resolve Cortana’s Memory Usage
To resolve Cortana’s excessive memory usage, you can try removing or modifying the Search.exe file. Here’s how:
1. Press the Windows key + R to open the Run dialog box.
2. Type “cmd” and press Enter to open the Command Prompt.
3. In the Command Prompt, type “taskkill /f /im search.exe” and press Enter to end the Search.exe process.
4. Navigate to the following location: C:\Windows\SystemApps\Microsoft.Windows.Cortana_cw5n1h2txyewy
5. Find the SearchUI.exe file and rename it to SearchUI.exe.old.
6. Restart your computer to apply the changes.
Please note that modifying system files can have unintended consequences, so proceed with caution. If you’re not comfortable with these steps, we recommend seeking assistance from a professional or contacting Microsoft support for further guidance.
Reinstalling Cortana to Address Excessive Memory Usage
To address excessive memory usage with Cortana, follow these steps:
1. Open the Command Prompt as an administrator.
2. Type in the following command: “Get-AppxPackage -AllUsers Microsoft.Windows.Cortana | Foreach {Add-AppxPackage -DisableDevelopmentMode -Register “$($_.InstallLocation)\AppXManifest.xml” -Verbose}” and press Enter.
3. Wait for the process to complete. This may take some time.
4. Once done, restart your computer.
Reinstalling Cortana can help resolve excessive CPU, memory, and network usage issues. By following these steps, you can ensure that Cortana is properly installed and functioning optimally. If you continue to experience any issues, consider reaching out to our support team for further assistance.
Remember to always keep your Windows version up to date to benefit from the latest improvements and bug fixes.
Steps to Fix Cortana’s Excessive Memory Usage
- Open Task Manager by pressing Ctrl+Shift+Esc.
- Go to the Processes tab.
- Locate the Cortana process.
- Right-click on the process and select End Task.
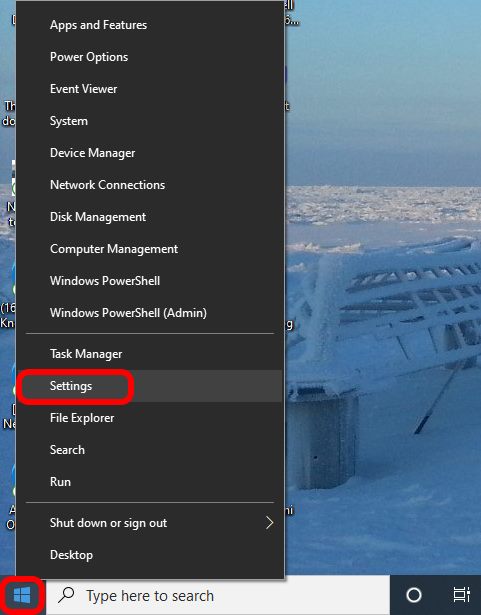
- Click on the Start button and open Settings.
- Select Cortana & Search.
- Toggle the Cortana switch to Off.
Repair Method 2: Reset Cortana
- Open Task Manager by pressing Ctrl+Shift+Esc.
- Go to the Processes tab.
- Locate the Cortana process.
- Right-click on the process and select End Task.
- Press Win+X and select Windows PowerShell (Admin).
- Type the command Get-AppXPackage -AllUsers | Foreach {Add-AppxPackage -DisableDevelopmentMode -Register “$($_.InstallLocation)\AppXManifest.xml”} and press Enter.
- Wait for the process to complete and then restart your computer.
Repair Method 3: Update Windows
- Click on the Start button and open Settings.
- Select Update & Security.
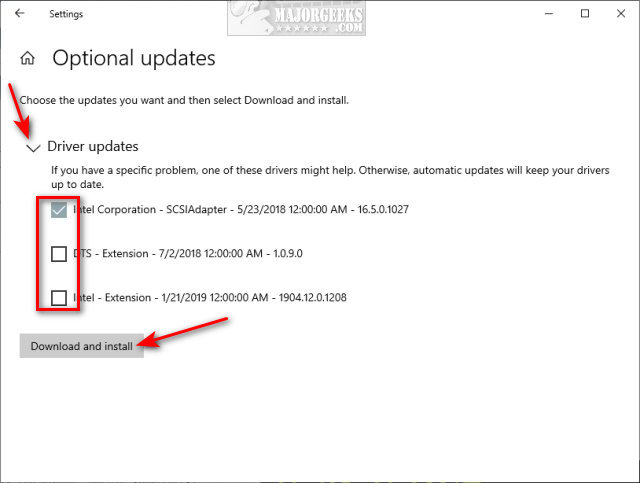
- Click on Check for updates.
- If updates are available, click on Download and install.
- Wait for the updates to be installed and then restart your computer.

Mark Ginter is a tech blogger with a passion for all things gadgets and gizmos. A self-proclaimed "geek", Mark has been blogging about technology for over 15 years. His blog, techquack.com, covers a wide range of topics including new product releases, industry news, and tips and tricks for getting the most out of your devices. If you're looking for someone who can keep you up-to-date with all the latest tech news and developments, then be sure to follow him over at Microsoft.