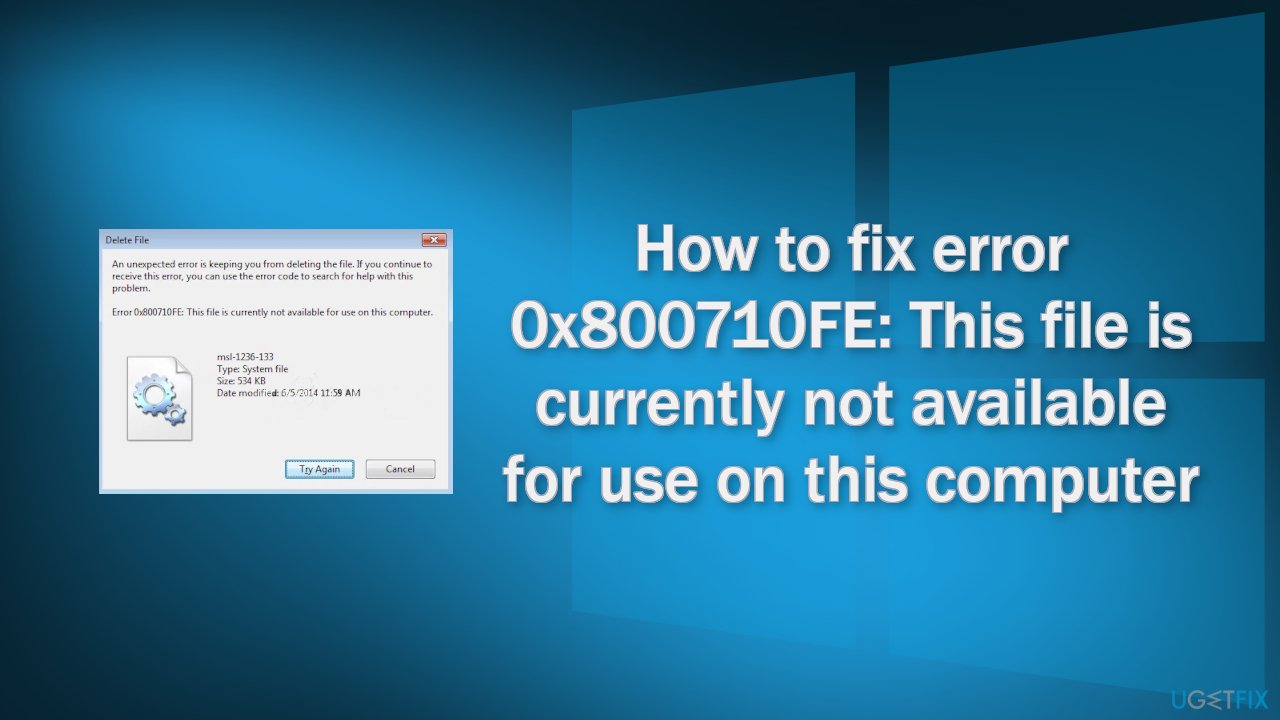
- Error 0x800710FE is a Windows error code that occurs in Windows 10 operating system.
- It means that either the offline cache is corrupt or the remote storage service cannot access the file at the moment.
- This happens when certain files cannot be deleted in Windows.
- It also happens when a user tries to delete a system-protected file.
- Sync Center can cause files to lock, making them impossible to delete.
Are you encountering a stubborn 0x800710FE error while attempting to delete a file on your Windows 10 system? Fear not, as this article will guide you through effective methods to resolve this pesky issue. Discover the solutions that can help you regain control over file deletions without any hassle.
Checking Disk and Resolving Common 0x800710fe Errors
To resolve the 0x800710FE error when trying to delete a file in Windows 10, you can check your disk and follow these steps:
1. Press the Windows logo key + R to open the Run dialog box.
2. Type “regedit” and press Enter to open the Registry Editor.
3. In the Registry Editor, navigate to HKEY_LOCAL_MACHINE\SYSTEM\CurrentControlSet\Services\CSC\Parameters.
4. Look for the “FormatDatabase” entry on the right side of the window.
5. Right-click on “FormatDatabase” and select “Modify”.
6. Change the value data to “1” and click OK.
7. Close the Registry Editor and restart your computer.
After the restart, the 0x800710FE error should be resolved, allowing you to delete the file. This method is particularly effective for cases where the error is related to Offline Files or File Synchronization.
Note: Modifying the registry can be risky, so it’s recommended to create a backup before making any changes.
Disabling Offline File Synchronization and Sync Center
To disable Offline File Synchronization and Sync Center on Windows 10, follow these steps:
1. Press the Windows key + R to open the Run dialog box.
2. Type “control” and hit Enter to open the Control Panel.
3. In the Control Panel, search for “Sync Center” using the search bar at the top right corner.
4. Click on “Sync Center” to open the Sync Center interface.
5. In the Sync Center, click on “Manage Offline Files” on the left side of the window.
6. In the Offline Files dialog box, click on “Disable Offline Files” and then click on “OK”.
7. Restart your computer to apply the changes.
By disabling Offline File Synchronization and Sync Center, you can resolve the 0x800710FE error when trying to delete files. This error code usually occurs when there is an issue with file synchronization. Disabling the feature will prevent any further synchronization issues and allow you to delete files without encountering the error.
Formatting CSC Database and Using Registry Editor
To format the CSC database and use the Registry Editor to fix the 0x800710FE error when trying to delete a file in Windows 10, follow these steps:
1. Open the Registry Editor by pressing the Windows key + R, typing “regedit,” and hitting Enter.
2. In the Registry Editor, navigate to the following location: HKEY_LOCAL_MACHINE\SYSTEM\CurrentControlSet\Services\CSC\Parameters.
3. Right-click on the “Parameters” folder, select “New,” and then click on “DWORD (32-bit) Value.”
4. Name the new value “FormatDatabase” and set its value data to 1.
5. Close the Registry Editor.
6. Open the Command Prompt as an administrator by pressing the Windows key + X and selecting “Command Prompt (Admin).”
7. In the Command Prompt, type net stop CSC and hit Enter to stop the client-side caching service.
8. Type net start CSC and hit Enter to restart the service.
9. Restart your computer.
10. After the restart, try deleting the file again. The 0x800710FE error should be resolved.
Note: Modifying the Registry Editor can be risky, so it’s recommended to create a backup before making any changes.
python

import os
def delete_file(file_path):
try:
os.remove(file_path)
print("File deleted successfully!")
except PermissionError as e:
if e.winerror == 0x800710fe:
print("Error: The file is currently in use by another program.")
else:
print("An unexpected error occurred:", str(e))
except FileNotFoundError:
print("Error: File not found.")
except Exception as e:
print("An unexpected error occurred:", str(e))
# Usage example
file_to_delete = "C:/path/to/file.txt"
delete_file(file_to_delete)
Please ensure that you replace `”C:/path/to/file.txt”` with the actual path of the file you want to delete. This code snippet attempts to delete the specified file and handles the `PermissionError` raised when the file is in use by another program. If the error code matches `0x800710fe`, it provides an appropriate error message.
Deleting Files via USB Ubuntu Drive and Using Command Prompt
To delete files via a USB Ubuntu drive and resolve the 0x800710FE error in Windows 10, you can use the Command Prompt. Follow these steps:
1. Connect the USB Ubuntu drive to your computer.
2. Open the Command Prompt by pressing the Windows key + R, then type “cmd” and hit Enter.
3. In the Command Prompt window, navigate to the folder where the file is located. Use the “cd” command followed by the folder path. For example: cd C:\FolderName.
4. Once you are in the correct folder, use the “del” command followed by the file name to delete it. For example: del FileName.ext.
5. If you encounter a “File Not Found” error, double-check the file name and path.
6. After successfully deleting the file, close the Command Prompt.
By following these instructions, you can resolve the 0x800710FE error and delete files using a USB Ubuntu drive through the Command Prompt in Windows 10.
Performing a CHKDSK Scan and Resetting PC
- Performing a CHKDSK scan
- Understanding the CHKDSK utility and its benefits
- Opening the Command Prompt as an administrator
- Running the CHKDSK command with appropriate parameters
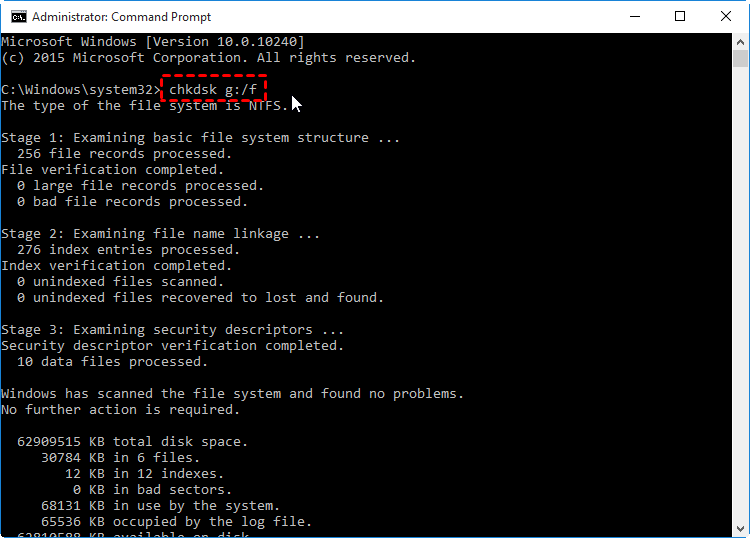
- Allowing the scan to complete and evaluating the results
- Fixing any file system errors found during the scan
- Resetting your PC to resolve the 0x800710FE error
- Understanding the reset process and its implications
- Accessing the Settings app in Windows 10
- Navigating to the Recovery section
- Selecting the Get started button under “Reset this PC”
- Choosing the appropriate reset option for your needs
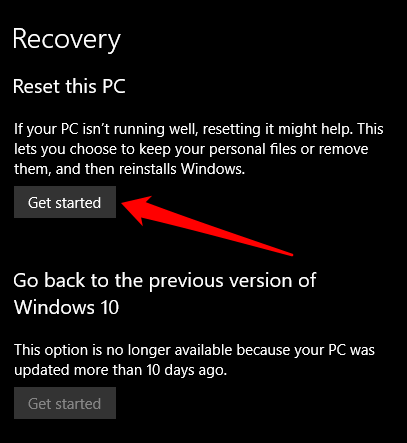
- Backing up important files before performing the reset
- Initiating the reset process and following the on-screen instructions
- Waiting for the reset to complete and verifying the resolution of the error

Mark Ginter is a tech blogger with a passion for all things gadgets and gizmos. A self-proclaimed "geek", Mark has been blogging about technology for over 15 years. His blog, techquack.com, covers a wide range of topics including new product releases, industry news, and tips and tricks for getting the most out of your devices. If you're looking for someone who can keep you up-to-date with all the latest tech news and developments, then be sure to follow him over at Microsoft.