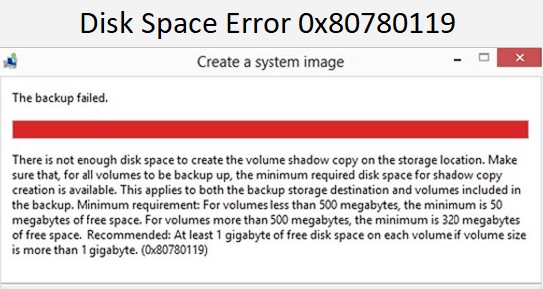
- Error 0x80780119 usually occurs due to problems with disk space.
- There is probably not enough free space on the system partition to create a system image.
- N logs have become too large.
- Too many language packs can also free up space on your hard drive.
- Updating or corrupt device drivers also cause error 0x790119.
- Increasing the size of the OEM partition can also resolve the problem.
Unveiling the Enigmatic Disk Space Error 0x80780119: Resolving the Windows 10 System Image Creation Conundrum
Troubleshooting the Error 0x80780119 when Creating a System Image
If you encounter the error code 0x80780119 while trying to create a system image in Windows 10, it indicates a disk space issue. To resolve this problem, follow these steps:
1. Check available disk space: Ensure that you have enough free space on the drive where you’re trying to create the system image. Right-click on the drive, select “Properties,” and check the available space.
2. Free up disk space: If there isn’t enough space, you’ll need to delete unnecessary files or move them to a different drive. You can use the built-in Disk Cleanup tool or manually delete files.
3. Disable System Restore: Temporarily disable the System Restore feature to free up some space. Right-click on “This PC,” select “Properties,” click on “System Protection,” and then click on “Configure.” Disable system protection for the affected drive.
4. Check for storage issues: Use the CHKDSK command to scan and fix any potential disk errors. Open a Command Prompt as an administrator and run the command “chkdsk /f” followed by the drive letter of the affected drive.
5. Resize system partition: If the issue persists, you may need to resize the system partition to allocate more space. This process requires advanced knowledge and caution, so it’s recommended to seek assistance from a professional.
By following these troubleshooting steps, you should be able to resolve the disk space error 0x80780119 and successfully create a system image in Windows 10.
Setting up the Partition and Parameters
To set up the partition and parameters for troubleshooting the disk space error 0x80780119 when creating a system image in Windows 10, follow these steps:
1. Open the Start menu and search for “Disk Management.” Click on the “Create and format hard disk partitions” option.
2. In the Disk Management window, locate the volume that you want to use for the system image backup. Right-click on the volume and select “Shrink Volume.”
3. Enter the amount of space you want to allocate for the system image backup in the “Enter the amount of space to shrink in MB” field. Click “Shrink” to create unallocated space.
4. Right-click on the unallocated space and select “New Simple Volume.” Follow the prompts to create a new partition.
5. Once the partition is created, open the Start menu and search for “Backup and Restore (Windows 7).” Click on the “Create a system image” option.
6. Select the newly created partition as the destination for the system image backup.
7. Follow the on-screen instructions to complete the system image backup process.
By setting up the partition and adjusting the parameters, you can resolve the disk space error 0x80780119 and successfully create a system image backup in Windows 10.
Deleting the USN Journal and Increasing the OEM Partition Size
To delete the USN Journal and increase the OEM partition size, follow these steps:
1. Press the Windows key + R to open the Run dialog box.
2. Type “diskmgmt.msc” and press Enter to open Disk Management.
3. In the Disk Management window, locate the OEM partition.
4. Right-click on the OEM partition and select “Shrink Volume” from the context menu.
5. Enter the amount of space you want to shrink the partition by and click Shrink.
6. Once the partition has been shrunk, right-click on the unallocated space and select “New Simple Volume”.
7. Follow the prompts to create a new volume.
8. To delete the USN Journal, open the Command Prompt as an administrator.
9. Type “fsutil usn deletejournal /d C:” (replace C: with the drive letter of the system drive) and press Enter.
10. Restart your computer for the changes to take effect.
By deleting the USN Journal and increasing the OEM partition size, you can troubleshoot the 0x80780119 error when creating a system image in Windows 10. This error is often caused by not having enough disk space for the system image backup process.
python

import subprocess
def check_disk_space_error():
try:
# Run the DISM command to check disk space error
command = 'DISM /Online /Cleanup-Image /AnalyzeComponentStore'
result = subprocess.run(command, capture_output=True, text=True)
# Check if the error code is 0x80780119
if '0x80780119' in result.stdout:
print("Disk space error (0x80780119) detected.")
print("Please free up disk space to resolve the issue.")
else:
print("No disk space error found.")
# Additional checks or actions can be implemented here
except Exception as e:
print("An error occurred while checking disk space:", str(e))
# Call the function to check for disk space error
check_disk_space_error()
In this example, we use the `subprocess` module in Python to run the DISM (Deployment Image Servicing and Management) command-line tool. The `/AnalyzeComponentStore` option is used to check for disk space errors. If the error code 0x80780119 is detected in the command output, it indicates a disk space issue while creating a system image. The code then advises freeing up disk space as a resolution. If no disk space error is found, it provides a corresponding message.
Keep in mind that this code is a basic illustration and may require modifications based on your specific needs and environment.
Checking and Repairing Disk Errors
To check and repair disk errors in Windows 10, follow these steps:
1. Open File Explorer and right-click on the drive you want to check for errors.
2. Select “Properties” from the context menu.
3. Go to the “Tools” tab and click on “Check” under the “Error checking” section.
4. Click on “Scan drive” to start the disk error checking process.
5. If any errors are found, click on “Repair drive” to fix them.
To fix the System Image backup error 0x80780119, follow these steps:
1. Open the Control Panel and go to “System and Security” > “Backup and Restore (Windows 7)”.
2. Click on “Create a system image” on the left side of the window.
3. Choose a destination where you want to save the system image.
4. If you encounter the 0x80780119 error, it means there is not enough disk space.
5. To free up space, delete unnecessary files or move them to an external drive.
6. After freeing up space, try creating the system image again.
By following these steps, you can easily check and repair disk errors and resolve the System Image backup error 0x80780119 in Windows 10.
Uninstalling Language Packs
To uninstall language packs in Windows 10 and resolve the disk space error 0x80780119 when creating a system image, follow these steps:
1. Open the Control Panel and navigate to “Clock and Region” > “Language”.
2. Click on “Advanced settings” in the left-hand menu.
3. Under the “Override for Windows display language” section, click on “Uninstall language packs”.
4. A list of installed language packs will appear. Select the language pack you want to uninstall and click “Next”.
5. Follow the on-screen prompts to complete the uninstallation process.
6. Once the language pack is uninstalled, try creating a system image again.
By uninstalling unnecessary language packs, you can free up disk space and potentially fix the error 0x80780119 when creating a system image in Windows 10.
Creating a Backup without Errors
When creating a system image in Windows 10, you may encounter the Disk Space Error 0x80780119. To troubleshoot this issue and create a backup without errors, follow these steps:
1. Check available disk space: Ensure that you have enough free space on the destination drive to store the system image. Verify the volume size of the destination drive to confirm there is sufficient space.
2. Fix disk errors: Run the Fix Disk utility to repair any issues with the destination drive. This can help resolve any storage issues that may be causing the error.
3. Check system reserved partition: Verify that the System Reserved partition is not filled up with unnecessary files. If it is, delete any unnecessary files to free up space.
4. Check volume shadow copy storage: The error may occur if the volume shadow copy storage is full. To fix this, delete any unnecessary restore points or increase the maximum storage size.
By following these steps, you should be able to create a system image without encountering the 0x80780119 error.
Automatically Repairing Errors
To automatically repair the error when creating a system image in Windows 10, follow these steps:
1. Press the Windows key and type “cmd” to open the Command Prompt.
2. Right-click on Command Prompt and select “Run as administrator.”
3. In the Command Prompt window, type sfc /scannow and press Enter. This will scan and repair any system file errors.
4. Once the scan is complete, restart your computer and try creating the system image again.
If the error persists, you may need to free up disk space on your computer. You can do this by deleting unnecessary files or moving them to an external storage device. Additionally, you can try disabling the Volume Shadow Copy service by following these steps:
1. Press the Windows key and type “services.msc” to open the Services app.
2. Scroll down and locate the “Volume Shadow Copy” service.
3. Right-click on it and select “Properties.”
4. Change the startup type to “Disabled” and click OK.
5. Restart your computer and try creating the system image again.
By following these steps, you can automatically repair the error and successfully create a system image in Windows 10.

Mark Ginter is a tech blogger with a passion for all things gadgets and gizmos. A self-proclaimed "geek", Mark has been blogging about technology for over 15 years. His blog, techquack.com, covers a wide range of topics including new product releases, industry news, and tips and tricks for getting the most out of your devices. If you're looking for someone who can keep you up-to-date with all the latest tech news and developments, then be sure to follow him over at Microsoft.
Related posts:
 Error 0x80780166 “Unable to create a system image” has been fixed
 How to Troubleshoot “Please insert the last disk of the Multi-Volume set” Error Message on Windows PC
 How to Resolve Fatal Device Hardware Error on External Hard Drive
 Repairing the error “VSS service interrupted due to inactivity delay”