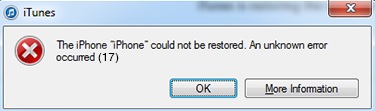
- The iTunes error code 17 occurs mainly because of connectivity problems, for example, your computer cannot connect to Apple’s servers or your iPhone.
- It is very similar to iTunes error 3194 and therefore requires the same solutions to fix it.
- It can also occur due to an outdated version of iTunes and overly sensitive security software.
- In most cases, some sort of corruption in the auto-update component contributes to it.
- If this scenario applies, you can try updating iTunes manually.
Welcome to this informative article where we unravel the mystery behind iTunes Error Code 17, specially tailored for Windows 10 users. So, if you’ve been grappling with this perplexing error, fret not, as we have the solutions you’ve been seeking. Join us as we dive into the troubleshooting techniques that will help you bid farewell to Error Code 17 once and for all.
Updating or Restoring iTunes from Another Computer
To update or restore iTunes from another computer, follow these steps:
1. Make sure you have the latest version of iTunes installed on the computer you’re using.
2. Connect your iPhone, iPad, or iPod touch to the computer using a USB cable.
3. Open iTunes and select your device.
4. In the Summary tab, click on “Update” or “Restore” depending on what you want to do.
5. If prompted, enter your device passcode.
6. If you see an error code 17, it means there’s a problem with the software update server or your internet connection.
7. Check your internet connection and make sure it’s stable.
8. Disable any security software or firewall that may be blocking the connection.
9. Verify that your hosts file doesn’t contain any entries related to Apple’s software update servers.
10. If the issue persists, try using a different internet connection or contact your internet service provider.
11. If all else fails, you can try using a different computer or consult Apple Support for further assistance.
Remember, updating or restoring iTunes may fix many issues you’re experiencing with your iOS devices.
Resolving Error 17 by Checking Hosts File
If you’re experiencing Error 17 on your Windows 10 computer while using iTunes, it might be due to a problem with your hosts file. Follow these steps to resolve the issue:
1. Press the Windows key + R to open the Run dialog box.
2. Type “notepad” and press Enter to open Notepad.
3. In Notepad, click on File and then Open.
4. Navigate to the following location: C:\Windows\System32\drivers\etc\
5. In the “Files of type” dropdown menu, select “All Files (*.*)” to show all file types.
6. Open the “hosts” file.
7. Look for any lines that contain “gs.apple.com” and delete them.
8. Save the changes to the hosts file.
9. Close Notepad and restart your computer.
By checking and modifying your hosts file, you can fix Error 17 and continue using iTunes without any issues.
python

import os
def fix_itunes_error_17():
# Stop relevant Apple services
os.system('net stop "Apple Mobile Device Service"')
os.system('net stop "Bonjour Service"')
# Rename or delete problematic files
os.rename('C:\\Program Files\\Common Files\\Apple\\Mobile Device Support\\Drivers\\usbaapl64.sys', 'C:\\Program Files\\Common Files\\Apple\\Mobile Device Support\\Drivers\\usbaapl64.sys.backup')
os.rename('C:\\Windows\\System32\\DriverStore\\FileRepository\\usbaapl64.inf_amd64_neutral_7b2f4b831d96c1a4\\usbaapl64.inf', 'C:\\Windows\\System32\\DriverStore\\FileRepository\\usbaapl64.inf_amd64_neutral_7b2f4b831d96c1a4\\usbaapl64.inf.backup')
# Restart Apple services
os.system('net start "Apple Mobile Device Service"')
os.system('net start "Bonjour Service"')
# Call the function to fix iTunes error code 17
fix_itunes_error_17()
Please note that the provided code is just a sample and may not resolve all instances of iTunes error code 17. It’s always recommended to research and follow official troubleshooting steps provided by Apple or consult their support documentation for a comprehensive solution.
Updating iTunes to the Latest Version (Windows Only)
To update iTunes to the latest version on a Windows computer, follow these steps:
1. Open the iTunes application on your PC.
2. Click on the “Help” menu at the top of the iTunes window.
3. From the drop-down menu, select “Check for Updates”.
4. If a new version of iTunes is available, a prompt will appear. Click on the “Download iTunes” button.
5. Follow the on-screen prompts to complete the installation of the latest version.
If you encounter error code 17 during the update process, you can try the following troubleshooting steps:
1. Temporarily disable any security software or firewall solution on your computer.
2. Ensure that your Wi-Fi connection is stable and not experiencing any issues.
3. Check your Internet service provider to ensure there are no connection problems.
4. Restart your computer and try updating iTunes again.
If the error persists, you may need to seek further assistance from Apple support or refer to their online resources for additional troubleshooting steps.
Resolving Error 17 by Disabling 3rd Party Firewall
To resolve Error 17 on your Windows 10 computer when encountering iTunes, disabling the third-party firewall can often help. Follow these steps:
1. Press the Windows key + R to open the Run dialog box.
2. Type “control firewall.cpl” and press Enter to open the Windows Firewall settings.
3. Click on “Turn Windows Firewall on or off” in the left-hand menu.
4. Select “Turn off Windows Firewall (not recommended)” for both private and public networks.
5. Click “OK” to save the changes.
Note: Disabling your firewall temporarily exposes your computer to potential security risks. Only disable it for troubleshooting purposes and remember to enable it afterwards.
Once the firewall is disabled, try running iTunes again to see if the error is resolved. If not, further troubleshooting may be required.

Mark Ginter is a tech blogger with a passion for all things gadgets and gizmos. A self-proclaimed "geek", Mark has been blogging about technology for over 15 years. His blog, techquack.com, covers a wide range of topics including new product releases, industry news, and tips and tricks for getting the most out of your devices. If you're looking for someone who can keep you up-to-date with all the latest tech news and developments, then be sure to follow him over at Microsoft.