
- If you’ve upgraded to iOS 12, you may have noticed, like the user above, that Apple has removed the Live Photos feature in iOS 12.
- Without an explanation for the removal or information on when the feature will return, Apple has left many iPhone users confused and angry.
- There is no solution to this problem because it is related to the operating system itself.
Unlock the secrets to resolving the frustrating issue of FaceTime Live Photos not working or saving.
Troubleshooting FaceTime Live Photos Saving Issue
If you’re experiencing issues with FaceTime Live Photos not working or saving, follow these troubleshooting steps to fix the problem.
1. Check iOS Version Requirements: Ensure that your device meets the minimum iOS version requirements for FaceTime Live Photos. Update your iOS if necessary.
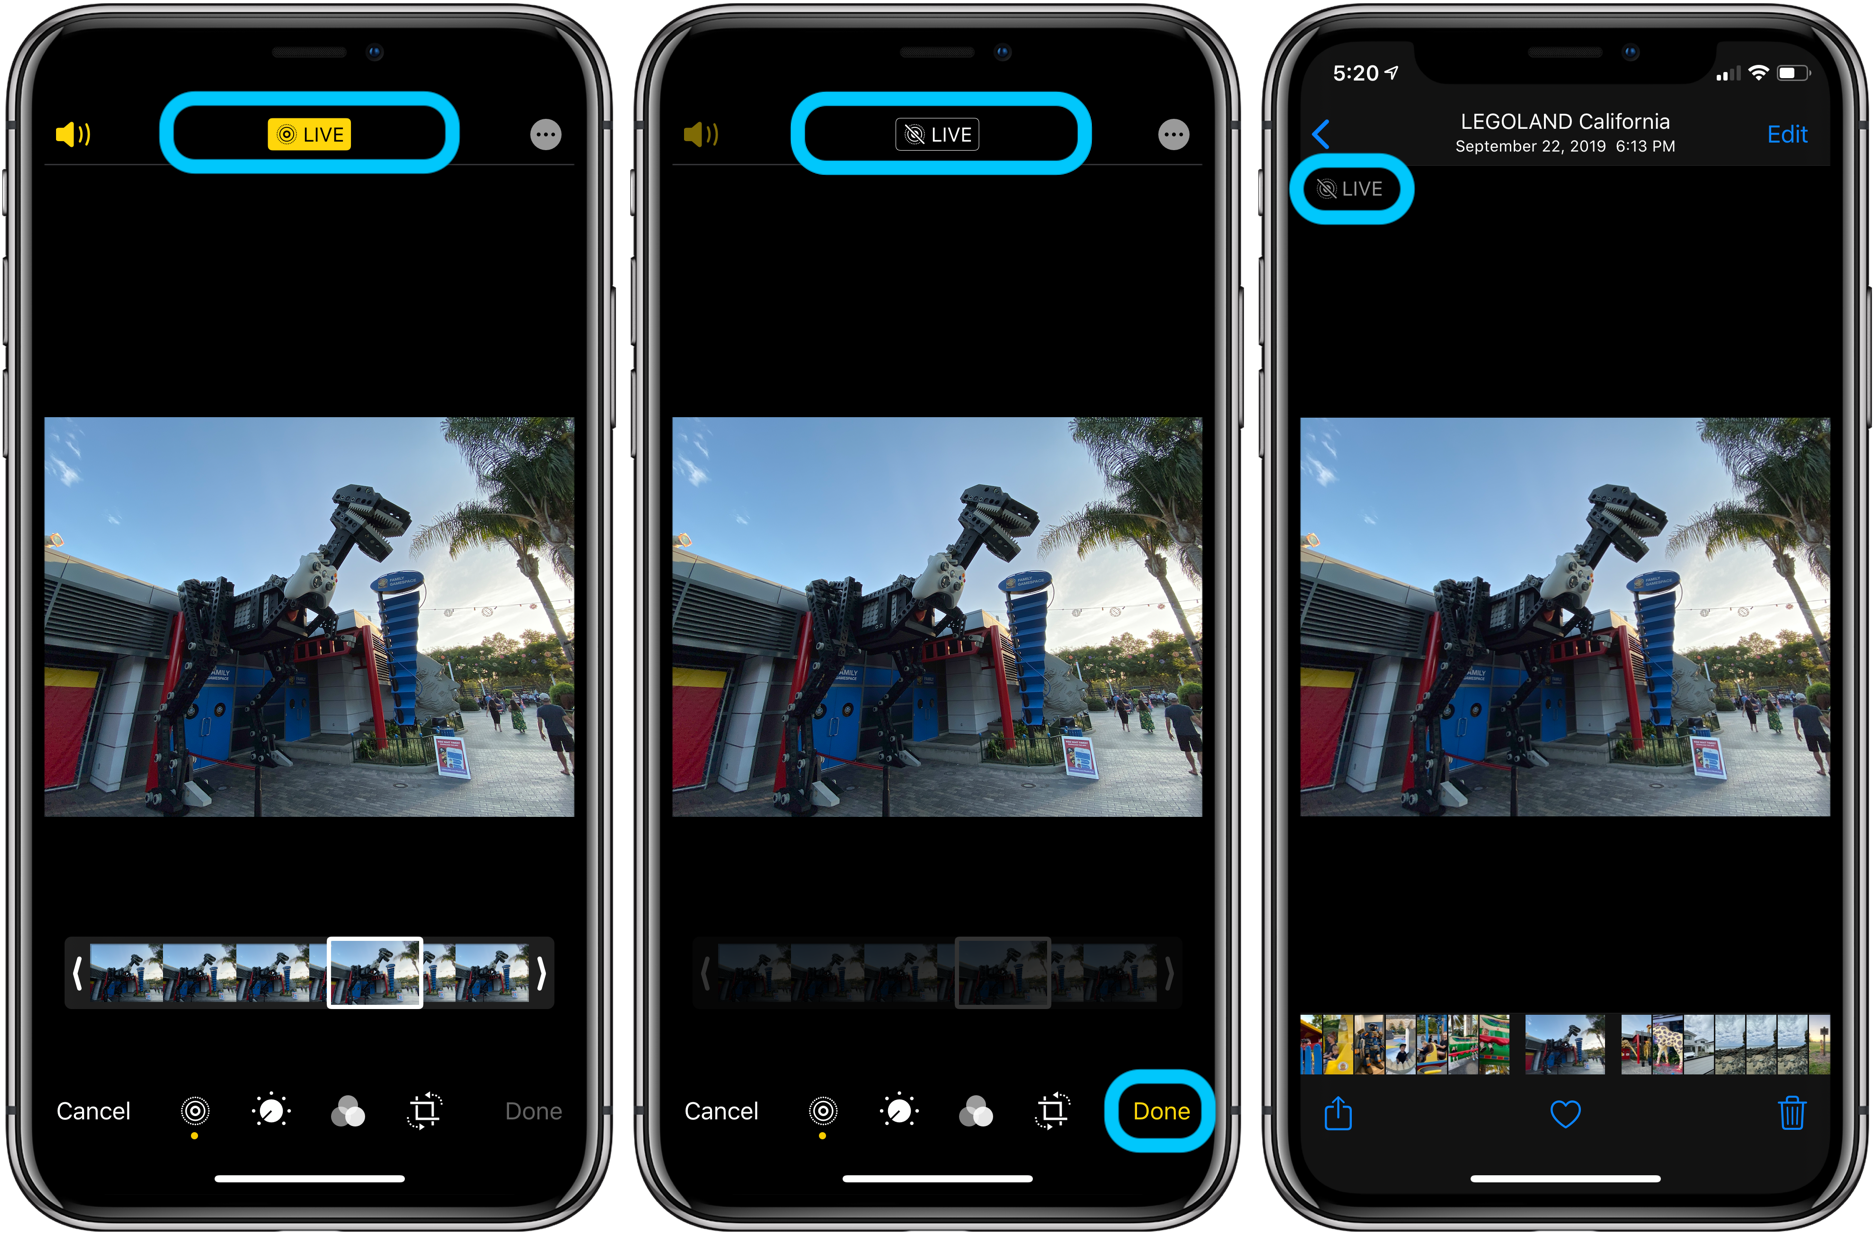
2. Enable FaceTime Live Photos: During a FaceTime call, tap the camera button to access the Live Photos option. Make sure it is enabled.
3. Toggle FaceTime Live Photos: If the feature is already enabled, try toggling it off and on again to refresh the settings.
4. Check Privacy Settings: Go to Settings > Privacy > Photos and ensure that FaceTime has permission to access your photos.
5. Check Storage Space: Make sure you have enough storage space on your device to save Live Photos. Clear unwanted files if needed.
6. Restart FaceTime: Close the FaceTime app and relaunch it. This can help resolve minor glitches.
Following these troubleshooting steps should help resolve the FaceTime Live Photos saving issue. Remember to update your iOS and check your privacy settings for the best experience.
Ensuring Compatibility and Region Settings for FaceTime Live Photos
To fix FaceTime Live Photos not working or saving, it’s important to ensure compatibility and check region settings. Make sure both devices have the necessary features and are running iOS 11 or later.
If FaceTime Live Photos are not saving or working properly, try these troubleshooting steps:
1. Toggle the Live Photos feature: During a FaceTime call, tap the camera button and make sure the Live Photos toggle button is enabled.
2. Check privacy settings: Go to “Settings” > “FaceTime” > “Allowed Apps” and ensure that the Camera and Photo options are enabled.
3. Ensure sufficient storage: FaceTime Live Photos require space on your device. Make sure there is enough storage available in the camera roll or iCloud.
4. Restart devices: Sometimes a simple restart can fix minor glitches. Restart both devices and try again.
By following these fixes, you should be able to resolve FaceTime Live Photos issues and capture the best moments during FaceTime calls.
Updating iOS and FaceTime Settings to Fix Live Photos Not Saving
If you’re experiencing issues with FaceTime Live Photos not saving, there are a few steps you can take to troubleshoot the problem.
First, make sure you’re running the latest version of iOS on your iPhone. Go to Settings > General > Software Update to check for any available updates.
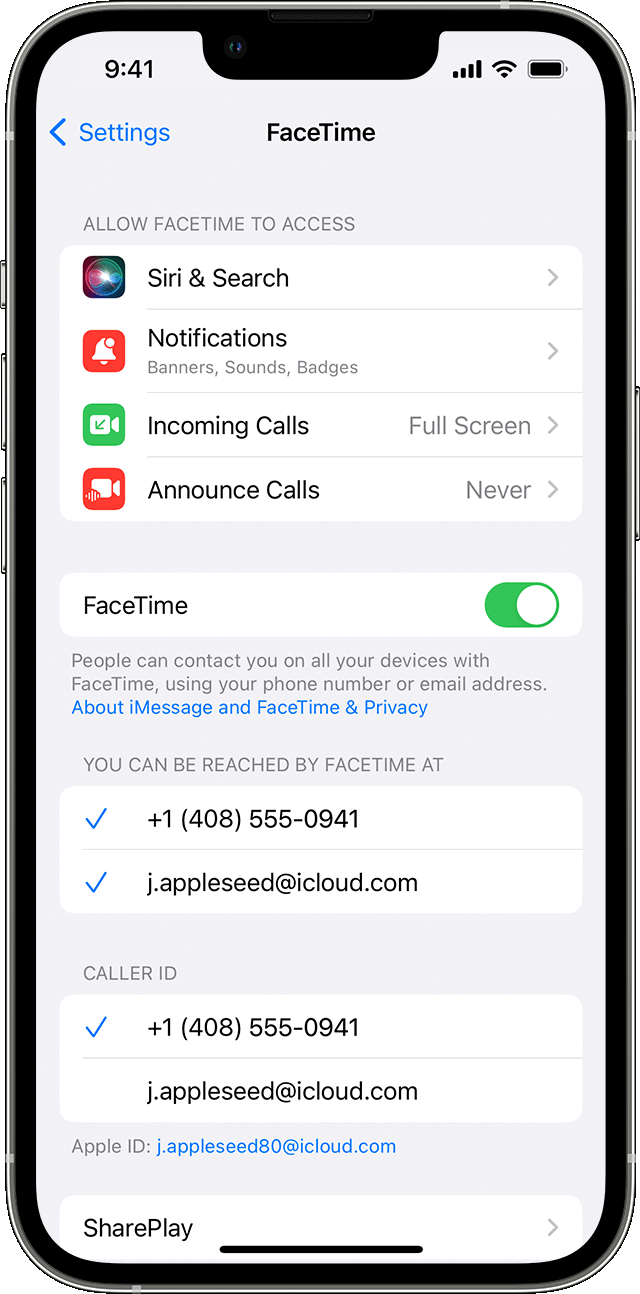
Next, ensure that FaceTime is enabled on your device. Go to Settings > FaceTime and toggle the button to turn it on.
If you’re still having trouble, check your privacy settings. Go to Settings > Privacy > Photos and make sure that the FaceTime app has permission to access your photos.
It’s also a good idea to restart your device, as this can sometimes resolve glitches. Press and hold the power button, then slide to power off. Once your device is off, press and hold the power button again to turn it back on.
By following these steps, you should be able to fix the issue with FaceTime Live Photos not saving.
Restarting and Force Restarting Your Apple Device for Live Photos Issue
If you’re experiencing issues with FaceTime Live Photos not working or saving, restarting your Apple device can often resolve the problem. Here’s how you can do it:
1. For iPhones with Face ID (iPhone X or later), press and hold the side button along with either volume button until the power off slider appears. Drag the slider to turn off your device. To turn it back on, press and hold the side button again until the Apple logo appears.
2. For iPhones with a Home button (iPhone 8 or earlier), press and hold the power button until the power off slider appears. Drag the slider to turn off your device. To turn it back on, press and hold the power button again until the Apple logo appears.
3. For iPads without a Home button, press and hold the top button until the power off slider appears. Drag the slider to turn off your device. To turn it back on, press and hold the top button again until the Apple logo appears.
4. For Mac computers, click on the Apple logo in the top-left corner and select “Restart” from the drop-down menu. Wait for your Mac to restart.
After following these steps, try using FaceTime Live Photos again to see if the issue has been resolved. If not, you can try force restarting your device. Here’s how:
1. For iPhones with Face ID, quickly press and release the volume up button, then quickly press and release the volume down button. Finally, press and hold the side button until the Apple logo appears.
2. For iPhones with a Home button, press and hold both the home button and the power button until the Apple logo appears.
3. For iPads without a Home button, quickly press and release the volume up button, then quickly press and release the volume down button. Finally, press and hold the top button until the Apple logo appears.
4. For Mac computers, press and hold the power button until your Mac turns off. Then, press the power button again to turn it back on.
Once your device has restarted, check if FaceTime Live Photos are now working properly. If the issue persists, you may need to explore further troubleshooting options or contact Apple support for assistance.
Exploring Alternative Methods to Save FaceTime Live Photos on iPhone
- Open the Settings app on your iPhone.
- Scroll down and tap on FaceTime.
- Ensure that the Live Photos option is turned on.
- If it is already on, toggle it off and then turn it back on.
Method 2: Restart FaceTime
- Open the Settings app on your iPhone.
- Scroll down and tap on FaceTime.
- Toggle the FaceTime switch off.
- Wait for a few seconds and then toggle it back on.
Method 3: Update iOS
- Open the Settings app on your iPhone.
- Scroll down and tap on General.
- Select Software Update.
- If an update is available, tap on Download and Install.
- Follow the on-screen instructions to complete the update.
Method 4: Reset FaceTime
- Reset FaceTime Settings:
- Open the Settings app on your iPhone.
- Scroll down and tap on FaceTime.
- Tap on Reset FaceTime Settings.
- Confirm the action by tapping on Reset.
- Reset All Settings:
- Open the Settings app on your iPhone.
- Scroll down and tap on General.
- Tap on Reset.
- Select Reset All Settings.
- Enter your passcode if prompted and confirm the action.
Method 5: Check Available Storage
- Open the Settings app on your iPhone.
- Scroll down and tap on General.
- Tap on iPhone Storage.
- Check the available storage and ensure that it is not full.
- If the storage is nearly full, delete unnecessary files or apps to free up space.

Mark Ginter is a tech blogger with a passion for all things gadgets and gizmos. A self-proclaimed "geek", Mark has been blogging about technology for over 15 years. His blog, techquack.com, covers a wide range of topics including new product releases, industry news, and tips and tricks for getting the most out of your devices. If you're looking for someone who can keep you up-to-date with all the latest tech news and developments, then be sure to follow him over at Microsoft.