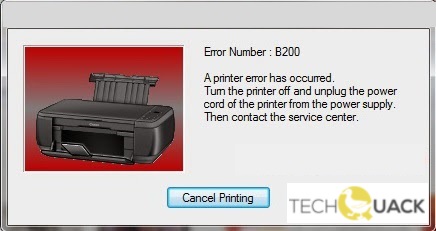
- A Canon B200 error indicates that the printer’s print head is malfunctioning.
- Sometimes the printer can give you a false error and you can fix it.
- Reinstall the print head and replace the problem cartridges with the correct cartridges.
- The printer should then start up and all that is left to do is check the nozzles, do a deep cleaning, and level the printer.
Welcome to this informative article on resolving the Canon B200 error! If you’re experiencing printer troubles and are seeking effective solutions, you’re in the right place. In the following sections, we will explore various tips and methods to help you fix the Canon B200 error and get your printer back up and running smoothly. So, let’s dive in and discover the remedies to this common printer error.
Understanding the Canon B200 Error
The Canon B200 Error is a common printer error that can be frustrating to deal with. If you’re experiencing this error, there are a few methods you can try to fix it. First, try resetting the printer by turning it off and unplugging it from the power source for a few minutes. Then, plug it back in and turn it on. If that doesn’t work, check the print head and make sure it’s clean and properly installed. You may also want to check the ink cartridges and replace any that are low or empty. If none of these methods work, it may be necessary to contact Canon support or take your printer in for repairs. Remember to always refer to your printer’s user manual or the manufacturer’s knowledge base for specific instructions and troubleshooting tips.
Troubleshooting the Canon B200 Error
If you’re experiencing the Canon B200 Error on your printer, follow these tips to fix the issue:
1. Power off your printer and unplug it from the power source.
2. Open the printer cover and check for any obstructions or paper jams. Remove them if found.
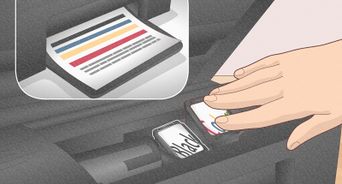
3. Lift the print head lever and remove the ink cartridges from the printer.
4. Clean the print head and ink cartridges using a lint-free cloth. Make sure to remove any dried ink or debris.
5. Reinsert the ink cartridges into their respective slots and close the printer cover.
6. Plug the printer back in and power it on.
7. Perform a printer head alignment and test a printout to see if the issue is resolved.
If the B200 error persists, it may indicate a more serious issue with the printer’s components. In this case, it is recommended to contact Canon support or a professional for further assistance.
Resolving Printer Error B200 on Canon Printers
If you’re facing the frustrating Printer Error B200 on your Canon printer, don’t worry, we’ve got you covered. Follow these simple steps to fix the issue:
1. Turn off your printer and unplug it from the power source.
2. Open the printer cover and carefully remove the ink cartridges.
3. Check for any obstructions or debris in the printer’s components and clean them using a soft, lint-free cloth.
4. Next, gently remove the print heads from the printer.
5. Clean the print heads using lukewarm water until no ink residue is left.
6. Allow the print heads to dry completely before reinstalling them.
7. Reinsert the ink cartridges into their respective slots and close the printer cover.
8. Plug in the printer and turn it on.
9. Perform a printer head alignment and test print to ensure everything is functioning properly.
Considerations for Printhead Replacement in Canon B200 Error
- Step 1: Ensure that the printer is turned off and unplugged from the power source.
- Step 2: Open the printer cover to access the ink cartridges and printhead.
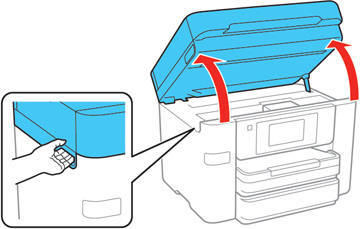
- Step 3: Carefully remove the ink cartridges from their slots by gently pulling them out.
- Step 4: Locate the printhead assembly, which is usually situated beneath the ink cartridges.
- Step 5: Identify the locking mechanism that holds the printhead in place.
- Step 6: Release the locking mechanism by either pressing a lever or sliding a switch, depending on the printer model.
- Step 7: Gently lift the printhead assembly out of the printer.
- Step 8: Inspect the printhead for any visible damage, such as clogs or dried ink.
- Step 9: If the printhead appears to be clogged, use a lint-free cloth lightly dampened with distilled water to clean the printhead nozzles.
- Step 10: Allow the printhead to air dry completely before reinstalling it.
- Step 11: Align the printhead properly with the slots in the printer and gently insert it back into place.
- Step 12: Secure the printhead by locking the mechanism back into position.
- Step 13: Carefully reinsert the ink cartridges into their corresponding slots.
- Step 14: Close the printer cover and plug the printer back into the power source.
- Step 15: Turn on the printer and perform a test print to check if the B200 error has been resolved.

Mark Ginter is a tech blogger with a passion for all things gadgets and gizmos. A self-proclaimed "geek", Mark has been blogging about technology for over 15 years. His blog, techquack.com, covers a wide range of topics including new product releases, industry news, and tips and tricks for getting the most out of your devices. If you're looking for someone who can keep you up-to-date with all the latest tech news and developments, then be sure to follow him over at Microsoft.