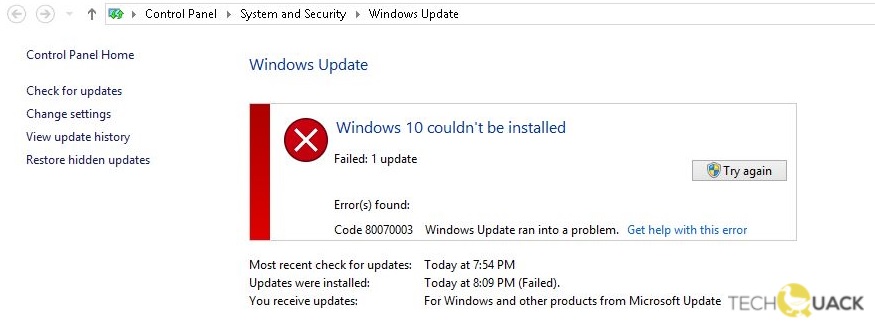
- The Windows update process may stop while downloading the update and error code 0x80070003 could not be installed.
- If updates are available, they cannot be downloaded and installed automatically through Windows Update.
Unveiling the Solution to Windows Update Error 0x80070003: A Guide for Windows 10 Users
Troubleshooting Windows Update Errors
If you’re experiencing the Windows Update Error 0x80070003 on Windows 10, don’t worry, we’ve got you covered. Follow these steps to solve the problem:
1. Restart your computer: Sometimes a simple restart can fix update errors. Give it a try.
2. Run the Windows Update Troubleshooter: This tool can automatically detect and fix common update errors. Open the Settings app, go to Update & Security, and select Troubleshoot. Choose Windows Update and follow the on-screen instructions.
3. Check your internet connection: A stable internet connection is crucial for successful updates. Make sure you’re connected to the internet and try updating again.
4. Reset Windows Update components: Open Command Prompt as an administrator and enter the following commands:
net stop wuauserv
net stop cryptSvc
net stop bits
net stop msiserver
ren C:\Windows\SoftwareDistribution SoftwareDistribution.old
ren C:\Windows\System32\catroot2 catroot2.old
net start wuauserv
net start cryptSvc
net start bits
net start msiserver
5. Use the SetupDiag.exe tool: This tool can help identify and resolve update installation problems. Download and run the tool from the Microsoft website.
If none of these solutions work, you may need to seek further assistance or consult Microsoft’s support documentation for more specialized help.
Registry Modification and Update Troubleshooter
If you’re encountering the Windows Update Error 0x80070003 on Windows 10, we have a solution for you. Here’s how to fix error 0x80070003:
1. Open the Registry Editor by pressing Windows Key + R, then typing “regedit” and hitting Enter.
2. Navigate to HKEY_LOCAL_MACHINE\SOFTWARE\Microsoft\Windows\CurrentVersion\Component Based Servicing\ComponentDetect\amd64_Microsoft-Windows-WinPE-SRT_31bf3856ad364e35_10.0.19041.1_none_5d0b1b5d5f6707c6.
3. Right-click on the “Version” DWORD value and select Modify. Change the value to 0.
4. Close the Registry Editor and restart your computer.
This should resolve the 0x80070003 update error. If you’re still experiencing issues, consider using specialized troubleshooting software like Macrium for further assistance. Remember to always create a backup of your important files before making any changes to the registry.
Repairing System Files and Restarting Update Service
To fix the Windows Update Error 0x80070003 on Windows 10, you can try repairing system files and restarting the update service. Follow these steps:
1. Open the Command Prompt as an administrator.
2. Type “sfc /scannow” and press Enter to run the System File Checker. This will scan and repair any corrupted system files on your PC.
3. After the scan is complete, restart your computer.
4. Open the Command Prompt as an administrator again.
5. Type “net stop wuauserv” and press Enter to stop the Windows Update service.
6. Type “net start wuauserv” and press Enter to restart the Windows Update service.
7. Close the Command Prompt and try updating your Windows again.
By repairing system files and restarting the update service, you can resolve the 0x80070003 error and ensure that your Windows 10 system is up to date.
Disabling Antivirus and Temporarily Deactivating Windows Defender
To solve the Windows Update Error 0x80070003 on Windows 10, you may need to disable your antivirus and temporarily deactivate Windows Defender. Here’s how:
1. Disable your antivirus program temporarily. Open the antivirus software on your computer and navigate to the settings or options menu. Look for an option to disable the antivirus temporarily. Note that this process may vary depending on the antivirus software you are using.
2. Temporarily deactivate Windows Defender. Press the Windows key + R on your keyboard to open the Run dialog box. Type “regedit” and press Enter. Navigate to the following registry path: HKEY_LOCAL_MACHINE\SOFTWARE\Policies\Microsoft\Windows Defender. Look for a key called “DisableAntiSpyware” and double-click on it. Change the value from 0 to 1, then click OK.
3. Restart your computer to apply the changes.
After restarting, try running the Windows Update again to see if the error is resolved. If you continue to experience the error, you may need to explore other troubleshooting solutions or seek specialized help from Microsoft or other experts in the field. Remember to re-enable your antivirus and Windows Defender after resolving the issue.
Manually Downloading Updates and Checking Time and Date Settings
- Open the Settings app by clicking on the Start menu and selecting Settings.
- In the Settings window, click on Update & Security.
- From the left-hand menu, select Windows Update.
- Click on the Check for updates button to search for available updates.

- If updates are found, click on the Download button to start the download process.
- Wait for the updates to be downloaded and installed on your computer.

- Restart your computer to complete the installation process.
Checking Time and Date Settings
- Open the Settings app by clicking on the Start menu and selecting Settings.
- In the Settings window, click on Time & Language.
- From the left-hand menu, select Date & Time.
- Make sure the Set time automatically option is turned on.
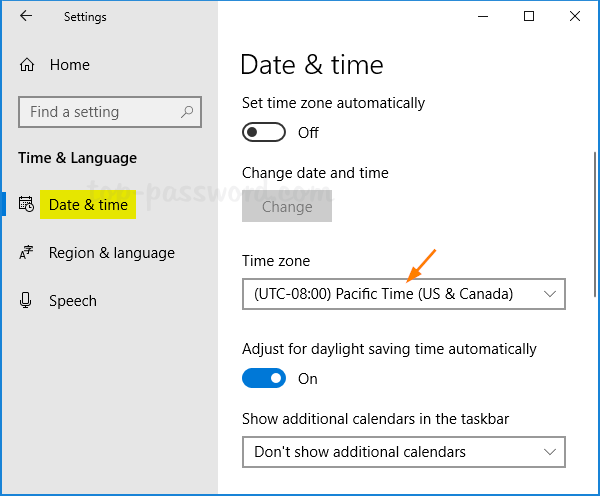
- Click on the Sync now button to synchronize your computer’s time with the internet time server.
- If the time and date are incorrect, click on the Change button and adjust them accordingly.

- Restart your computer to apply the changes.
Performing an In-Place Upgrade for Multiple Update Errors
If you’re experiencing multiple update errors, including error code 0x80070003, on your Windows 10 PC, an in-place upgrade can help resolve the issue. Here’s how to do it:
1. Make sure you have a backup of your important files and data.
2. Download the Windows 10 ISO file from the official Microsoft website.
3. Mount the ISO file and run the setup.exe.
4. Follow the on-screen instructions to begin the upgrade process.
5. Select the option to keep your personal files and apps.
6. Let the upgrade process complete. This may take some time.
7. Once the upgrade is finished, check if the update errors, including error code 0x80070003, are resolved.
If you encounter any problems during the upgrade, make sure to troubleshoot using tools like SetupDiag.exe or contacting Microsoft support for further assistance.

Mark Ginter is a tech blogger with a passion for all things gadgets and gizmos. A self-proclaimed "geek", Mark has been blogging about technology for over 15 years. His blog, techquack.com, covers a wide range of topics including new product releases, industry news, and tips and tricks for getting the most out of your devices. If you're looking for someone who can keep you up-to-date with all the latest tech news and developments, then be sure to follow him over at Microsoft.
Related posts:
 Retrieve Windows error code 48 – “The software on this device has been blocked at startup because it is known to have problems with Windows”
 Fixing Microsoft Store error 0x80131505
 Fixed 0x800f0831 installation failure when installing an update
 How to fix the error : Lifecam.exe cannot be initialized ‘cannot continue’