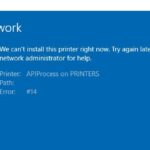
- If your Internet isn’t working and you’ve tried the troubleshooter, you get the error message “Your computer seems to be configured correctly, but the device or resource isn’t responding,” usually occurs when your computer is connected to the WLAN but cannot access the Internet.
- In order to access a page or site on the Internet, your computer needs to know which server to contact first.
Welcome to the troubleshooting guide that will help you resolve the infuriating “Computer Appears to be Correctly Configured” issue on your Windows 10 system. Find out how to tackle this problem head-on and regain control over your computer’s functionality.
Troubleshooting the “Computer Appears to Be Correctly Configured” Problem
If you’re experiencing the “Computer Appears to Be Correctly Configured” problem on Windows 10, there are a few troubleshooting steps you can follow to resolve the issue. First, check your network connection and make sure you’re connected to the internet.
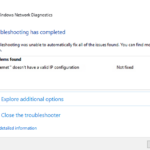
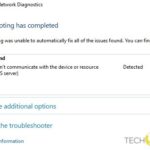
Next, open the Network Troubleshooter by right-clicking on the network icon in the system tray and selecting “Troubleshoot problems.” The troubleshooter will automatically detect and fix any network issues it finds.
If the problem persists, try resetting your network adapter by going to Device Manager, finding your network adapter under “Network adapters,” right-clicking on it, and selecting “Uninstall device.” Then restart your PC and Windows will reinstall the network adapter.
If none of these steps solve the problem, you can try manually setting your DNS servers. Open the Network Connections dialog, right-click on your network connection, select “Properties,” and then double-click on “Internet Protocol Version 4 (TCP/IPv4).” From there, you can enter the preferred and alternate DNS server addresses.
Remember, if you’re unsure of any steps or encounter any errors, you can visit the Microsoft website for more detailed instructions and resources.
Narrowing Down the Issue
If you are experiencing the “Your computer appears to be correctly configured, but the device or resource (DNS server) is not responding” error message on Windows 10, there are a few steps you can take to fix the issue.
First, check your internet connection and make sure it is working properly. If you are connected to a router, try restarting it and see if that resolves the problem.
Next, you can try running the Network Troubleshooter to automatically diagnose and fix any connection issues. To do this, right-click on the network icon in the taskbar, select “Troubleshoot problems,” and follow the instructions.
If that doesn’t work, you can try resetting your DNS settings. Open the Command Prompt as an administrator and type the following command: ipconfig /flushdns. This will clear the DNS cache and may resolve the issue.
If none of these steps fix the problem, it may be worth checking for any updates for your network drivers. You can do this by going to the Device Manager, expanding “Network adapters,” right-clicking on your network adapter, and selecting “Update driver.”
These steps should help you narrow down and fix the “Your computer appears to be correctly configured, but the device or resource (DNS server) is not responding” problem on Windows 10.
Restarting PC and Network Devices
If you are experiencing the “Your computer appears to be correctly configured, but the device or resource (DNS server) is not responding” error message on Windows 10, there are a few steps you can take to troubleshoot the problem.
First, try restarting your PC and network devices. This can often resolve temporary network issues.
To restart your PC, click on the Start button, select the Power icon, and choose Restart.
To restart your network devices, such as your router, simply unplug them from power for about 30 seconds, then plug them back in.
If the issue persists, you can also try resetting your network settings. To do this, open the Settings app, go to Network & Internet, select Status, and click on Network Reset.
Additionally, make sure you have the latest updates installed for Windows 10, as these can often fix known issues.
If none of these steps resolve the problem, you may want to reach out to your ISP for further assistance or consider updating your network drivers.
Remember, don’t panic if you encounter an error message like this. There are usually simple steps you can take to fix the issue and get back online.
Changing DNS Server
To change the DNS server in Windows 10 and fix the “Computer Appears to be Correctly Configured” problem, follow these steps:
1. Press the Windows key + X and select “Network Connections.”
2. Click on the network connection you’re currently using.
3. In the menu that appears, click “Properties.”
4. Scroll down and double-click on “Internet Protocol Version 4 (TCP/IPv4).”
5. In the dialog box that appears, select “Use the following DNS server addresses.”
6. Enter the preferred and alternate DNS server addresses. You can use public DNS servers like Google (8.8.8.8 and 8.8.4.4) or OpenDNS (208.67.222.222 and 208.67.220.220).
7. Click “OK” to save the changes.
8. Close the Network Connections window and restart your computer.
By changing the DNS server, you can resolve DNS errors and improve your internet connection. If you’re still experiencing issues, try running Windows network troubleshooters or contacting your ISP for further assistance. Remember not to panic and follow the steps carefully.
Updating Network Adapter Driver
If you’re experiencing the “Your computer appears to be correctly configured, but the device or resource (DNS server) is not responding” problem on Windows 10, it could be due to an outdated network adapter driver. Follow these steps to update it:
1. Press the Windows key + X and select “Device Manager.”
2. Expand the “Network adapters” category.
3. Right-click on your network adapter and select “Update driver.”
4. Choose the option to automatically search for updated driver software.
5. If an update is found, follow the on-screen instructions to install it.
6. Restart your computer to apply the changes.
Updating your network adapter driver can help resolve DNS errors and improve your internet connection. If you continue to experience problems, you can also try running Windows network troubleshooters or checking your browser proxy settings. Remember, don’t panic! Microsoft has plenty of guides and resources to help you troubleshoot network problems.
Flushing DNS Cache
To fix the “Your computer appears to be correctly configured” problem on Windows 10, you may need to flush the DNS cache. This can help resolve issues with your internet connection and DNS errors.
Here’s a step-by-step guide to flush the DNS cache on your Windows 10 computer:
1. Open the Command Prompt as an administrator. To do this, press the Windows key, type “Command Prompt,” right-click on it, and select “Run as administrator.”
2. In the Command Prompt window, type “ipconfig /flushdns” and press Enter. This will flush the DNS cache on your computer.
3. Once the command is executed, you should see a message confirming that the DNS cache has been successfully flushed.
4. Restart your computer to apply the changes.
Disabling Antivirus Temporarily
If you’re experiencing the “Your computer appears to be correctly configured, but the device or resource (DNS server) is not responding” problem on Windows 10, temporarily disabling your antivirus software may help resolve the issue.
To do this, follow these steps:
1. Right-click on the antivirus software icon in the system tray.
2. Select “Disable” or “Turn off” from the menu that appears.
3. Confirm any prompts or warnings that may appear.
4. Open your web browser and try accessing a web page to see if the problem is resolved.
5. If the issue persists, you can re-enable your antivirus software by right-clicking on the icon again and selecting “Enable” or “Turn on.”
Disabling your antivirus temporarily can help rule out any conflicts between the antivirus software and your network settings. Remember to re-enable your antivirus once you have determined whether it is the cause of the problem.
Running Network Troubleshooter
If you’re experiencing network issues on Windows 10, you can use the Network Troubleshooter to help identify and resolve the problem. Here’s how:
1. Press the Windows key + I to open the Settings app.
2. Click on “Network & Internet.”
3. In the left-hand menu, select “Status.”
4. Scroll down and click on “Network Troubleshooter” under the “Change your network settings” section.
5. The troubleshooter will now run and attempt to diagnose and fix any network issues.
If the troubleshooter detects any problems, it will provide recommendations for resolving them. Follow the suggested steps to fix the problem. If the troubleshooter is unable to fix the issue, it may provide additional information on possible causes.
By running the Network Troubleshooter, you can quickly and easily identify and resolve network problems, ensuring your computer is correctly configured for optimal performance.
Updating or Rolling Back Network Drivers
If you are experiencing connection issues on your Windows 10 computer and the Network Diagnostics tool indicates that “Your computer appears to be correctly configured, but the device or resource (DNS server) is not responding,” you may need to update or roll back your network drivers.
To update your network drivers, follow these steps:
1. Press the Windows key + X and select Device Manager.
2. Expand the Network adapters category.
3. Right-click on your network adapter and select Update driver.
4. Choose Search automatically for updated driver software.
5. Follow the on-screen instructions to complete the update.
If updating the drivers doesn’t fix the problem, you can try rolling back the drivers to a previous version:
1. Open Device Manager as described above.
2. Right-click on your network adapter and select Properties.
3. Go to the Driver tab and click on Roll Back Driver.
4. Follow the on-screen instructions to roll back the driver to the previous version.
These steps should help resolve the “Your computer appears to be correctly configured, but the device or resource (DNS server) is not responding” issue on Windows 10.

Mark Ginter is a tech blogger with a passion for all things gadgets and gizmos. A self-proclaimed "geek", Mark has been blogging about technology for over 15 years. His blog, techquack.com, covers a wide range of topics including new product releases, industry news, and tips and tricks for getting the most out of your devices. If you're looking for someone who can keep you up-to-date with all the latest tech news and developments, then be sure to follow him over at Microsoft.