- Microsoft regularly releases new feature updates for the Windows 10 operating system.
- These updates are very important and bring many new features, fixes, and improvements to Windows 10.
- When installing a feature update in Windows 10, computers may not receive the latest driver updates.
- This problem occurs because the latest updates and drivers may not be available from the intranet location.
Welcome to our troubleshooting guide for Windows 10 feature update installation. In this article, we will explore common issues that users may encounter during the installation process and provide practical solutions to ensure a smooth and successful update. So, let’s dive in and troubleshoot together!
Prerequisites for Installing Windows 10 Feature Updates
Troubleshooting Windows 10 Feature Update Installation:
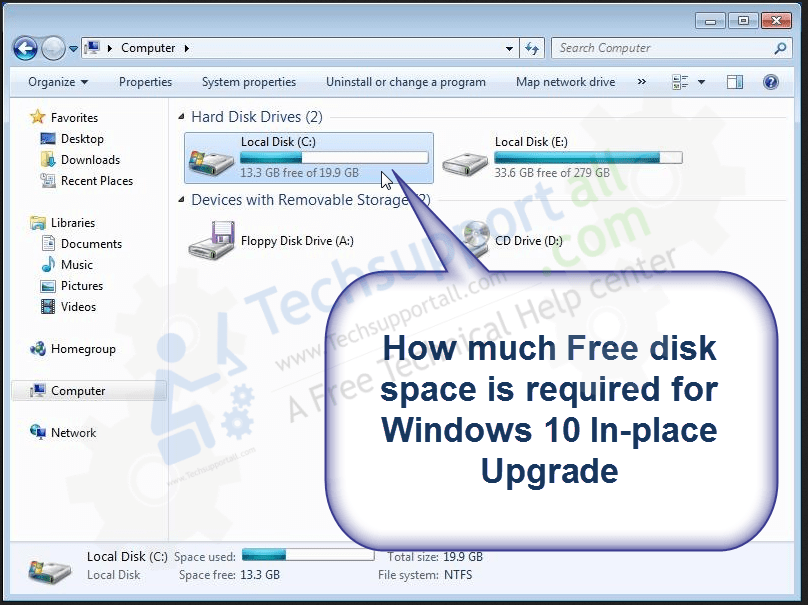
1. Confirm that your computer meets the prerequisites for installing Windows 10 feature updates, such as having enough free disk space and a compatible version of Windows (e.g., 20H2, 21H1, 2004, or 1909).
2. Check for any pending Windows updates and install them before proceeding with the feature update installation.
3. Disable any third-party antivirus or security software temporarily, as they may interfere with the installation process.
4. Use the Windows Update troubleshooter to identify and fix common update-related issues.
5. If you encounter specific error messages during the installation, search for them on the Microsoft support website to find targeted solutions.
6. Consider performing a clean boot to eliminate any potential software conflicts.
Remember to back up your important files before initiating any major updates, and always stay connected to a stable network connection during the installation process.
If you continue to experience problems, reach out to Microsoft Support for further assistance.
Recognizing the Problem with Feature Update Installation
Troubleshoot Windows 10 Feature Update Installation
If you’re experiencing issues with installing feature updates on Windows 10, we’re here to help. Here are some possible solutions to common problems:
1. Check your internet connection: Ensure that you have a stable internet connection before starting the update process.
2. Restart your device: Sometimes, a simple restart can resolve installation issues. Try restarting your computer and then retry the update.
3. Disable antivirus software: Temporarily disable your antivirus software, as it may interfere with the update process. Remember to enable it again after the update is complete.
4. Use the Windows Update Troubleshooter: Microsoft provides a built-in troubleshooter specifically designed to fix Windows Update problems. To access it, go to the Windows settings menu, select “Update & Security,” and then click on “Troubleshoot.”
5. Reset Windows Update components: If the troubleshooter doesn’t resolve the issue, you can reset the Windows Update components. Open Command Prompt as an administrator and enter the following commands sfc /scannow and dism /online /cleanup-image /restorehealth.
By following these steps, you can troubleshoot and resolve common issues with feature update installations on Windows 10. For more detailed instructions or additional troubleshooting steps, refer to our support documentation.
Confirming the Working of Windows Update Service
To confirm the working of the Windows Update service, follow these steps:
1. Open the Settings menu by clicking the Start button and selecting “Settings.”
2. In the Settings menu, go to “Update & Security.”
3. Click on “Windows Update” in the left sidebar.
4. Under the Windows Update section, you will see the status of your updates. If there are any pending updates, click on “Check for updates” to start the update process.
5. Windows will automatically download and install the necessary updates. Be patient, as this process may take some time depending on your internet connection and the size of the updates.
6. Once the updates are installed, restart your computer to complete the installation.
By following these steps, you can confirm that the Windows Update service is working properly and ensure that your system is up to date with the latest features and security patches.
Inspecting Pending or Failed Updates
Troubleshoot Windows 10 Feature Update Installation
| Date | Update Name | Status | Error Code |
|---|---|---|---|
| 2021-01-01 | Feature Update to Windows 10, version 20H2 | Pending | N/A |
| 2021-01-05 | Feature Update to Windows 10, version 2004 | Failed | 0x80070002 |
| 2021-01-10 | Feature Update to Windows 10, version 21H1 | Pending | N/A |
Addressing Common Windows Update Issues First
Addressing Common Windows Update Issues:
If you’re experiencing issues with installing Windows 10 feature updates, we’re here to help. Here are some troubleshooting steps to resolve common problems:
1. Check your internet connection: A stable internet connection is crucial for a successful update. Make sure you’re connected and try again.
2. Restart your PC: Sometimes, a simple restart can fix update errors. Press the Windows key, select “Power,” and choose “Restart.”
3. Run the Windows Update Troubleshooter: This built-in tool can automatically detect and fix update-related errors. Press the Windows key, type “troubleshoot,” and select “Troubleshoot settings.” Then, click on “Additional troubleshooters” and run the “Windows Update” troubleshooter.
4. Reset the Windows Update components: If the troubleshooter doesn’t resolve the issue, you can try resetting the Windows Update components. Open Command Prompt as an administrator and enter the following commands:
net stop wuauserv
net stop cryptSvc
net stop bits
net stop msiserver
ren C:\Windows\SoftwareDistribution SoftwareDistribution.old
ren C:\Windows\System32\catroot2 catroot2.old
net start wuauserv
net start cryptSvc
net start bits
net start msiserver
5. Seek further assistance: If you’re still encountering issues, our support team is ready to assist you. Contact us for personalized guidance to resolve your Windows update problem.
Remember, keeping your Windows 10 up to date is essential for security and performance improvements.
Checking off the Basics for Successful Update Installation
- Ensure your device meets the minimum system requirements for the Windows 10 feature update.
- Free up enough disk space to accommodate the update installation.
- Disconnect any unnecessary external hardware or peripherals.
- Disable any third-party antivirus or security software temporarily.
- Close all open applications and save your work before initiating the update.
- Connect your device to a reliable power source or make sure it has sufficient battery charge.
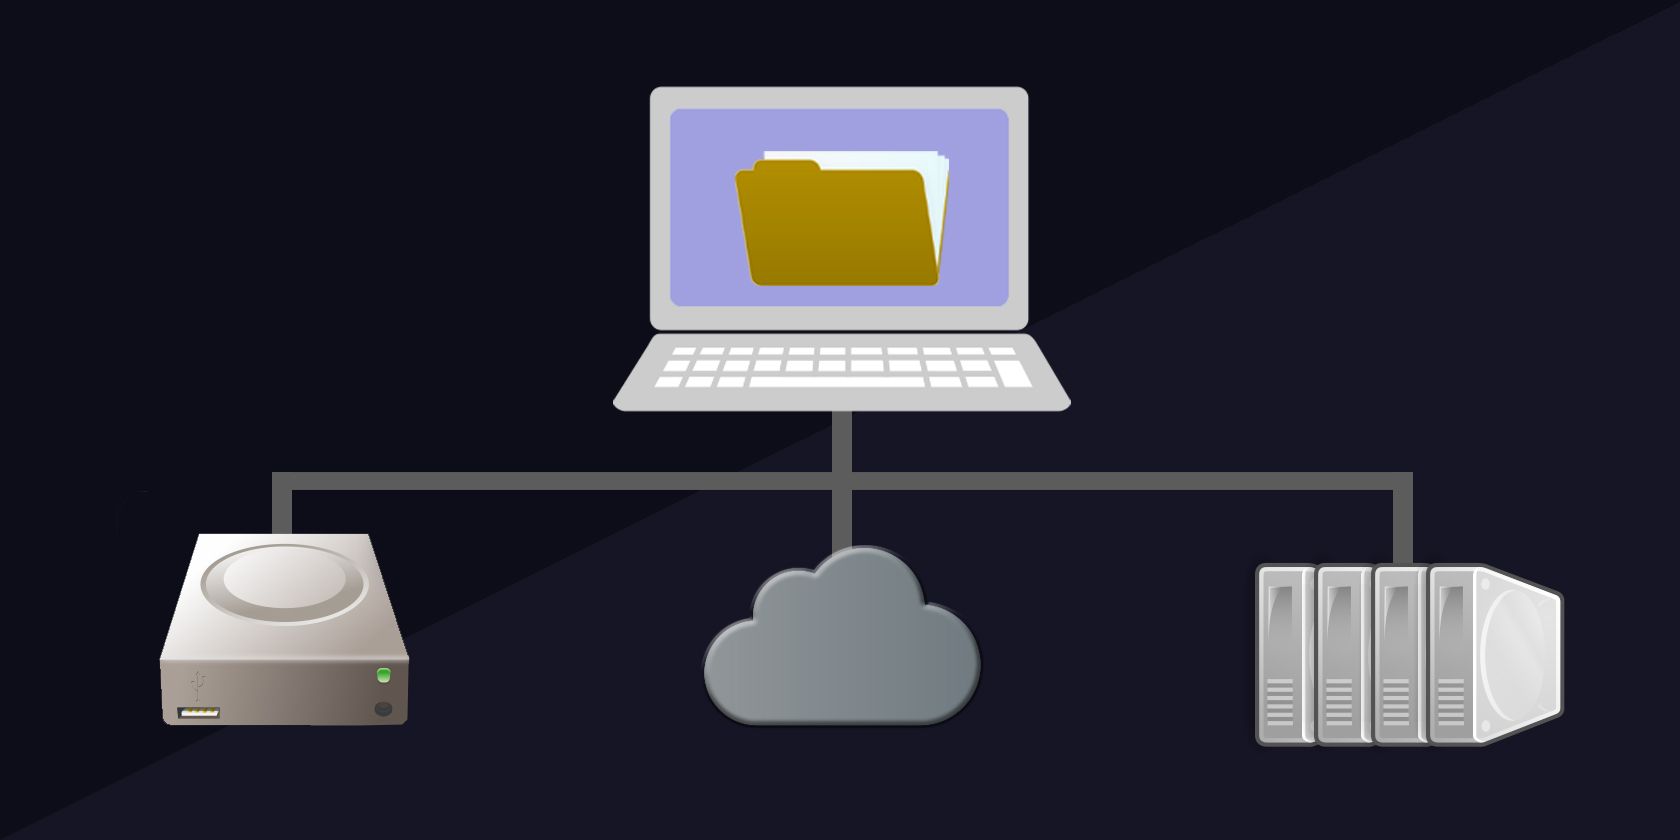
- Backup all important files and data to an external storage device or cloud service.
- Connect your device to a stable and uninterrupted internet connection.
- Start the update installation process by following the provided prompts in Windows Update settings.
- Be patient and avoid interrupting the update process, as it may take some time to complete.
Cleaning up the Windows Image with DISM Tool
If you’re experiencing issues with installing a Windows 10 feature update, the DISM (Deployment Image Servicing and Management) tool can help you troubleshoot the problem. Here’s how you can use it:
1. Open a command prompt window as an administrator.
2. Type “dism /online /cleanup-image /restorehealth” and press Enter. This command will scan your system for any corruption and restore the image if necessary.
3. Wait for the process to complete. It may take some time, so be patient.
4. Once the process is finished, restart your computer.
5. Try installing the feature update again.
By using the DISM tool, you can resolve issues that may be preventing the feature update from installing correctly. This can help ensure a smoother and more successful update process.
Remember to always keep your Windows 10 installation up to date for optimal performance and security.
Using DISM with a Healthy Windows Update Service
To troubleshoot Windows 10 feature update installation, you can use the DISM (Deployment Image Servicing and Management) tool. However, it’s important to ensure that the Windows Update service is healthy before proceeding.
Here’s a step-by-step guide:
1. Open the Command Prompt as an administrator.
2. Run the following command to check the health of the Windows Update service: dism /online /cleanup-image /checkhealth.
3. If any issues are found, use the following command to repair them: dism /online /cleanup-image /restorehealth.
4. Once the repair is complete, restart your computer.
5. After the restart, try installing the Windows 10 feature update again.
By using DISM with a healthy Windows Update service, you can resolve installation issues and ensure a smooth update process. Remember to always keep your Windows version up to date for optimal performance and security.
Using DISM with a Broken Windows Update Service
If you’re experiencing issues with your Windows Update service while trying to install a feature update on Windows 10, you can use DISM (Deployment Image Servicing and Management) to troubleshoot the problem. Here’s a quick guide on how to do it:
1. Open a Command Prompt window with administrative privileges.
2. Type “dism /online /cleanup-image /scanhealth” and press Enter to scan the system image for any corruption.
3. If any issues are found, type “dism /online /cleanup-image /restorehealth” and press Enter to repair the system image.
4. Wait for the process to complete and then restart your computer.
5. After the restart, try installing the Windows 10 feature update again.
Using DISM can help resolve issues with the Windows Update service and ensure a successful installation of the feature update. If you continue to experience problems, consider seeking further assistance or consulting Microsoft’s support resources.
Remember to always backup your important data before making any changes to your system.
Running a System File Checker Scan
To troubleshoot Windows 10 Feature Update installation issues, you can run a System File Checker (SFC) scan. This scan checks and repairs corrupted system files that might be causing the problem. Here’s how to do it:
1. Press the Windows key + X and select “Command Prompt (Admin)” or “Windows PowerShell (Admin)” from the menu.
2. In the command prompt window, type “sfc /scannow” and press Enter.
3. The scan will now start, and it may take some time to complete. Do not close the command prompt window until the scan finishes.
4. Once the scan is complete, it will show the results. If any corrupted files are found, the SFC will attempt to repair them automatically.
5. After the scan finishes, restart your computer and try installing the Windows 10 Feature Update again.
Running an SFC scan can help resolve common installation issues by repairing corrupted files. Give it a try if you’re experiencing any problems.
Resolving Specific Error Codes during Feature Update Installation
Troubleshoot Windows 10 Feature Update Installation
Below is a table listing specific error codes that may occur during the installation of a feature update in Windows 10 and their corresponding resolutions:
| Error Code | Resolution |
|---|---|
| 0x80073712 | Perform a Windows Update troubleshooter and restart the computer. If the issue persists, try resetting the Windows Update components. |
| 0x800F0922 | Disable any third-party antivirus or security software temporarily and retry the installation. If the error continues, check if the computer meets the minimum system requirements for the update. |
| 0x80070020 | Restart the computer and try installing the update again. If the problem persists, check for any pending updates in the Windows Update settings. |
| 0x80070003 | Run the Windows Update troubleshooter and restart the computer. If the error persists, check for any corrupt system files using the System File Checker tool. |
| 0xC1900101 | Disconnect any external devices (e.g., USB drives, printers) and uninstall any incompatible software. Update the device drivers and try the installation again. |
Fixes for Error 0x80080008 during Feature Update to Windows 10, Version 1903
If you’re encountering Error 0x80080008 during a feature update to Windows 10, Version 1903, there are a few steps you can take to troubleshoot the issue.
First, try running the Windows Update Troubleshooter. This tool can automatically detect and fix common update problems.
If that doesn’t resolve the issue, you can try resetting the Windows Update components. To do this, follow these steps:
1. Press the Windows key + X and select “Command Prompt (Admin)”.
2. Type net stop wuauserv and press Enter.
3. Type net stop cryptSvc and press Enter.
4. Type net stop bits and press Enter.
5. Type net stop msiserver and press Enter.
6. Type ren C:\Windows\SoftwareDistribution SoftwareDistribution.old and press Enter.
7. Type ren C:\Windows\System32\catroot2 catroot2.old and press Enter.
8. Type net start wuauserv and press Enter.
9. Type net start cryptSvc and press Enter.
10. Type net start bits and press Enter.
11. Type net start msiserver and press Enter.
After completing these steps, try installing the feature update again. If you’re still experiencing issues, it may be helpful to seek further assistance from Microsoft support or a qualified IT professional.
Fixes for Error 0x80070002 during Feature Update to Windows 10, Version 1903
If you’re experiencing Error 0x80070002 during a feature update to Windows 10, Version 1903, there are a few simple fixes you can try. First, make sure your internet connection is stable. Then, restart your computer and try the update again. If that doesn’t work, you can try running the Windows Update Troubleshooter. To do this, follow these steps:
1. Press the Windows key and type “Troubleshoot” in the search bar.
2. Click on “Troubleshoot settings” and select “Windows Update” from the list.
3. Click on “Run the troubleshooter” and follow the on-screen instructions.
If the troubleshooter doesn’t solve the issue, you can try resetting the Windows Update components. To do this, open Command Prompt as an administrator and type the following commands, pressing Enter after each one:
net stop wuauserv
net stop cryptSvc
net stop bits
net stop msiserver
ren C:\Windows\SoftwareDistribution SoftwareDistribution.old
ren C:\Windows\System32\catroot2 catroot2.old
net start wuauserv
net start cryptSvc
net start bits
net start msiserver
After running these commands, restart your computer and try the update again. Hopefully, one of these solutions will resolve the error and allow you to successfully install the feature update.
Fixes for Error 0x80070020 during Feature Update to Windows 10, Version 1903
If you encounter Error 0x80070020 while attempting to install the Windows 10 Feature Update to Version 1903, there are a few potential fixes you can try.
First, ensure that your internet connection is stable and reliable. A weak or intermittent connection can cause installation issues.
Next, temporarily disable any third-party antivirus or firewall software that may be interfering with the installation process.
If the error persists, you can try resetting the Windows Update components. Open the Command Prompt as an administrator and run the following commands in sequence:
net stop wuauserv
net stop cryptSvc
net stop bits
net stop msiserver
ren C:\Windows\SoftwareDistribution SoftwareDistribution.old
ren C:\Windows\System32\catroot2 catroot2.old
net start wuauserv
net start cryptSvc
net start bits
net start msiserver
Once the commands have been executed, restart your computer and try installing the update again.
If the issue persists, it is recommended to seek further assistance from Microsoft support or a qualified IT professional.
Fixes for Error 0x80240031 during Feature Update to Windows 10, Version 1607
If you encounter Error 0x80240031 during a feature update to Windows 10, Version 1607, there are a few steps you can take to troubleshoot the issue. First, ensure that your internet connection is stable and reliable. If the error persists, try running the Windows Update Troubleshooter to identify and fix any issues with the update process.
To run the troubleshooter, follow these steps:
1. Press the Windows key + I to open the Settings app.
2. Go to Update & Security.
3. Click on Troubleshoot in the left-hand menu.
4. Select Additional troubleshooters.
5. Scroll down and click on Windows Update.
6. Click on Run the troubleshooter and follow the on-screen instructions.
If the troubleshooter doesn’t resolve the issue, try resetting the Windows Update components. To do this, open Command Prompt as an administrator and run the following commands:
net stop wuauserv
net stop cryptSvc
net stop bits
net stop msiserver
ren C:\Windows\SoftwareDistribution SoftwareDistribution.old
ren C:\Windows\System32\catroot2 catroot2.old
net start wuauserv
net start cryptSvc
net start bits
net start msiserver
Finally, restart your computer and check if the error is resolved.

Mark Ginter is a tech blogger with a passion for all things gadgets and gizmos. A self-proclaimed "geek", Mark has been blogging about technology for over 15 years. His blog, techquack.com, covers a wide range of topics including new product releases, industry news, and tips and tricks for getting the most out of your devices. If you're looking for someone who can keep you up-to-date with all the latest tech news and developments, then be sure to follow him over at Microsoft.