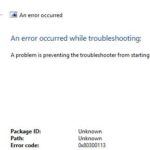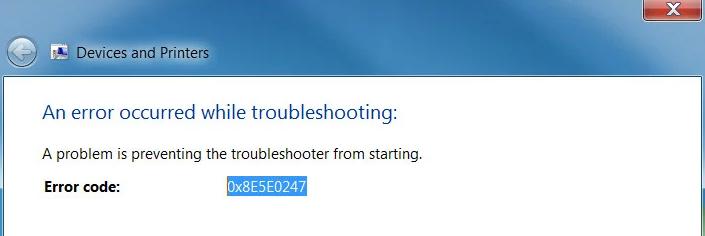
- The problem is that the troubleshooter does not start.
- The problem occurs in almost all versions of Windows.
- It usually happens when you try to run the built-in troubleshooters or the official Microsoft Fix It tool.
Welcome to the world of Windows Troubleshooter Error Fix 0x8E5E0247, where we unravel the mysteries behind this frustrating glitch. Discover the essential tips and tricks to overcome this obstacle and restore your Windows experience to its full potential.
Understanding the Error 0x8e5e0247 on Windows
help resolve the 0x8e5e0247 error on Windows.
Step 1: Run the Windows Update Troubleshooter.
– Press the Windows key + I to open Settings.
– Go to Update & Security, then Troubleshoot.
– Select Windows Update and click Run the troubleshooter.
– Follow the instructions to complete the troubleshooting process.
Step 2: Use the System File Checker (SFC) tool.
– Press the Windows key + X and select Command Prompt (Admin).
– Type sfc /scannow and press Enter.
– Wait for the scanning process to complete.
Step 3: Check for driver issues.
– Press the Windows key + X and select Device Manager.
– Expand the categories and look for any devices with a yellow exclamation mark.
– Right-click the device and select Update Driver.
If these steps don’t fix the issue, consider seeking help from Microsoft or a professional.
Troubleshooting Methods for Error 0x8e5e0247
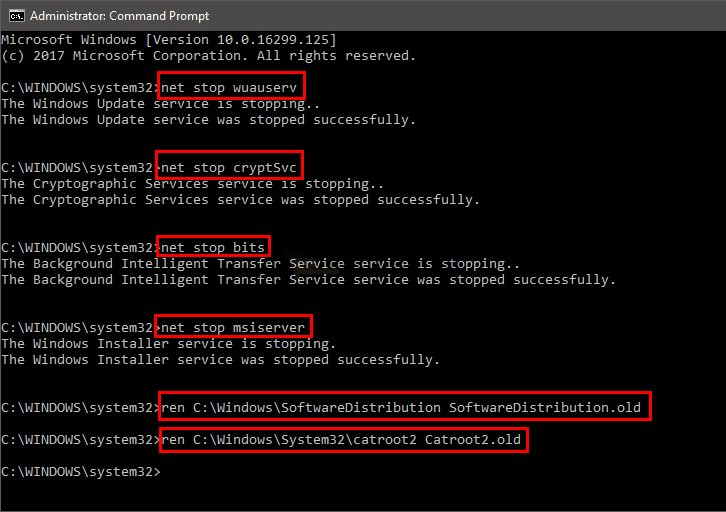
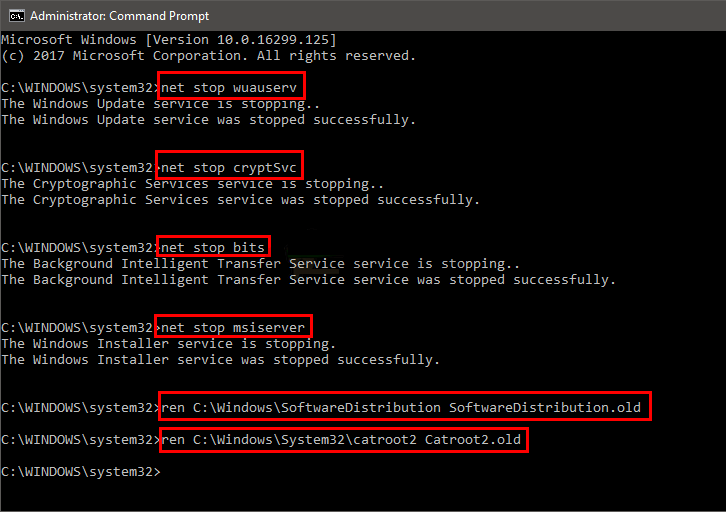
- Reset Windows Update Components
- Open Command Prompt as an administrator
- Type the following commands and press Enter after each one:
- net stop wuauserv
- net stop cryptSvc
- net stop bits
- net stop msiserver
- net stop wuauserv
- Type ren C:\Windows\SoftwareDistribution SoftwareDistribution.old and press Enter
- Type ren C:\Windows\System32\catroot2 catroot2.old and press Enter
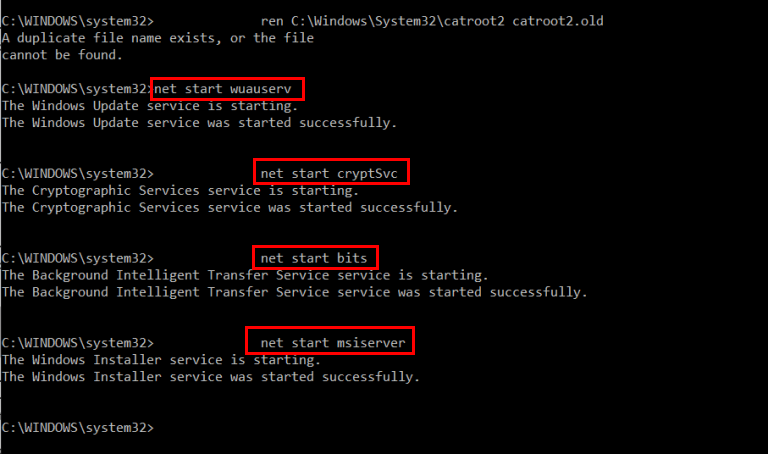
- Type the following commands and press Enter after each one:
- net start wuauserv
- net start cryptSvc
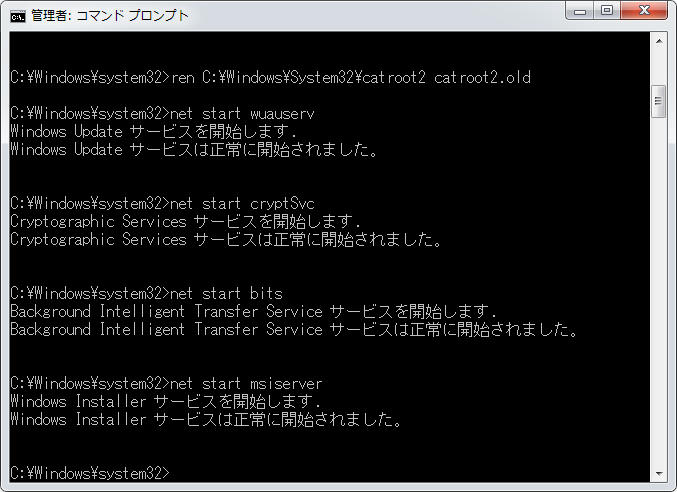
- net start bits
- net start msiserver
- Restart your computer
- Run Windows Update Troubleshooter
- Press Windows key + I to open Settings
- Select Update & Security
- Click on Troubleshoot in the left pane
- Scroll down and click on Windows Update
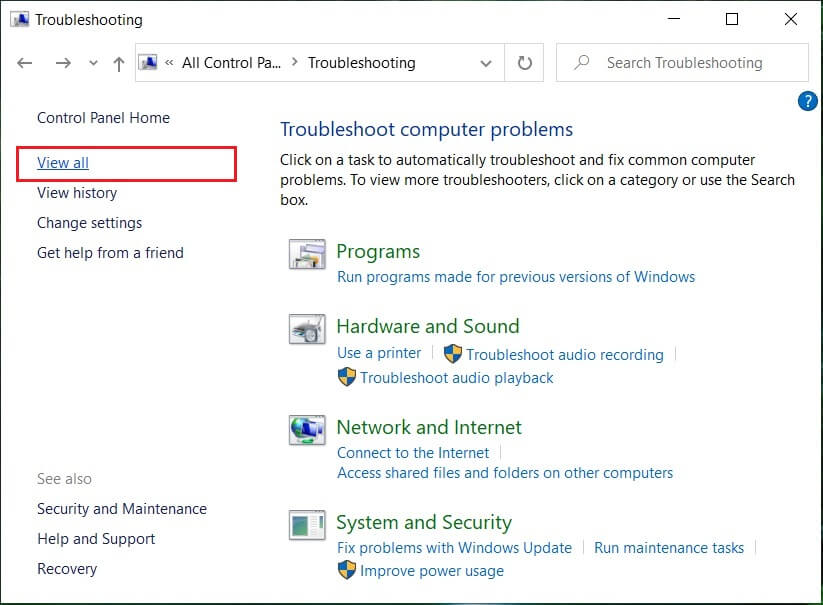
- Click on Run the troubleshooter
- Follow the on-screen instructions to complete the troubleshooting process

- Perform a System File Check (SFC) scan
- Open Command Prompt as an administrator
- Type sfc /scannow and press Enter
- Wait for the scan to complete
- If any issues are found, restart your computer and run the scan again

- Reset Windows Update Components using a batch file
- Open Notepad
- Copy and paste the following commands into Notepad:
- @echo off
- net stop wuauserv
- net stop cryptSvc
- net stop bits
- net stop msiserver
- ren C:\Windows\SoftwareDistribution SoftwareDistribution.old
- ren C:\Windows\System32\catroot2 catroot2.old
- net start wuauserv
- net start cryptSvc
- net start bits
- net start msiserver
- pause
- Save the file with a .bat extension, for example ResetWindowsUpdate.bat
- Right-click the batch file and select Run as administrator
- Follow any on-screen prompts
- Restart your computer
Fix 1: Performing SFC and DISM Scans
If you’re encountering the 0x8E5E0247 error code while using the Windows Troubleshooter, you can try performing SFC and DISM scans to fix the problem.
Step 1: Press the Win + X keys and select “Command Prompt (Admin)” to open an elevated command window.
Step 2: In the command window, type “sfc /scannow” and hit Enter. This command will scan and repair any corrupted system files.
Step 3: After the SFC scan is complete, type “dism /online /cleanup-image /restorehealth” and hit Enter. This command will repair any issues with the Windows image.
Once the scans are finished, restart your computer and check if the error is resolved. These scanning methods can help fix system file corruption, which is often the cause of the 0x8E5E0247 error.
For more troubleshooting solutions, you can visit the Microsoft website or consult the Windows Troubleshooting wizard.
Fix 2: Uninstalling Intel Matrix Storage
If you are experiencing the 0x8E5E0247 error code while using the Windows Troubleshooter, try uninstalling Intel Matrix Storage as a possible solution. This fix can help resolve issues related to system file corruption or conflicts with the Rapid Storage Driver.
To uninstall Intel Matrix Storage, follow these steps:
1. Press the Win + R keys to open the Run dialog box.
2. Type “appwiz.cpl” and press Enter to open the Programs and Features window.
3. Locate Intel Matrix Storage in the list of installed programs.
4. Right-click on Intel Matrix Storage and select Uninstall.
5. Follow the on-screen instructions to complete the uninstallation process.
After uninstalling Intel Matrix Storage, restart your computer and check if the error persists. If it does, you may need to try other fixes or consult further troubleshooting resources.
For more detailed instructions and additional fixes for error code 0x8E5E0247, visit the Aurelie | MiniTool website or seek assistance from Microsoft support.
Fix 3: Updating the Intel Rapid Storage Technology
To fix the Windows Troubleshooter Error 0x8E5E0247, you can try updating the Intel Rapid Storage Technology (RST) driver. Follow these steps:
1. Download the latest version of the Intel RST driver from the official Intel website or the manufacturer’s website.
2. Install the downloaded driver by running the installation file and following the on-screen instructions.
3. Restart your computer to apply the changes.
After updating the Intel RST driver, try running the Windows Troubleshooter again to see if the error is resolved. If the issue persists, you can try other solutions or contact support for further assistance.
It’s important to keep your drivers up to date to ensure system stability and performance. Updating the Intel RST driver can help resolve compatibility issues and improve overall system functionality.

Mark Ginter is a tech blogger with a passion for all things gadgets and gizmos. A self-proclaimed "geek", Mark has been blogging about technology for over 15 years. His blog, techquack.com, covers a wide range of topics including new product releases, industry news, and tips and tricks for getting the most out of your devices. If you're looking for someone who can keep you up-to-date with all the latest tech news and developments, then be sure to follow him over at Microsoft.