- The Sedlauncher service and launcher are connected to the Windows Repair Service, which is responsible for installing Windows 10 update features.
- If you want the latest security updates and want to take advantage of the extra features that a particular update brings, you should not stop that service and let it download and install the latest feature updates.
Unleashing the Hidden Solutions: Taming Sedlauncher.exe’s Disk Usage on Windows 10
Understanding Sedlauncher.exe
Sedlauncher.exe is a process in Windows 10 that helps manage Windows Updates and improve the overall performance of your computer.
If you are experiencing high disk usage due to Sedlauncher.exe, here are some steps you can take to fix the issue:
1. Check for Updates: Make sure you have installed the latest Windows updates. Sedlauncher.exe may be running because it is trying to install pending updates. Go to Settings > Update & Security > Windows Update to check for updates.
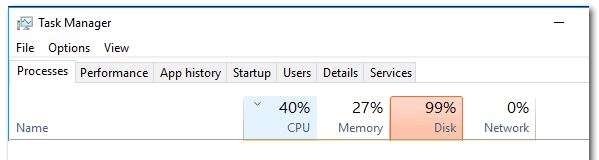
2. Monitor Sedlauncher.exe: Open the Task Manager by pressing Ctrl + Shift + Esc. Look for the Sedlauncher.exe process under the Processes or Details tab. If it is using an excessive amount of CPU or disk, try the next steps.
3. Restart your PC: Sometimes, a simple restart can resolve high disk usage issues. Restart your computer and check if the problem persists.
4. Disable Sedlauncher.exe: If the issue continues, you can try disabling Sedlauncher.exe temporarily. Open the Task Scheduler by searching for it in the Start menu. Disable the tasks related to Sedlauncher.exe by right-clicking on them and selecting Disable.
5. Update Windows: Ensure that your Windows OS is up to date. Sedlauncher.exe may be trying to update specific components or features. Go to Settings > Update & Security > Windows Update and click on Check for updates to install any pending updates.
If you are still experiencing high disk usage or have any other inquiries, it is recommended to reach out to Microsoft Support for further assistance.
Should you disable Sedlauncher.exe?
If you are experiencing high disk usage on Windows 10 due to Sedlauncher.exe, you may be wondering if it’s safe to disable this process. Disabling Sedlauncher.exe is not recommended, as it plays a crucial role in managing and optimizing system updates.
Sedlauncher.exe is part of the Windows Remediation Service, which helps ensure your device stays up to date with the latest security patches, bug fixes, and feature updates. Disabling it can result in missed updates and potential security vulnerabilities.
If you are facing performance issues or high CPU usage related to Sedlauncher.exe, it’s best to let the process complete its tasks. However, if you are still experiencing problems after an extended period, you can try restarting your PC or running the Windows Update Troubleshooter.
For more in-depth troubleshooting, you can reach out to Microsoft support or refer to reputable tech blogs like FileWhopper Blog for further assistance. Remember, it’s important to keep your Windows OS updated for optimal performance and security.
Fixing high disk usage by Sedlauncher
If you are experiencing high disk usage caused by Sedlauncher.exe on your Windows 10 device, there are a few steps you can take to resolve this issue.
First, you can try disabling Sedlauncher.exe through the Task Scheduler. Open the Task Scheduler and navigate to Microsoft > Windows > Sedlauncher. Right-click on Sedlauncher and select Disable.
If disabling Sedlauncher.exe does not resolve the issue, you can try updating your drivers. Outdated drivers can sometimes cause high disk usage. Visit the manufacturer’s website for your device and download the latest drivers for your hardware.
Additionally, you can try running the Windows Update troubleshooter to fix any OS issues that may be causing the problem. Open the Settings app, go to Update & Security, and select Troubleshoot. Run the Windows Update troubleshooter and follow the on-screen instructions.
If these solutions do not work, you can try uninstalling the KB4023057 update. This update has been known to cause high disk usage. Go to Control Panel, click on Programs, and then click on View installed updates. Locate the KB4023057 update, right-click on it, and select Uninstall.
By following these steps, you should be able to alleviate the high disk usage caused by Sedlauncher.exe on your Windows 10 device. If you continue to experience issues, it may be helpful to reach out to Microsoft support for further assistance.
python

import psutil
def monitor_disk_usage():
disk_usage = psutil.disk_usage('/')
total_disk_space = disk_usage.total
used_disk_space = disk_usage.used
disk_usage_percentage = disk_usage.percent
print(f"Total disk space: {total_disk_space} bytes")
print(f"Used disk space: {used_disk_space} bytes")
print(f"Disk usage percentage: {disk_usage_percentage}%")
monitor_disk_usage()
This code utilizes the psutil library to monitor the disk usage of the root directory (‘/’). It retrieves the total disk space, used disk space, and the percentage of disk usage. However, please note that this code is not directly related to sedlauncher, but rather provides a general example of how you can monitor disk usage using Python.
Method 1: Disable Sedlauncher.exe from Task Manager
If you’re experiencing high disk usage caused by Sedlauncher.exe on Windows 10, you can disable it using Task Manager. Here’s how:
1. Press Ctrl + Shift + Esc to open Task Manager.
2. Go to the Processes tab.
3. Look for Sedlauncher.exe in the list of processes.
4. Right-click on Sedlauncher.exe and select End Task.
5. Confirm the action if prompted.
Disabling Sedlauncher.exe should help reduce the high disk usage on your Windows 10 system. Keep in mind that this method only stops the process temporarily and it may restart on its own. If you encounter any issues or have further inquiries, please refer to the relevant resources provided by Microsoft or seek assistance from their support team.
Method 2: Turning off Sedlauncher.exe in Services
To fix Sedlauncher.exe high disk usage on Windows 10, you can disable the Sedlauncher.exe service in Services. Here’s how:
1. Press the Windows key + R to open the Run dialog box.
2. Type “services.msc” and press Enter to open the Services window.
3. Scroll down and locate the “Sedlauncher” service.
4. Right-click on it and select “Properties.”
5. In the Properties window, change the Startup type to “Disabled.”
6. Click on “Apply” and then “OK” to save the changes.
7. Restart your computer for the changes to take effect.
By disabling the Sedlauncher.exe service, you can prevent it from consuming excessive disk usage. This method can help improve your overall system performance and resolve any issues related to Sedlauncher.exe.
For more helpful tips and guides, visit the FileWhopper Blog.
Remember to exercise caution when modifying services, as disabling essential services can lead to other problems with your system.
Method 3: Block Sedlauncher.exe with Windows Firewall or Antivirus Program
To address high disk usage caused by Sedlauncher.exe on Windows 10, you can block it using the Windows Firewall or an antivirus program. Here’s how:
1. Open the Windows Firewall settings or your antivirus program’s settings.
2. Navigate to the “Programs” or “Applications” section.
3. Look for Sedlauncher.exe in the list of programs.
4. Select Sedlauncher.exe and choose the option to block or disable it.
5. Save the changes and exit the settings.
Blocking Sedlauncher.exe will prevent it from consuming excessive system resources and causing high disk usage. This method can help improve the overall performance of your Windows 10 system.
Remember to regularly update your antivirus program and Windows OS to ensure optimal security and performance.
Uninstalling SedLauncher/Windows Remediation Service
To uninstall SedLauncher/Windows Remediation Service and fix high disk usage caused by Sedlauncher.exe on Windows 10, follow these steps:
1. Press the Windows key + R to open the Run dialog box.
2. Type “services.msc” and hit Enter to open the Services window.
3. Scroll down and locate “Windows Remediation Service” in the list.
4. Right-click on it and select “Properties”.
5. In the Properties window, click on the “Stop” button to stop the service.
6. Change the “Startup type” to “Disabled” and click “Apply” followed by “OK”.
7. Now, press Windows key + X, and choose “Windows PowerShell (Admin)”.
8. Type “Get-WindowsCapability -Online | ? Name -like ‘SedSvc.*’ | Remove-WindowsCapability -Online” and press Enter to uninstall SedSvc.
9. Restart your computer to apply the changes.
By following these steps, you can remove SedLauncher/Windows Remediation Service and resolve the high disk usage issue on Windows 10.
Deleting Task Schedule and Uninstalling Updates
To fix Sedlauncher.exe high disk usage on Windows 10, you can try deleting task schedules and uninstalling updates. Follow these steps to resolve the issue:
1. Press the Windows key + R, then type “taskschd.msc” and hit Enter to open Task Scheduler.
2. In the Task Scheduler window, navigate to Microsoft > Windows > Servicing.
3. Delete any task related to Sedlauncher or Sedsvc.
4. Next, open the Control Panel and go to “Programs” > “Programs and Features.”
5. Click on “View installed updates” on the left-hand side.
6. Locate the recent updates and uninstall them one by one.
7. Restart your computer to apply the changes.
By removing these tasks and updates, you can potentially resolve the high disk usage caused by Sedlauncher.exe. If the issue persists, consider seeking further assistance or performing a system restore to a previous stable state. Remember to keep your system updated and practice regular maintenance to ensure a smooth user experience.
Performing System Restore to resolve high disk usage
Performing a System Restore can help resolve high disk usage caused by the Sedlauncher.exe process on Windows 10. This method can be useful if the issue is related to recent changes or updates made to the system. Follow these steps to perform a System Restore:
1. Press the Windows key and type “System Restore” in the search bar.
2. Select “Create a restore point” from the results.
3. In the System Properties window, click on the “System Restore” button.
4. Choose a restore point that predates the high disk usage issue and click “Next.”
5. Confirm your selection and click “Finish” to begin the restoration process.
6. Your system will restart, and the restore process will commence.
7. After the restoration is complete, check if the Sedlauncher.exe high disk usage issue has been resolved.
Please note that a System Restore will revert your system to a previous state, so any changes made after the chosen restore point will be lost. Make sure to back up any important files before proceeding.

Mark Ginter is a tech blogger with a passion for all things gadgets and gizmos. A self-proclaimed "geek", Mark has been blogging about technology for over 15 years. His blog, techquack.com, covers a wide range of topics including new product releases, industry news, and tips and tricks for getting the most out of your devices. If you're looking for someone who can keep you up-to-date with all the latest tech news and developments, then be sure to follow him over at Microsoft.