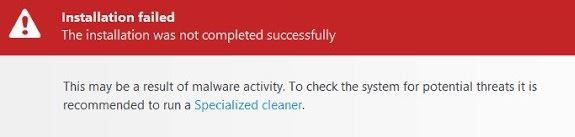
- Many users have indicated that they cannot install antivirus software on their Windows 10 PC.
- This can happen if your antivirus is not compatible with Windows 10.
Introducing a Common Dilemma: Windows 10 Antivirus Installation Issue
Troubleshooting Windows 10 Antivirus Installation
If you’re facing issues with installing an antivirus program on your Windows 10 PC, follow these steps to fix the problem.
1. Check compatibility: Ensure that the antivirus software you’re trying to install is compatible with Windows 10. Some older programs may not work properly on the latest operating system.
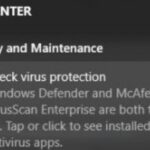
2. Disable Windows Defender: If you have Windows Defender enabled, it may interfere with the installation. Temporarily disable it by following these steps: Open Windows Security ➡️ Virus & threat protection ➡️ Manage settings ➡️ Real-time protection ➡️ Turn off the toggle switch.
3. Run as administrator: Right-click on the antivirus installation file and select “Run as administrator.” This will give the program the appropriate permissions it needs to install correctly.
4. Disable other antivirus programs: If you have any other antivirus programs installed, they might conflict with the installation process. Uninstall or disable them temporarily before installing the new antivirus.
5. System updates: Ensure that your Windows 10 operating system is up to date. Install any pending updates by going to Settings ➡️ Update & Security ➡️ Windows Update ➡️ Check for updates.
By following these steps, you should be able to resolve common antivirus installation issues on Windows 10. If the problem persists, contact the antivirus software’s support team for further assistance.
Removing Conflicting Antivirus Programs
If you encounter issues with Windows 10 antivirus installation, it may be due to conflicting antivirus programs on your PC. To resolve this, follow these steps:
1. Uninstall any existing antivirus programs: Open the Control Panel, go to “Programs” or “Programs and Features,” and uninstall any antivirus software listed. If you’re unsure which programs to remove, consult your antivirus provider’s website for guidance.
2. Use the appropriate removal tool: Some antivirus vendors provide specific tools to completely remove their software. Visit the vendor’s website and search for their removal tool. Download and run it to ensure all remnants of the antivirus program are removed.
3. Restart your computer: After uninstalling conflicting antivirus programs, restart your PC to complete the removal process.
4. Install Windows 10 antivirus: Now that conflicting antivirus software has been removed, you can proceed with installing your preferred Windows 10 antivirus solution. Make sure to download it from a trusted source and follow the installation instructions provided.
By following these steps, you can successfully remove conflicting antivirus programs and install a compatible Windows 10 antivirus solution.
python

import wmi
def check_antivirus():
# Connect to the Windows Management Instrumentation (WMI) service
c = wmi.WMI()
# Query the installed antivirus products using the WMI class 'AntiVirusProduct'
antivirus_products = c.Win32_Product(definition='AntivirusProduct')
if len(antivirus_products) > 0:
print("Antivirus software found:")
for product in antivirus_products:
print(f"- {product.DisplayName}")
else:
print("No antivirus software found.")
# Call the check_antivirus function to check for installed antivirus software
check_antivirus()
This code utilizes the `wmi` module, which provides an interface to the Windows Management Instrumentation service. It queries the installed antivirus products using the `Win32_Product` class with the `definition` parameter set to `’AntivirusProduct’`. If any antivirus products are found, it prints their display names. Otherwise, it prints a message indicating that no antivirus software was found.
Please note that this code is a basic example and may not cover all scenarios or edge cases. Additionally, it requires the `wmi` module to be installed, which you can install using `pip install wmi`.
Running System Scans for Errors
Running system scans for errors is an important step in resolving Windows 10 antivirus installation issues. To begin, open the Windows Security Center by clicking on the Start menu and searching for “Windows Security.”
Once you have the Security Center open, navigate to the “Virus & threat protection” tab.
Here, you will find the “Quick scan” option. Click on it to start a scan of your system for any potential errors or threats.
If the scan detects any issues, it will provide you with a report detailing the problems found. Follow the instructions provided to fix the identified problems.
If the scan doesn’t find any issues, you may need to try other troubleshooting methods.
One option is to manually update your Windows system. To do this, go to the Start menu, search for “Windows Update,” and click on “Check for updates.”
If there are any available updates, install them and restart your computer.
Another option is to check if you have the appropriate permissions to install the antivirus software. Right-click on the antivirus installation file and select “Run as administrator.”
If you are still encountering issues, it may be helpful to consult online forums or seek assistance from a professional. Remember, running regular system scans can help prevent and resolve installation problems.
Cleaning the PC for Optimal Performance
Cleaning your PC regularly is important for maintaining optimal performance. Here are some steps to follow:
1. Start by removing unnecessary files and programs. Go to the Control Panel, click on “Programs,” then “Programs and Features.” Uninstall any programs you no longer use.
2. Next, clean up your hard drive. Open File Explorer, right-click on your hard drive, and select “Properties.” Click on “Disk Cleanup” to remove temporary files and free up disk space.
3. Scan your PC for malware and viruses. Download a reliable antivirus program like Avast or Microsoft Defender. Install and run a full system scan to detect and remove any threats.
4. Regularly update your operating system and antivirus software. System updates often include security patches that help protect your PC from new threats.
Remember, cleaning your PC regularly can help improve its performance and protect your personal data. If you encounter any issues during the installation or update processes, consult online resources or contact customer support for assistance.
Performing a Clean Boot for Troubleshooting
If you’re experiencing issues with antivirus installation on Windows 10, performing a clean boot can help identify and resolve the problem.
A clean boot starts your computer with only the essential programs and services running, eliminating any conflicts that may be causing installation problems. Here’s how to do it:
1. Press the Windows key + R, type “msconfig“, and hit Enter to open the System Configuration window.
2. In the General tab, select “Selective startup” and uncheck “Load startup items.”
3. Go to the Services tab, check “Hide all Microsoft services,” and click “Disable all.”
4. Navigate to the Startup tab and click “Open Task Manager.”
5. In Task Manager, disable all startup items by right-clicking each one and selecting “Disable.”
6. Close Task Manager and go back to the System Configuration window.
7. Click “OK” and restart your computer.
Once your computer restarts, try reinstalling your antivirus. If the issue persists, you can revert the changes by following the same steps and selecting “Normal startup” in the System Configuration window.
Performing a clean boot can help troubleshoot installation issues by eliminating potential conflicts.
Restarting the Windows Audio Service for Antivirus Installation
To resolve antivirus installation issues on Windows 10, you may need to restart the Windows Audio Service. Here’s how:
1. Press the Windows key + R to open the Run dialog box.
2. Type “services.msc” and press Enter to open the Services window.
3. Scroll down and locate the “Windows Audio” service.
4. Right-click on it and select “Restart” from the context menu.
5. Wait for the service to restart and then close the Services window.
After restarting the Windows Audio Service, try reinstalling your antivirus software. This should help resolve any conflicts or issues related to audio services during installation.
If you continue to experience problems, it’s recommended to check for any other conflicting software or consult your antivirus provider’s support for further assistance.
Remember, keeping your antivirus software up to date is crucial for protecting your device and data from potential threats.
Disabling Windows Defender for Antivirus Installation
To disable Windows Defender for Antivirus Installation on Windows 10, follow these steps:
1. Open the Start menu and type “Windows Security” to launch the Windows Security app.
2. In the Windows Security app, click on “Virus & threat protection” in the left-hand menu.
3. Under the “Virus & threat protection settings” section, click on “Manage settings.”
4. Turn off the “Real-time protection” toggle switch to disable Windows Defender temporarily.
5. Now, you can proceed with your antivirus installation without any interference from Windows Defender.
Remember to re-enable Windows Defender after the antivirus installation is complete for ongoing protection.
If you encounter any issues during the installation process, such as update failures or access problems to the specified device path, consider using a rescue disk or seeking assistance from antivirus partners like Avast Antivirus.
For more information on Windows 10 antivirus installation issues, visit our support page or contact our customer service.

Mark Ginter is a tech blogger with a passion for all things gadgets and gizmos. A self-proclaimed "geek", Mark has been blogging about technology for over 15 years. His blog, techquack.com, covers a wide range of topics including new product releases, industry news, and tips and tricks for getting the most out of your devices. If you're looking for someone who can keep you up-to-date with all the latest tech news and developments, then be sure to follow him over at Microsoft.