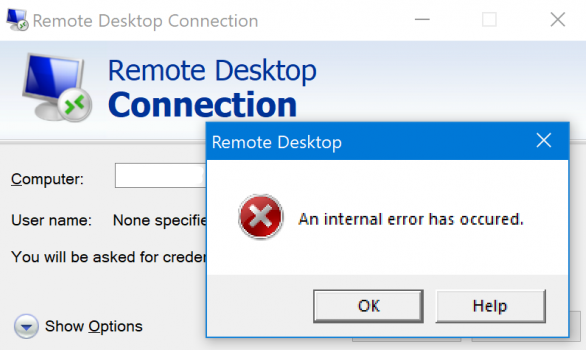
- The Remote Desktop Connection Error Error Error is a very vague error message.
- It usually happens when a user tries to connect to a remote computer.
- This could be due to a weak network connection, a misconfigured remote connection, etc.
- It could be caused by both a problem with the Remote Desktop Server and the client.
- In some cases, the error message appears because of your RDP security level in Windows Group Policy.
Unveiling the Solution: Conquering the Remote Desktop Connection Internal Error
Adjust Remote Desktop Connection Settings
Adjusting Remote Desktop Connection Settings can help fix the Internal Error you are experiencing. Here are some steps to follow:
1. Open the Remote Desktop Connection Settings by searching for it in the Start Menu or using the “mstsc” command in the Run dialog box.
2. In the Remote Desktop Connection window, click on the “Show Options” button.
3. Go to the “Advanced” tab and click on the “Settings” button in the “Connect from anywhere” section.
4. In the RD Gateway settings, make sure the correct server address is entered and the “Bypass RD Gateway server for local addresses” option is checked.
5. Check the “Use my RD Gateway credentials for the remote computer” option if you want to use the same credentials for both.
6. Click on “OK” to save the changes and try connecting again.
If you are still experiencing issues, it is recommended to check your firewall and antivirus settings, as well as ensuring that your VPN connection is properly configured. Additionally, make sure that your Windows OS and Remote Desktop Connection software are up to date with the latest updates from Microsoft.
Disable Network Level Authentication
To fix the “Remote Desktop Connection Internal Error,” you can try disabling Network Level Authentication (NLA) in your Windows settings.
Here’s how to do it:
1. Open the Start Menu and search for “Remote Desktop Connection” to launch the RDP client.
2. In the Remote Desktop Connection window, click on the “Show Options” button to expand the settings.
3. Go to the “Advanced” tab and uncheck the box that says “Require Network Level Authentication.”
4. Click on the “Connect” button to establish the RDP connection without NLA.
Disabling NLA can help resolve authentication-related issues and allow you to connect to the remote machine successfully. Remember to consult your network administrator before making any changes to your system settings.
For a visual guide, you can watch this video tutorial: [insert video link here]
Keep in mind that disabling NLA may have security implications, so be cautious and consider re-enabling it once the connection issue is resolved.
If you continue to experience problems, it’s recommended to check for Windows updates, ensure your firewall and antivirus settings are not interfering, and verify that your VPN client and connection are configured correctly.
If the issue persists, it may be necessary to seek further assistance from Microsoft or consult their online Q&A forums.
Restart Remote Desktop Service
To fix the Remote Desktop Connection Internal Error, you can restart the Remote Desktop Service. Follow these steps:
1. Press Windows key + R to open the Run dialog box.
2. Type services.msc and press Enter.
3. In the Services window, scroll down and find the “Remote Desktop Services” option.
4. Right-click on it and select “Restart” from the context menu.
5. Wait for the service to restart.
6. Once the service is restarted, try connecting to the remote desktop again.
If the issue persists, you can also try restarting your computer and checking for any Windows updates. Additionally, ensure that your network administrator has allowed remote access and that your VPN client and connection are properly configured.
For more detailed solutions and troubleshooting steps, you can refer to this video link or consult our Q&A section for further assistance.
Regards,
Microsoft Support
Allow Remote Connections
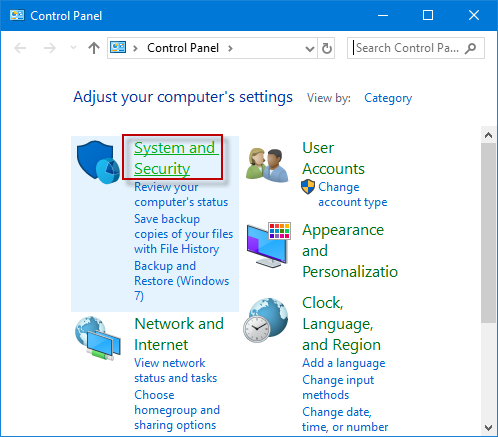
- Open the Start menu by clicking on the Windows icon in the bottom-left corner of the screen.
- Search for “Control Panel” and click on it when it appears in the search results.
- In the Control Panel window, change the View by option to “Large icons” or “Small icons” if it is currently set to “Category”.
- Locate and click on the “System and Security” category.
- Within the System and Security category, click on the “System” option.
- In the System window, find and click on the “Remote settings” link located on the left-hand side.
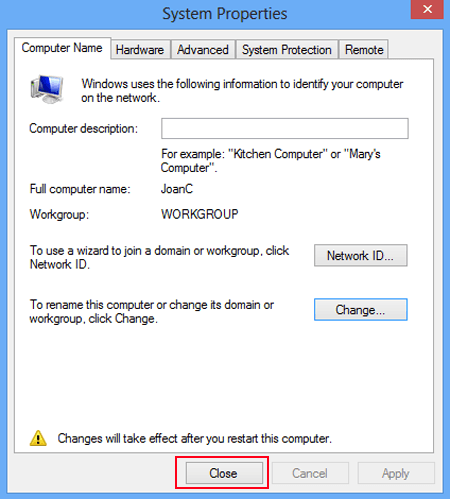
- A System Properties window will appear. Go to the “Remote” tab.
- Under the Remote Desktop section, check the box that says “Allow remote connections to this computer”.
- Click on the “Apply” button at the bottom of the window to save the changes.
- If prompted by a User Account Control (UAC) dialog box, click “Yes” to allow the changes to be made.
- Click on the “OK” button to close the System Properties window.
- Restart your computer to apply the changes.
Configure RDP Security Settings
To fix the Remote Desktop Connection Internal Error, you’ll need to configure the RDP security settings. Here’s how:
1. Open the Group Policy Editor by pressing the Windows key + R, then typing gpedit.msc and hitting Enter.
2. Navigate to Computer Configuration -> Administrative Templates -> Windows Components -> Remote Desktop Services -> Remote Desktop Session Host -> Security.
3. Enable the policies “Require use of specific security layer for remote (RDP) connections” and “Require user authentication for remote connections by using Network Level Authentication”.
4. Apply the changes and close the Group Policy Editor.
5. Restart your computer to ensure the new settings take effect.
By configuring these security settings, you can enhance the security of your remote desktop connections and fix the internal error. If you continue to experience complications, make sure your system settings are up to date with the latest Windows updates.
Regards,
Microsoft
Turn Off Active VPNs
To fix the “Remote Desktop Connection Internal Error” when using a VPN, you may need to turn off any active VPNs on your machine. Here’s how:
1. Press the Windows key + R to open the Run dialog box.
2. Type “ncpa.cpl” and press Enter to open the Network Connections window.
3. Right-click on your active VPN connection and select “Disconnect” or “Disable” from the context menu. Alternatively, you can also navigate to the VPN settings in your OS and disable the VPN connection from there.
4. Once the VPN is disabled, try connecting to the remote desktop again.
If you’re still experiencing issues, it’s possible that there are other underlying causes for the error. It’s recommended to check for any recent Windows updates, ensure your RDP settings are configured correctly, and consider using tools like TCP Optimizer to optimize your network connection.
Remember to re-enable your VPN connection once you’re done with the remote desktop session.
Modify Local Security Policy
To fix the Internal Error with Remote Desktop Connection, you can modify the Local Security Policy. Here’s how:
1. Press the Windows key + R to open the Run dialog box.
2. Type “secpol.msc” and press Enter to open the Local Security Policy.
3. In the left pane, navigate to Security Settings -> Local Policies -> Security Options.
4. In the right pane, locate “Network Security: LAN Manager authentication level” and double-click it.
5. Select “Send LM & NTLM – use NTLMv2 session security if negotiated” and click OK.
6. Close the Local Security Policy window.
By modifying the Local Security Policy, you’re adjusting the authentication level for LAN Manager, which can help resolve the Internal Error. Remember to restart your computer after making these changes.
Please note that this solution is specifically for Windows 2016 and Windows Server 2012. It may not apply to other versions of Windows.
Change Startup of Remote Desktop Service
To fix the “Internal Error” in Remote Desktop Connection, you may need to change the startup settings of the Remote Desktop Service. Here’s how:
1. Press the Windows key + R to open the Run dialog box.
2. Type “services.msc” and press Enter to open the Services console.
3. Scroll down and locate “Remote Desktop Services” in the list.
4. Right-click on it and select “Properties.”
5. In the Properties window, go to the “General” tab.
6. Change the “Startup type” to “Automatic” if it’s not already selected.
7. Click on “Apply” and then “OK” to save the changes.
8. Close the Services console.
By changing the startup settings of the Remote Desktop Service to “Automatic,” you ensure that it starts automatically whenever your computer boots up, allowing for remote access. This should help resolve the internal error and enable successful connections to remote desktops.
Note: Remember to restart your computer for the changes to take effect.
Allow Firewall Access for RDP
To allow firewall access for RDP and fix the internal error in your remote desktop connection, follow these steps:
1. Press the Windows key and type “Windows Firewall” to open the Windows Firewall settings.
2. Click on “Allow an app or feature through Windows Firewall” on the left-hand side.
3. Scroll down and find “Remote Desktop” in the list of apps and features. If it’s not there, click on “Change settings” and then “Allow another app…” to add it manually.
4. Check both the “Private” and “Public” checkboxes next to “Remote Desktop” and click “OK” to save the changes.
If the internal error persists, you may need to check your group policy settings. Here’s how:
1. Press the Windows key and type “Group Policy” to open the Group Policy Editor.
2. Navigate to “Computer Configuration” > “Policies” > “Administrative Templates” > “Windows Components” > “Remote Desktop Services” > “Remote Desktop Session Host” > “Security”.
3. Double-click on “Require use of specific security layer for remote (RDP) connections” and select “Enabled”.
4. Choose “SSL” from the drop-down menu and click “OK” to save the changes.
These steps should resolve the firewall access issue and fix the internal error in your RDP connection.
Rejoin Domain to Resolve Internal Error
To resolve the internal error in Remote Desktop Connection and rejoin the domain, follow these steps:
1. Press the Windows key + R to open the Run dialog box.
2. Type “sysdm.cpl” and press Enter to open the System Properties window.
3. Go to the “Computer Name” tab and click on the “Change” button.
4. In the “Computer Name/Domain Changes” window, select the “Domain” option.
5. Enter the domain name and click on the “OK” button.
6. You will be prompted to enter domain credentials. Provide the necessary information and click on the “OK” button.
7. Restart your computer for the changes to take effect.
By rejoining the domain, you should be able to resolve the internal error in Remote Desktop Connection. Remember to use the correct domain name and provide the appropriate credentials. If you continue to experience any complications, consider checking your group policy security settings and verifying the Windows updates on both the server and client machines.

Mark Ginter is a tech blogger with a passion for all things gadgets and gizmos. A self-proclaimed "geek", Mark has been blogging about technology for over 15 years. His blog, techquack.com, covers a wide range of topics including new product releases, industry news, and tips and tricks for getting the most out of your devices. If you're looking for someone who can keep you up-to-date with all the latest tech news and developments, then be sure to follow him over at Microsoft.