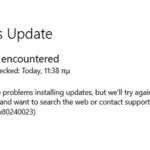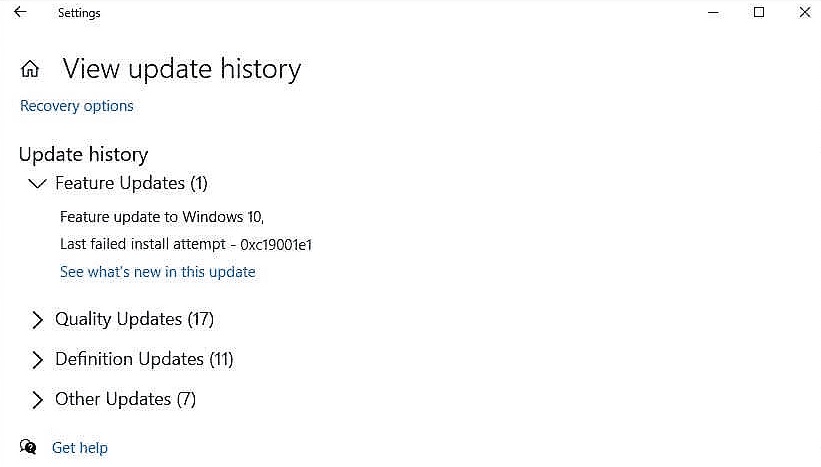
- Windows update error 0xc19001e1 can be caused by corrupted system files, third-party antivirus programs, insufficient disk space, or other reasons.
- Windows Update Troubleshooter is specifically designed to fix errors that prevent users from installing the latest Windows update.
- Windows has several built-in troubleshooting tools that not only detect errors but also try to fix them automatically.
Unveiling the Solution: Troubleshooting the Windows 10 Version 2004 Failed 0xc19001e1 Error
Clean Up Disk Space and Reset Windows Update Components
- Open File Explorer by pressing Windows key + E
- Right-click on the C: drive and select Properties
- In the General tab, click on the Disk Cleanup button
- Wait for the Disk Cleanup utility to calculate the amount of space that can be freed up
- Check the boxes next to the types of files you want to delete (e.g., Temporary files, Recycle Bin)
- Click on the OK button to start the cleanup process
- Confirm the deletion by clicking on the Delete Files button
- Wait for the cleanup process to complete

Reset Windows Update Components
- Open Command Prompt as an administrator by pressing Windows key + X and selecting Command Prompt (Admin)
- Type the following commands one by one and press Enter after each:
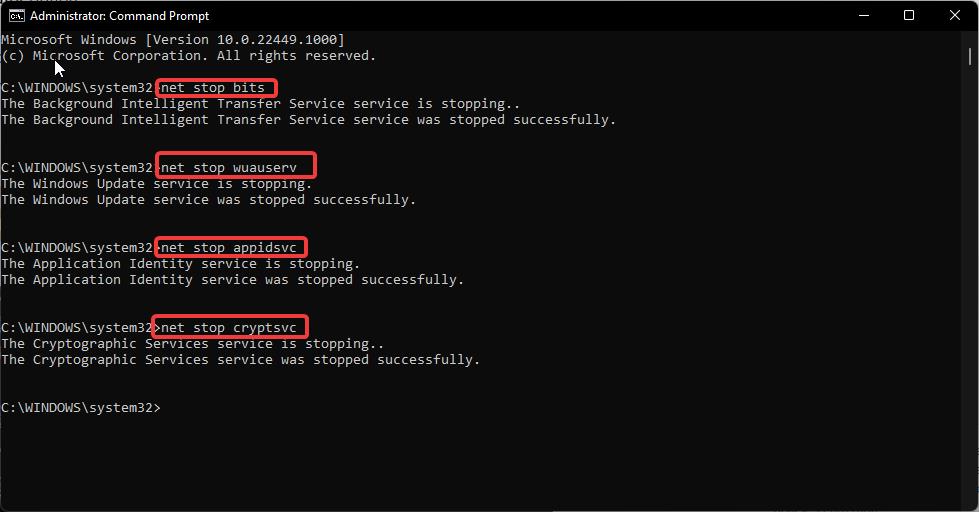
- net stop bits
- net stop wuauserv
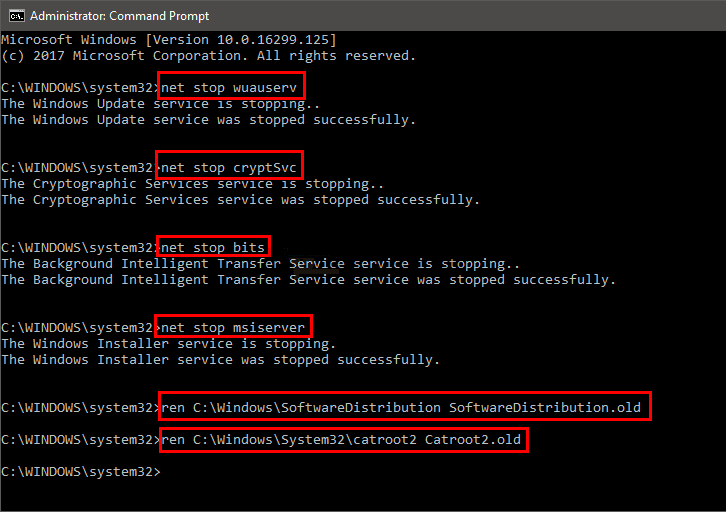
- net stop appidsvc
- net stop cryptsvc
- Minimize or close the Command Prompt window
- Open File Explorer by pressing Windows key + E
- Navigate to the following folder: C:\Windows\SoftwareDistribution
- Select all the files and folders inside the SoftwareDistribution folder and delete them
- Maximize or reopen the Command Prompt window
- Type the following commands one by one and press Enter after each:
- net start bits
- net start wuauserv
- net start appidsvc
- net start cryptsvc
Manually Upgrade Windows and Use DISM and SFC
To manually upgrade Windows and resolve the 0xC19001E1 error, follow these steps:
1. Make sure you have enough disk space on your PC. Check your disk space by going to My Computer and right-clicking on your main drive. Select Properties and check the available space.
2. Download the Windows 10 version 2004 update from the Microsoft website.
3. Open the Command Prompt as an administrator. To do this, right-click on the Start button and select Command Prompt (Admin).
4. In the Command Prompt, type sfc /scannow and press Enter. This will scan your system for any corrupted files and attempt to fix them.
5. If the SFC scan doesn’t resolve the issue, run the DISM (Deployment Image Servicing and Management) tool. In the Command Prompt, type dism /online /cleanup-image /restorehealth and press Enter. This will repair any system image issues.
6. After running the DISM tool, run the SFC scan again by typing sfc /scannow and pressing Enter.
7. Once the scans are complete, restart your system and try upgrading to Windows 10 version 2004 again.
By following these steps, you should be able to resolve the 0xC19001E1 error and successfully upgrade your Windows 10 version.
Install Windows 10 v2004 Update via In-Place Upgrade and Uninstall Antivirus
To resolve the Windows 10 Version 2004 failed 0xc19001e1 error, you can try installing the update via an in-place upgrade and uninstalling the antivirus software. Here’s how:
1. Begin by performing an in-place upgrade of Windows 10 v2004. This process will replace any corrupted system files and resolve compatibility issues. To do this, follow these steps:
– Go to the Microsoft website and download the Windows 10 Media Creation Tool.
– Open the tool and select “Upgrade this PC now.”
– Follow the on-screen instructions to complete the upgrade.
2. After the upgrade, uninstall your antivirus software temporarily. Some antivirus programs can interfere with the update process. To uninstall the antivirus:
– Press the Windows key + R to open the Run dialog box.
– Type “appwiz.cpl” and press Enter to open the Programs and Features window.
– Find your antivirus software in the list, right-click on it, and select Uninstall.
– Follow the prompts to remove the software.
By performing an in-place upgrade and temporarily uninstalling your antivirus software, you can resolve the 0xc19001e1 error and successfully update to Windows 10 Version 2004. Remember to reinstall your antivirus software after the update is complete for continued protection.
python

import subprocess
def resolve_error_0xc19001e1():
try:
# Disable antivirus software temporarily
subprocess.run('powershell.exe -ExecutionPolicy Bypass -Command "Set-MpPreference -DisableRealtimeMonitoring $true"')
# Clear Windows Update cache
subprocess.run('net stop wuauserv')
subprocess.run('rd /s /q C:\Windows\SoftwareDistribution')
subprocess.run('net start wuauserv')
# Run Windows Update troubleshooter
subprocess.run('msdt.exe /id WindowsUpdateDiagnostic')
# Enable antivirus software
subprocess.run('powershell.exe -ExecutionPolicy Bypass -Command "Set-MpPreference -DisableRealtimeMonitoring $false"')
print("Error 0xc19001e1 resolved successfully.")
except Exception as e:
print(f"An error occurred while resolving the issue: {str(e)}")
# Call the function to resolve the error
resolve_error_0xc19001e1()
Please note that this is just a sample code snippet and may need to be modified based on your specific requirements or environment. Additionally, running PowerShell commands and modifying system settings can have potential risks, so it’s important to proceed with caution and ensure you have appropriate permissions to perform these actions.
Run Windows Update Troubleshooter and Disconnect Hardware
To resolve the 0xc19001e1 error in Windows 10 Version 2004, follow these steps:
1. Run the Windows Update Troubleshooter:
– Press the Windows key + R to open the Run dialog box.
– Type “ms-settings:troubleshoot” and press Enter.
– Select “Windows Update” from the list and click on “Run the troubleshooter”.
2. Disconnect any hardware devices:
– Disconnect any external devices connected to your computer, such as printers or USB drives.
– Restart your computer and try the update again.
If the issue persists, you can try the following additional steps:
3. Clean up system files:
– Press the Windows key + R to open the Run dialog box.
– Type “cleanmgr” and press Enter.
– Select the drive where Windows is installed (usually C:).
– Check the “Temporary Internet Files” box and click on “OK”.
4. Use Windows Native Disk Cleanup:
– Open “My Computer” and right-click on the drive where Windows is installed.
– Select “Properties” and click on “Disk Cleanup”.
– Check the “Temporary Internet Files” box and click on “OK”.
If you still encounter errors, it is recommended to seek further assistance from Microsoft Support or consult the Windows 10 Version 2004 troubleshooting guide.
Try Using CleanMyPC and Update Drivers and BIOS
To resolve the Windows 10 Version 2004 failed 0xc19001e1 error, we recommend trying two methods: using CleanMyPC and updating drivers and BIOS.
CleanMyPC is a powerful utility that can help improve the performance of your system. First, download and install CleanMyPC from their official website. Once installed, launch the program and select Cleanup System Files. This will remove unnecessary files and free up disk space. Additionally, you can use the Windows Native Disk Cleanup tool to further clean your system.
Next, it’s important to update your drivers and BIOS. Outdated or incompatible drivers can cause errors during updates. To update drivers, go to the manufacturer’s website and download the latest versions for your hardware. For BIOS updates, visit your computer’s manufacturer website and follow their instructions.
By using CleanMyPC and updating drivers and BIOS, you can potentially resolve the Windows 10 Version 2004 failed 0xc19001e1 error and ensure your system’s well-being and security.
Run Disk Cleanup and Windows Update General Troubleshooting
To resolve the 0xc19001e1 error when updating Windows 10 version 2004, follow these steps:
1. Run Disk Cleanup to remove unnecessary files and clear up space on your system.
– Press the Windows key + R, type “cleanmgr“, and press Enter.
– Select the drive you want to clean and check the boxes for “Temporary files” and “Recycle Bin“.
– Click “OK” and then “Delete Files“.
2. Troubleshoot Windows Update using the built-in tool.
– Press the Windows key + I to open the Settings app.
– Go to “Update & Security” > “Troubleshoot” > “Windows Update“.
– Click “Run the troubleshooter” and follow the on-screen instructions.
If these steps don’t resolve the error, consider checking the event log for more information.
– Press the Windows key + R, type “eventvwr“, and press Enter.
– Go to “Windows Logs” > “System“.
– Look for entries with “Windows-WindowsUpdateClient” as the source.
Remember to regularly update your system to stay protected and enjoy the latest features. For more advanced troubleshooting, consult the Microsoft support site or contact your system administrator.

Mark Ginter is a tech blogger with a passion for all things gadgets and gizmos. A self-proclaimed "geek", Mark has been blogging about technology for over 15 years. His blog, techquack.com, covers a wide range of topics including new product releases, industry news, and tips and tricks for getting the most out of your devices. If you're looking for someone who can keep you up-to-date with all the latest tech news and developments, then be sure to follow him over at Microsoft.