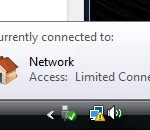
- The problem of a non-functioning Ethernet connection can occur when you boot your laptop or desktop computer after Windows 10 Creators Update or Windows 10 Fall Creators update.
- Causes of Ethernet not working on Windows 10 may be Ethernet cable issues, port issues, Ethernet driver issues, or some internal Windows settings.
- Your PC’s Ethernet driver may not be up to date, which is the main reason for the problem.
Unraveling the Mysteries: Unveiling the Culprits Behind Ethernet Port Dysfunction in Windows 10
Check the Ethernet Cable and Port
1. Inspect the Ethernet cable: Ensure that the cable is securely connected to both your computer and the Ethernet port. If there are any visible damages or bends in the cable, consider replacing it.
2. Verify the Ethernet port: Check if the Ethernet port on your computer is functioning properly. Connect the cable to a different port, if available, and see if it resolves the issue.
3. Update network drivers: Outdated or incompatible network drivers can cause Ethernet connection problems. Use a reliable driver update tool, like Driver Easy, to scan for and update your network drivers.
4. Restart your computer: Sometimes, a simple restart can fix connectivity issues. Restart your computer and check if the Ethernet port is working afterwards.
5. Troubleshoot network adapters: Open Device Manager, expand the “Network Adapters” category, and locate your Ethernet controller. Right-click on it and select “Update driver” to ensure you have the latest driver.
6. Use Network and Sharing Center: Open the Network and Sharing Center in Windows 10 and click on “Troubleshoot problems.” Follow the on-screen instructions to diagnose and fix any network-related issues.
By following these steps, you can troubleshoot Ethernet port issues in Windows 10 and ensure a stable and reliable internet connection.
Run Network Troubleshooter
If you’re experiencing issues with your Ethernet port not working in Windows 10, running the Network Troubleshooter can help identify and resolve the problem. Follow these steps to run the troubleshooter:
1. Press the Windows key + I to open the Settings app.
2. Click on “Network & Internet.”
3. In the left-hand menu, click on “Status.”
4. Scroll down and click on “Network Troubleshooter.”
5. The troubleshooter will scan your network connection and attempt to fix any detected issues.
If the troubleshooter is unable to resolve the problem, there may be an issue with your network card driver. You can try updating the driver using a tool like Driver Easy. Simply download and install Driver Easy, scan your PC for outdated drivers, and download and install any available updates for your network card driver.
By following these steps, you can quickly identify and resolve network connection issues with your Ethernet port in Windows 10.
Update the Ethernet Adapter’s Driver
1. Press the Windows key + X and select Device Manager from the list.
2. Expand the Network adapters category and locate your Ethernet adapter.
3. Right-click on the Ethernet adapter and select Update driver.
4. Choose the option to search automatically for updated driver software.
5. If Windows finds a new driver, follow the on-screen instructions to install it.
6. If Windows doesn’t find a new driver, visit the manufacturer’s website and download the latest driver for your Ethernet adapter.
7. Once downloaded, double-click on the driver file to install it.
8. Restart your PC to apply the changes.
Updating the Ethernet adapter’s driver can often resolve issues with an Ethernet port not working in Windows 10. If you’re still experiencing problems, you may want to consider other troubleshooting methods or contact your network provider for further assistance.
python

import subprocess
def check_ethernet_status():
try:
# Run ipconfig command to check Ethernet adapter status
result = subprocess.run(['ipconfig', '/all'], capture_output=True, text=True)
# Check if Ethernet adapter is present and working
if 'Ethernet adapter' in result.stdout and 'Media State . . . . . . . . . . . : Media disconnected' not in result.stdout:
print("Ethernet port is working.")
else:
print("Ethernet port is not working or disconnected.")
except Exception as e:
print("An error occurred while checking Ethernet status:", str(e))
# Call the function to check Ethernet status
check_ethernet_status()
This code snippet uses the `subprocess` module in Python to run the `ipconfig /all` command, which displays detailed information about all network interfaces on the Windows system. It then checks the output to determine if the Ethernet adapter is present and if it is in a working state. The result is printed to the console.
Please note that this is a basic example and may not cover all possible scenarios or provide an in-depth analysis of the issue. Troubleshooting network-related problems can be complex, and additional checks or diagnostics may be required depending on the specific situation.
Check Power Management Settings for Ethernet
If your Ethernet port is not working in Windows 10, one possible cause could be the power management settings. To troubleshoot this issue, follow these steps:
1. Press the Windows key + X and select Device Manager.
2. Expand the Network adapters category.
3. Right-click on the Ethernet adapter and select Properties.
4. Go to the Power Management tab.
5. Make sure the option “Allow the computer to turn off this device to save power” is unchecked.
6. Click OK to save the changes.
By ensuring the power management settings are correctly configured, you can prevent the Ethernet port from being turned off and resolve the connectivity issue. If you continue to experience problems, consider updating the network driver or checking for any cable issues.
Check Fixed IP Settings and LAN Proxy Settings
Troubleshoot Ethernet Port Not Working in Windows 10
Here is a table summarizing the steps to check Fixed IP Settings and LAN Proxy Settings:
| Step | Description |
|---|---|
| Step 1 | Open Network and Sharing Center |
| Step 2 | Click on Change adapter settings |
| Step 3 | Right-click on your Ethernet connection and select Properties |
| Step 4 | Double-click on Internet Protocol Version 4 (TCP/IPv4) |
| Step 5 | Check the option “Use the following IP address” and enter the desired fixed IP settings |
| Step 6 | Click on OK to save the settings |
| Step 7 | Click on LAN settings |
| Step 8 | Check the proxy settings and make sure they are configured correctly |
| Step 9 | Click on OK to save the settings |
Try Different Ports on the Router
If your Ethernet port is not working in Windows 10, you can try troubleshooting the issue by checking different ports on your router.
1. Unplug the network cable from the current Ethernet port on your PC and plug it into a different port on the router.
2. Restart your PC to allow it to detect the new connection.
3. Check for connectivity by opening a web browser and trying to access a website.
4. If the issue persists, try using a different network cable to rule out any cable issues.
5. Update your network driver by using a reliable driver update tool like Driver Easy.
By trying different ports on your router, you can determine if the problem lies with a specific port or if it’s a broader issue with your Ethernet connection.
Mark Ginter is a tech blogger with a passion for all things gadgets and gizmos. A self-proclaimed "geek", Mark has been blogging about technology for over 15 years. His blog, techquack.com, covers a wide range of topics including new product releases, industry news, and tips and tricks for getting the most out of your devices. If you're looking for someone who can keep you up-to-date with all the latest tech news and developments, then be sure to follow him over at Microsoft.


