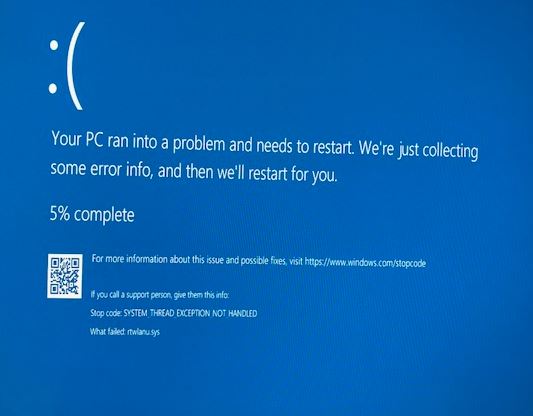
- Rtwlanu.sys errors are random and can occur when using Wi-Fi heavily, such as when streaming on YouTube or downloading a file.
- This error seems to mostly affect Windows 10; however, there are times when PCs running Windows 7 or Windows 8 experience the same error.
- The error can occur if your network driver is corrupt or if the WLAN is not configured to wake up your computer.
Unraveling the Mysteries: Tackling the rtwlanu.sys BSOD Error
Understanding the rtwlanu.sys BSOD error
If you’re experiencing the rtwlanu.sys BSOD error on your Windows 10 computer, there are a few steps you can take to fix it. First, make sure you have the latest drivers for your WLAN adapter installed. You can download them from the Realtek Semiconductor Corporation website.
If that doesn’t solve the issue, try updating your Windows OS to the latest version. Sometimes, Windows updates can address and fix these types of errors.
If the problem persists, you can try running a system file checker scan to check for any corrupt system files. Open a command prompt as an administrator and type “sfc /scannow“. This will scan and repair any corrupted files it finds.
If none of these solutions work, you may need to seek further assistance from a professional or contact Microsoft support.
Methods to fix the rtwlanu.sys BSOD error
- Open Device Manager by pressing Windows Key + X and selecting Device Manager from the menu.
- Expand the Network adapters category.
- Right-click on your wireless adapter and select Update driver.
- Choose the option to Search automatically for updated driver software.
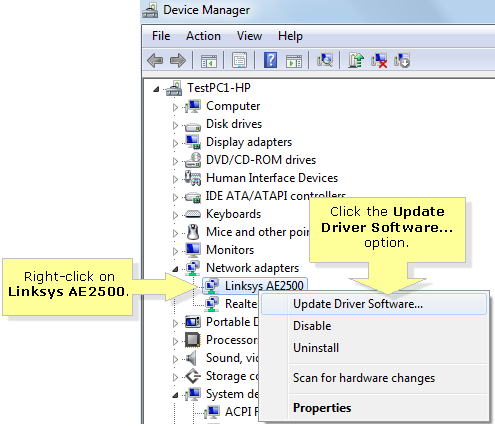
- Wait for the process to complete and then restart your computer.
Method 2: Roll Back the Wireless Adapter Driver
- Open Device Manager by pressing Windows Key + X and selecting Device Manager from the menu.
- Expand the Network adapters category.
- Right-click on your wireless adapter and select Properties.
- Go to the Driver tab and click on Roll Back Driver.
- Follow the on-screen instructions to complete the rollback process.
- Restart your computer.
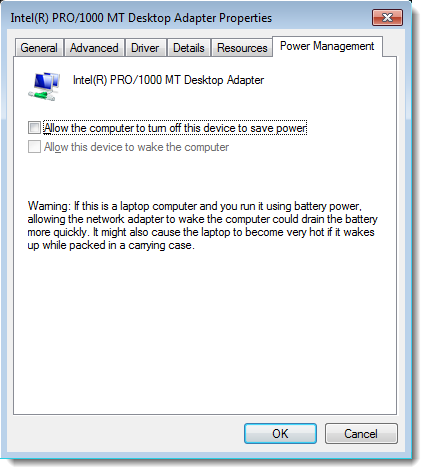
Method 3: Disable Power Saving for the Wireless Adapter
- Open Device Manager by pressing Windows Key + X and selecting Device Manager from the menu.
- Expand the Network adapters category.
- Right-click on your wireless adapter and select Properties.
- Go to the Power Management tab.
- Uncheck the option that says Allow the computer to turn off this device to save power.
- Click OK and restart your computer.
Method 4: Run a System File Checker Scan
- Open Command Prompt as an administrator.
- Type sfc /scannow and press Enter.
- Wait for the scan to complete.
- If any corrupted system files are found, the tool will attempt to repair them automatically.
- Restart your computer.
Method 5: Perform a Clean Boot
- Press Windows Key + R to open the Run dialog box.
- Type msconfig and press Enter.
- In the System Configuration window, go to the Services tab.
- Check the box that says Hide all Microsoft services.
- Click on Disable all.
- Go to the Startup tab and click on Open Task Manager.
- In the Task Manager, disable all the startup programs.
- Close the Task Manager and go back to the System Configuration window.
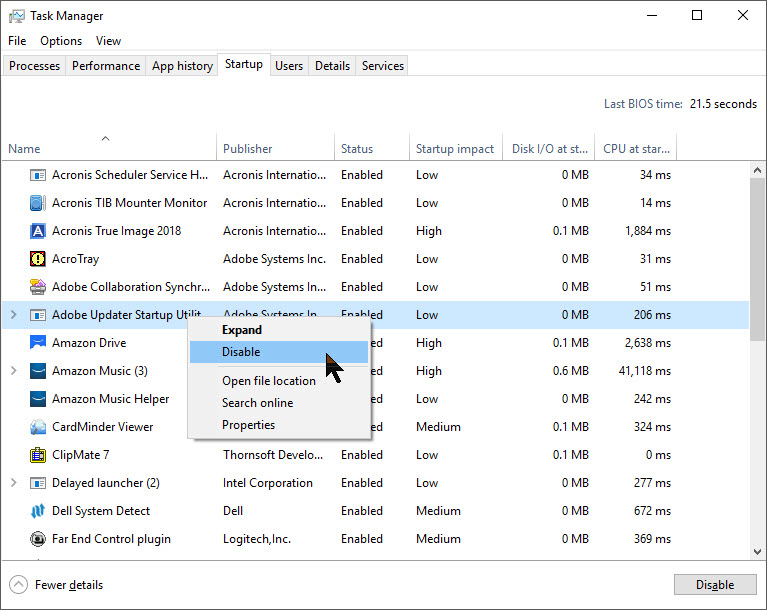
- Click OK and restart your computer.
Scanning for malware and updating network drivers
To fix the rtwlanu.sys BSOD error, it’s important to scan for malware and update network drivers on your Windows device. Malware can often cause system errors and crashes, while outdated or corrupt network drivers can lead to connectivity issues. Follow these steps to resolve the problem:
1. Scan for malware: Use a trusted antivirus program to perform a full system scan. Remove any detected threats to ensure they are not causing the BSOD error.
2. Update network drivers: Visit the website of your network adapter’s manufacturer, such as Realtek Semiconductor Corporation, and download the latest drivers for your specific device model and Windows version.
3. Install the updated drivers: Once downloaded, double-click the driver file and follow the on-screen instructions to install it. Restart your PC after the installation is complete.
By scanning for malware and updating your network drivers, you can effectively address the rtwlanu.sys BSOD error and prevent future issues with your WLAN connectivity.
Configuring LAN settings and running system restore
1. Press the Windows key + R to open the Run dialog box.
2. Type “ncpa.cpl” and hit Enter to open the Network Connections window.
3. Right-click on your LAN connection and select “Properties.”
4. In the Properties window, scroll down and double-click on “Internet Protocol Version 4 (TCP/IPv4).”
5. Select “Use the following IP address” and enter the necessary details provided by your network administrator.
6. Click “OK” to save the changes.
To run a system restore, follow these steps:
1. Press the Windows key + R to open the Run dialog box.
2. Type “rstrui” and hit Enter to open the System Restore window.
3. Click “Next” and choose a restore point before the BSOD error occurred.
4. Follow the on-screen instructions to complete the system restore process.
These steps should help resolve the rtwlanu.sys BSOD error. If the issue persists, consider updating your device drivers or seeking further assistance.
Cleaning up and optimizing your PC for better performance
| Cleaning up and optimizing your PC for better performance | |
|---|---|
| Step | Action |
| 1 | Remove unnecessary startup programs |
| 2 | Uninstall unused applications |
| 3 | Delete temporary files and folders |
| 4 | Run a disk cleanup |
| 5 | Defragment your hard drive |
| 6 | Update device drivers |
| 7 | Scan for malware and viruses |
| 8 | Adjust visual effects for better performance |
| 9 | Disable unnecessary Windows services |
| 10 | Upgrade your hardware if necessary |

Mark Ginter is a tech blogger with a passion for all things gadgets and gizmos. A self-proclaimed "geek", Mark has been blogging about technology for over 15 years. His blog, techquack.com, covers a wide range of topics including new product releases, industry news, and tips and tricks for getting the most out of your devices. If you're looking for someone who can keep you up-to-date with all the latest tech news and developments, then be sure to follow him over at Microsoft.